Getting Started
Predictive Search for WordPress – featuring “Smart Search” technology. Give your store customers the most awesome search experience on the web via blocks, widgets, shortcodes, search results pages and the Predictive Search function.
The Predictive Search plugin gives you complete control over your WordPress search algorithm. It lets you create your own customizable website search and allows you to manually select which content should be indexed and displayed on your search results.
The plugin can also be easily integrated into your WordPress theme and is optimized for mobile devices as well. The plugin can be add into your website by 4 methods:
- Block – If you are using Full Site Editor or Gutenberg the easy way to insert a search box is by block. Easy to embed and to customize (see how to use the block).
- Shortcode – If you are using a classic theme and the site have disabled the Gutenberg can use the Search plugin shortcode (see how to use the shortcode).
- Widget Leagcy – If you are using a classic theme and the site have disabled the Gutenberg can use the Search plugin widget (see how to use the widget legacy).
- PHP Function – Copy the global function into your themes header.php file to replace any existing search function (see how to use the php function work).
Display the custom search forms on site header, footer, sidebar or widget area, navigation or menu, on pages, posts, custom post types or anywhere on the site using it’s shortcode or block.
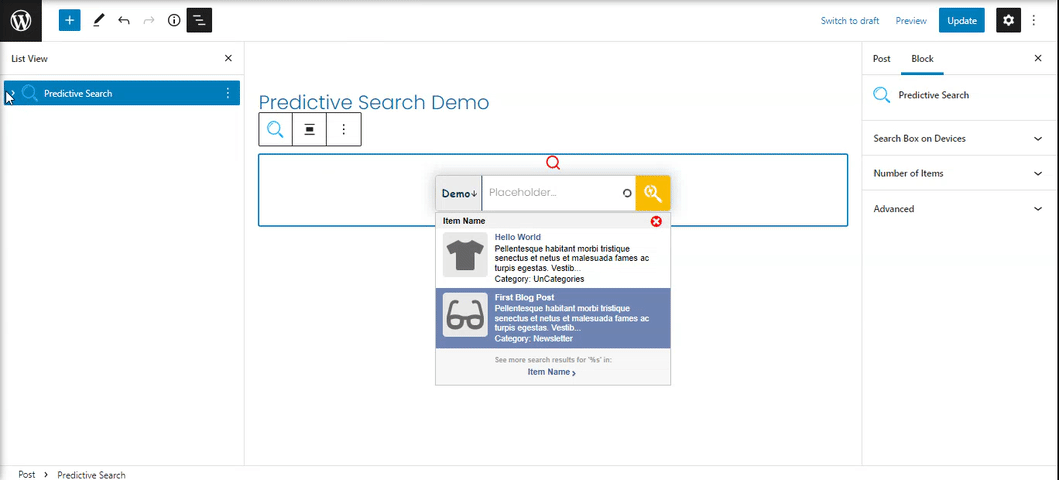
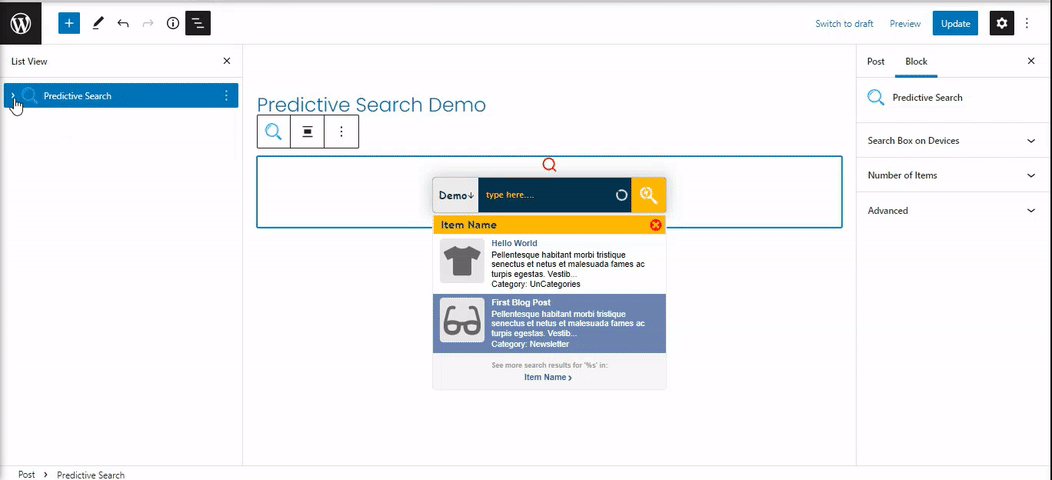
Add Predictive Search Bar block
Add the search bar easily with our block. Open the block inserter and look for Predictive Search block. Once find, inserted wherever you want to display it and customize the block style and settings by your needs.
Now let’s explore the plugin backend settings. First thing is to setup the plugin and then to style the search box to match with your website design.
Once you have the plugin installed and activated it adds the Predictive Search menu to your WordPress admin page. It looks like this when click on Predictive Search.
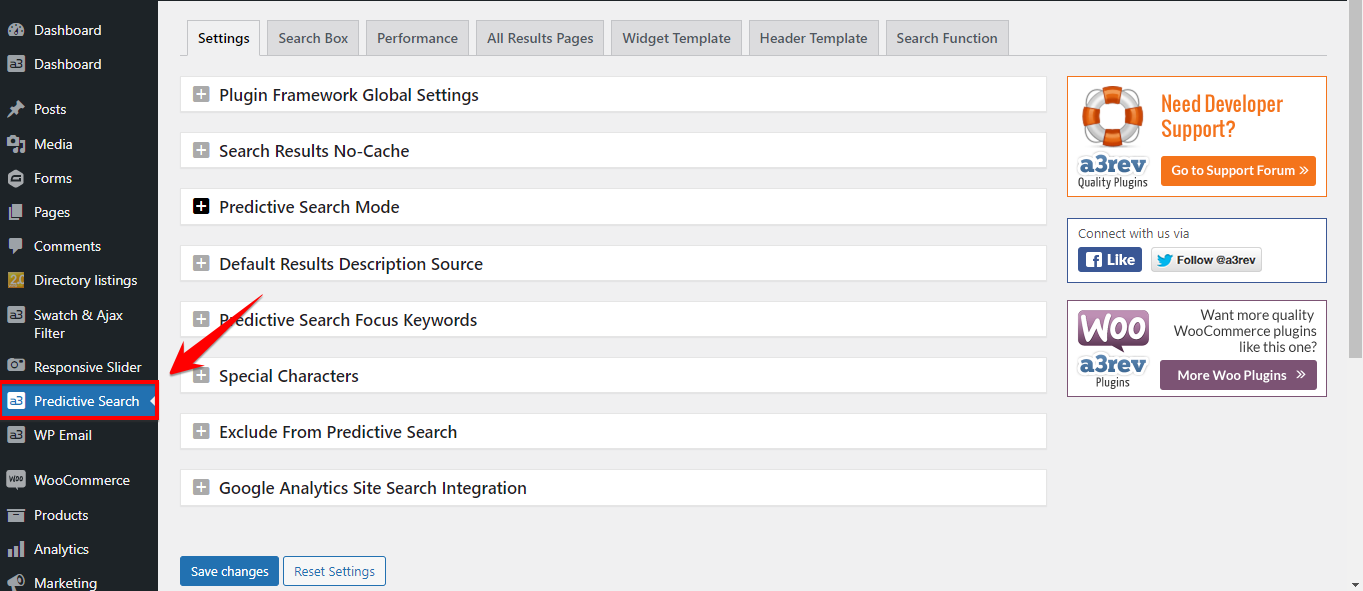
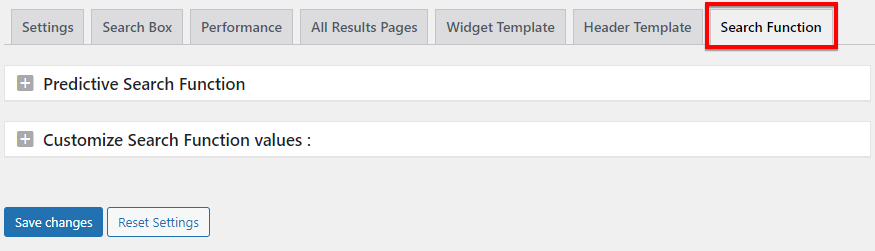
Predictive Search Settings
From here you can set the general features and settings for the Predictive Search.
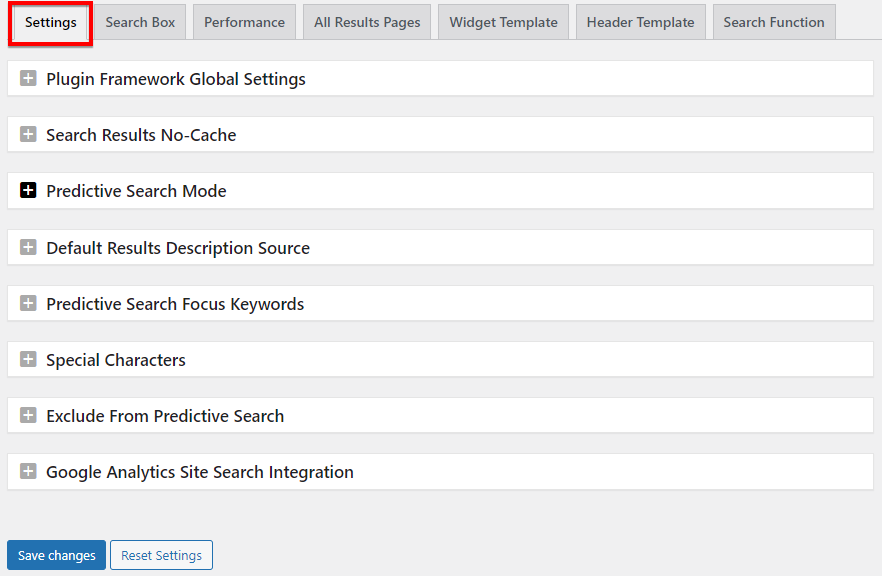
Plugin Framework Global Settings
By default each admin panel will open with all Setting Boxes in the CLOSED position.
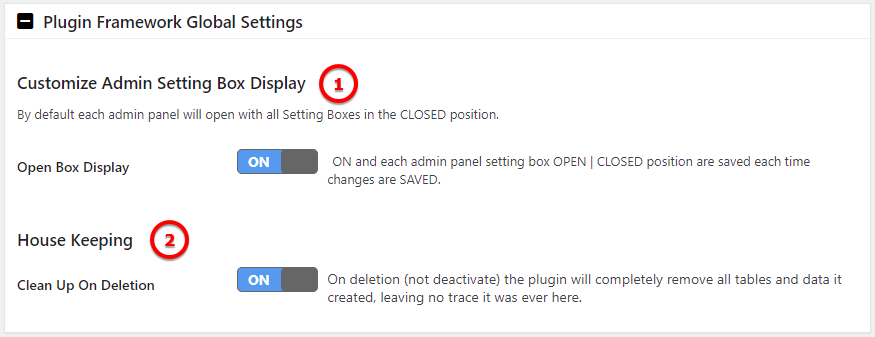
Image Legend
1. Customize Admin Setting Box Display – ON and each admin panel setting box OPEN | CLOSED position are saved each time changes are SAVED.
2. House Keeping – On deletion (not deactivate) the plugin will completely remove all tables and data it created, leaving no trace it was ever here.
Search Results No-Cache
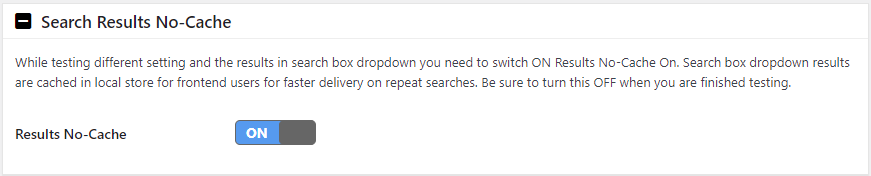
Image Legend:
Results No-Cache – While testing different setting and the results in search box dropdown you need to switch ON Results No-Cache On. Search box dropdown results are cached in local store for frontend users for faster delivery on repeat searches. Be sure to turn this OFF when you are finished testing.
Predictive Search Mode
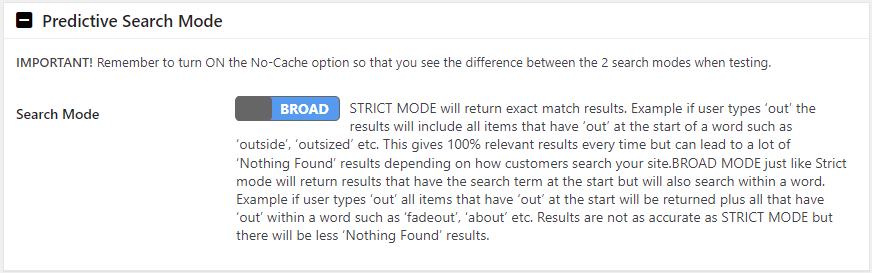
Image Legend:
Strict Mode – Will return exact match results. Example if user types ‘out’ the results will include all items that have ‘out’ at the start of a word such as ‘outside’, ‘outsized’ etc. This gives 100% relevant results every time but can lead to a lot of ‘Nothing Found’ results depending on how customers search your site.
Broad Mode – Just like Strict mode will return results that have the search term at the start but will also search within a word. Example if user types ‘out’ all items that have ‘out’ at the start will be returned plus all that have ‘out’ within a word such as ‘fadeout’, ‘about’ etc. Results are not as accurate as STRICT MODE but there will be less ‘Nothing Found’ results.
Default Results Description Source
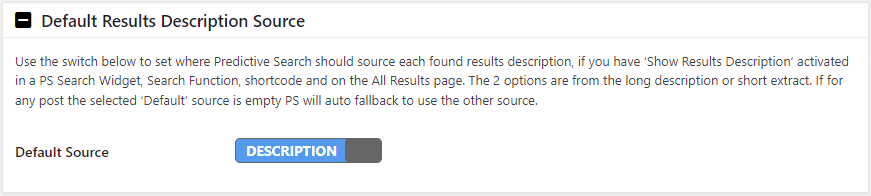
Image Legend:
Default Source – Use the switch below to set where Predictive Search should source each found results description, if you have ‘Show Results Description’ activated in a PS Search Widget, Search Function, shortcode and on the All Results page. The 2 options are from the long description or short extract. If for any post the selected ‘Default’ source is empty PS will auto fallback to use the other source.
Predictive Search Focus Keywords
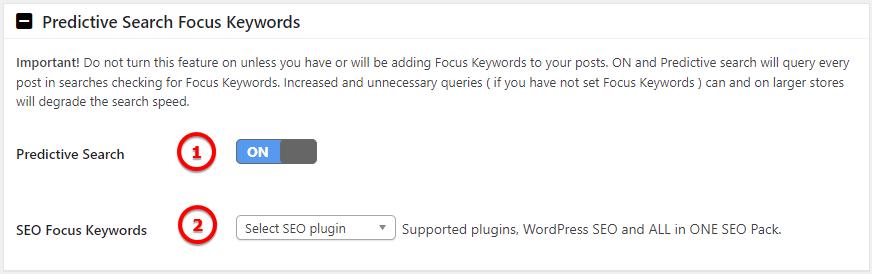
Image Legend:
1. Predictive Search – Important! Do not turn this feature on unless you have or will be adding Focus Keywords to your posts. ON and Predictive search will query every post in searches checking for Focus Keywords. Increased and unnecessary queries ( if you have not set Focus Keywords ) can and on larger stores will degrade the search speed.
2. SEO Focus Keywords – Supported plugins, WordPress SEO and ALL in ONE SEO Pack.
Special Characters
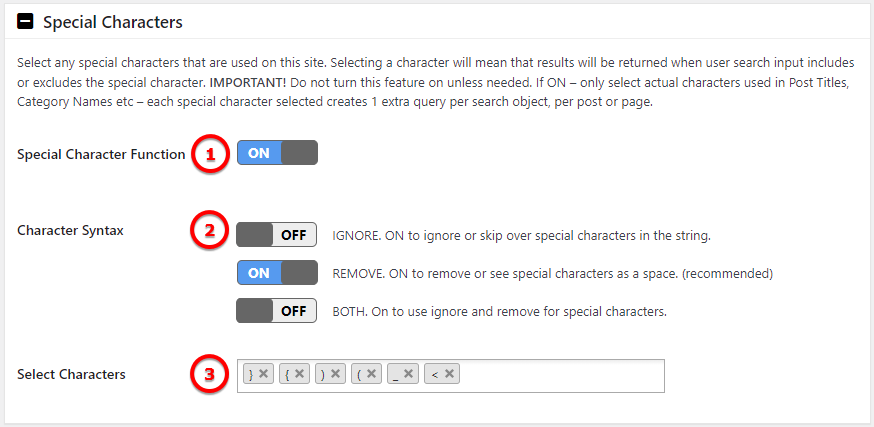
Image Legend:
1. Special Character Function – Select any special characters that are used on this site. Selecting a character will mean that results will be returned when user search input includes or excludes the special character. IMPORTANT! Do not turn this feature on unless needed. If ON – only select actual characters used in Post Titles, Category Names etc – each special character selected creates 1 extra query per search object, per post or page.
2. Character Syntax –
IGNORE. ON to ignore or skip over special characters in the string.
REMOVE. ON to remove or see special characters as a space. (recommended)
BOTH. On to use ignore and remove for special characters.
3. Select Characters – Select from a commune list of characters to be ignore.
Exclude From Predictive Search
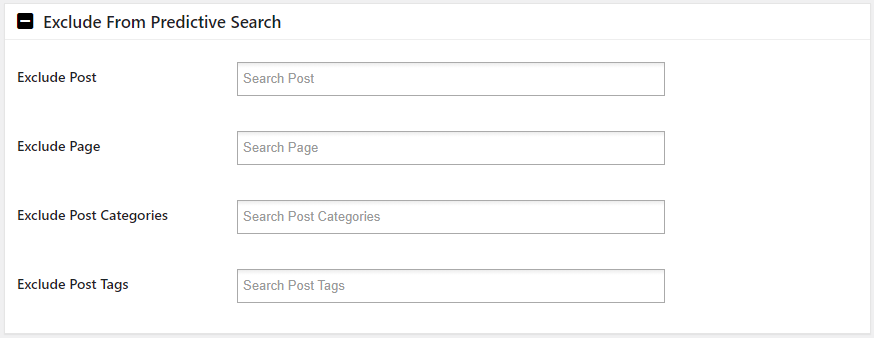
Image Legend:
You can have exclude from Predictive Search Posts, Pages, Categories and Tags.
Google Analytics Site Search Integration
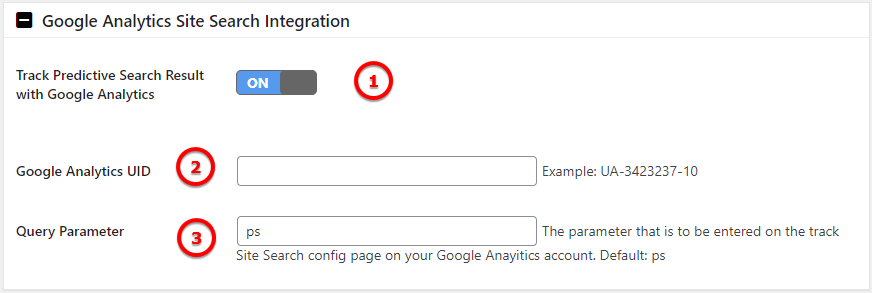
Image Legend:
Turn On/Off the Track Predictive Search Result with Google Analytics
Google Analytics UID – Enter your UID
Query Parameter – The parameter that is to be entered on the track Site Search config page on your Google Anayitics account. Default: ps
Search Box
Global Search Box Text


Image Legend:
Text to Show – Add your text to be display in the search box container. If you leave it empty will not show nothing.
Dropdown Results Animation

Image Legend:
Add CSS animation to the loading of Results in the Search box dropdown. IMPORTANT! On settings tab turn ON Results NO-CACHE and when you check the animation on front end clear your browser cache so you can see the new animation effect that you have set.
Search In Category Feature

Image Legend:
1. Search In Category – Turn On this option
2. Post Category Cache – Category Cache enables loading of your full post category tree on the search box with just 1 query which is a massive saving on server resources used.
3. Editing / Refresh Type – Post Categories cache will be auto refreshed when add / edit / delete a CategoryYou will be prompted to manually refresh Cache when add / edit / delete a Post Category
4. Auto Refresh Every – If your Post Categories Don’t change very often set this long example ’12 months’
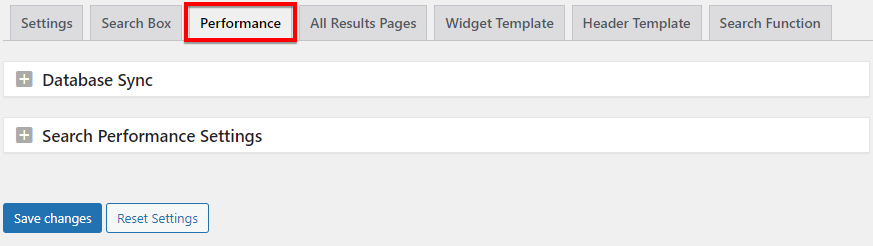
Performance
Database Sync
Predictive Search database is auto updated whenever a post is published or updated. Please run a Manual database sync if you upload post by csv or feel that Predictive Search results are showing old data. Will sync the Predictive Search database with your current WordPress databases.
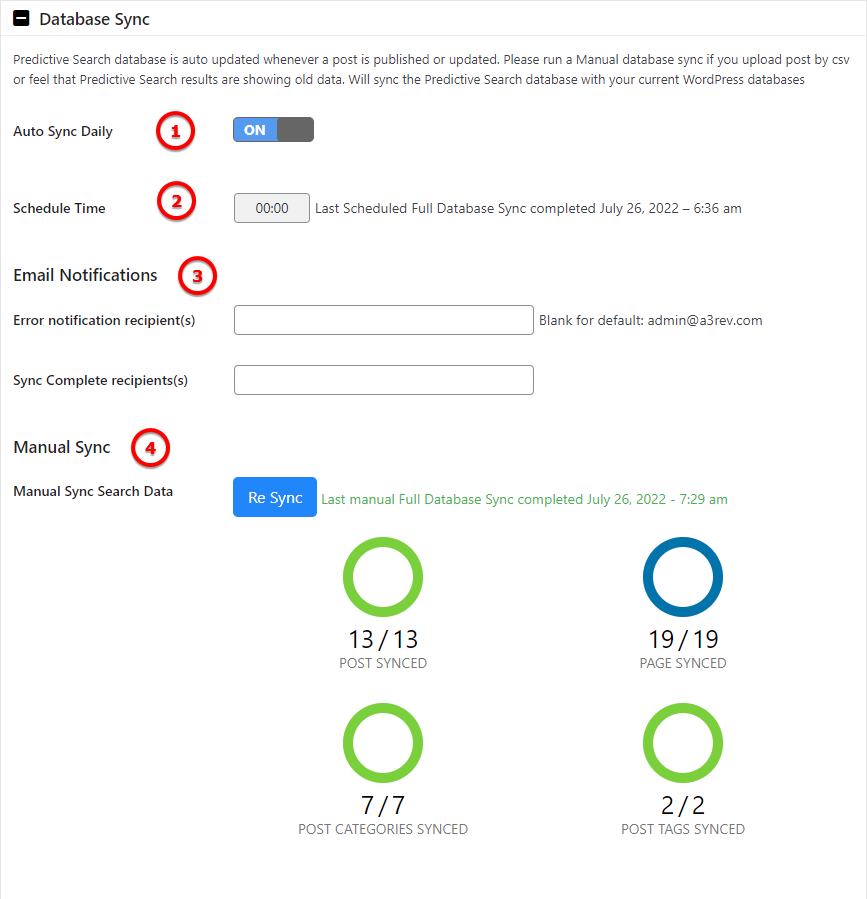
Image Legend:
1. Auto Sync Daily – Set On and the database will automate sync daily.
2. Schedule Time – Schedule a time for sync.
3. Email Notifications – Set emails for errors and succeed sync. Leave blank and it will be used the email set as admin.
4. Manual Sync – Run a manual database sync if you upload post by csv or feel that Predictive Search results are showing old data.
Search Performance Settings
If you have a large site with 1,000’s of posts or an underpowered server use the settings below to tweak the search performance.
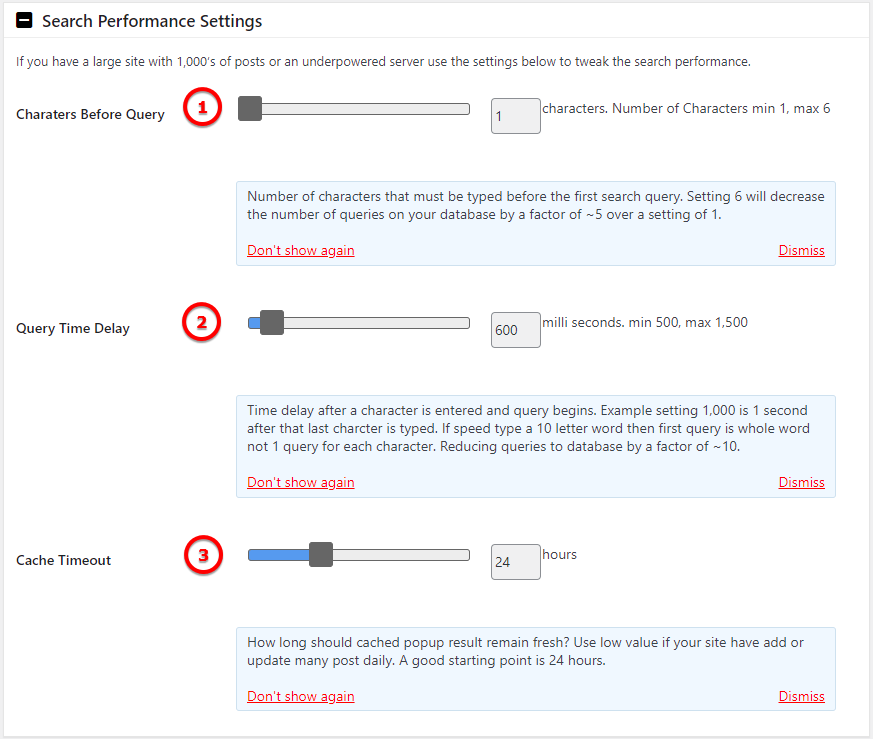
Image Legend:
1. Characters Before Query – Number of characters that must be typed before the first search query. Setting 6 will decrease the number of queries on your database by a factor of ~5 over a setting of 1.
2. Query Time Delay – Time delay after a character is entered and query begins. Example setting 1,000 is 1 second after that last charcter is typed. If speed type a 10 letter word then first query is whole word not 1 query for each character. Reducing queries to database by a factor of ~10.
3. Cache Timeout – How long should cached popup result remain fresh? Use low value if your site have add or update many post daily. A good starting point is 24 hours.
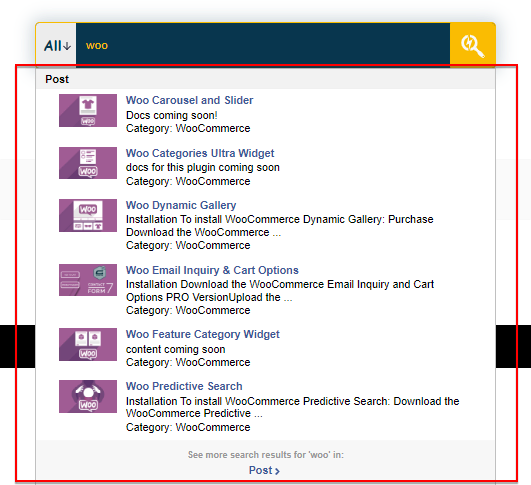
All Results Pages
In this section, we will see what search results pages are and why they’re important. Then, we’ll outline how to customize your WordPress results page to include the functionality your readers expect to see.
The Predictive Search for WordPress give for choose two way of creating a page to show all the results . First option is creating a template by inserting the shortcode and style the page from the backend of the site. The second option is to create the page by the WP Predictive Search Results Gutenberg Blocks.
Note !
You can’t have the shortcode and Predictive Search Results Blocks on the same page. The script will not work correct if have both on same page.
When you switch to Shortcode, you need to remove blocks from Results page or choose different page with shortcode .

Now let’s get thru the options of the page customization.
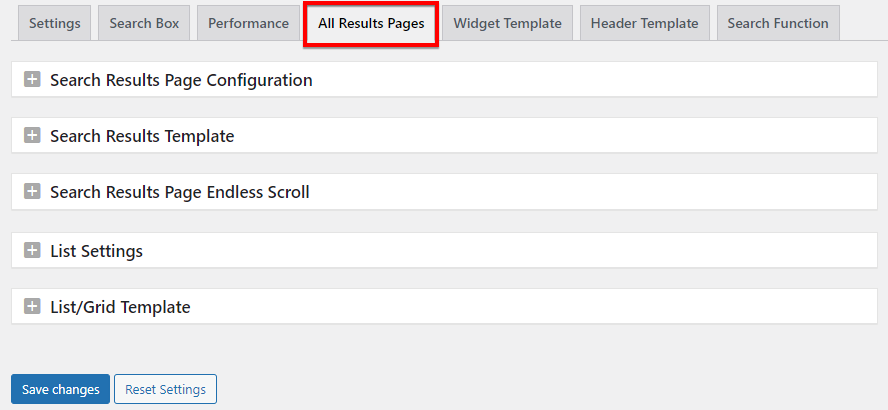
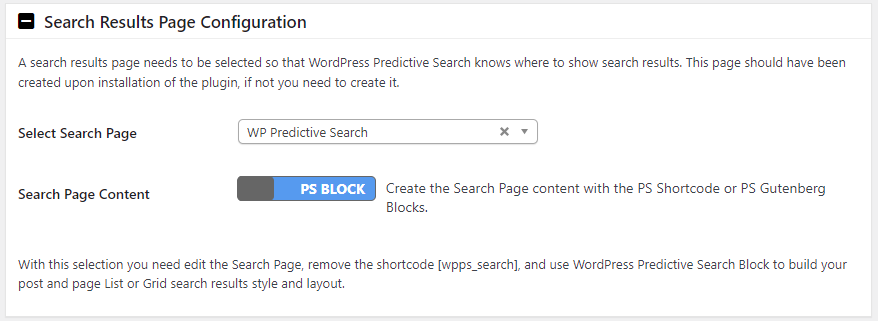
Search Results Page Configuration
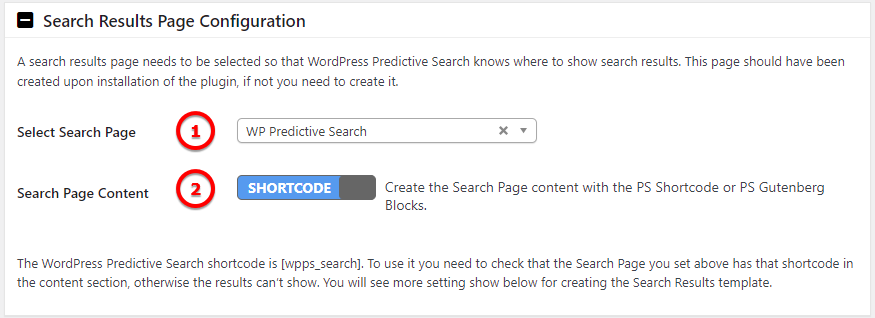
Image Legend:
1. Select Search Page – A search results page needs to be selected so that WordPress Predictive Search knows where to show search results. This page should have been created upon installation of the plugin, if not you need to create it.
2. Search Page Content – Create the Search Page content with the PS Shortcode or PS Gutenberg Blocks.
The first option will gonna explore is the Shortcode one.
Shortcode Search Results Template
The WordPress Predictive Search shortcode is . To use it you need to check that the Search Page you set above has that shortcode in the content section, otherwise the results can’t show. You will see more setting show below for creating the Search Results template.
If you have chosen to use the WordPress Predictive Search Shortcode in your designated All Results Search Page. You now need to choose to apply the Themes template for the search results page display or use the Predictive Search built in template. Each of the template comes with their individual settings.
Theme Templates
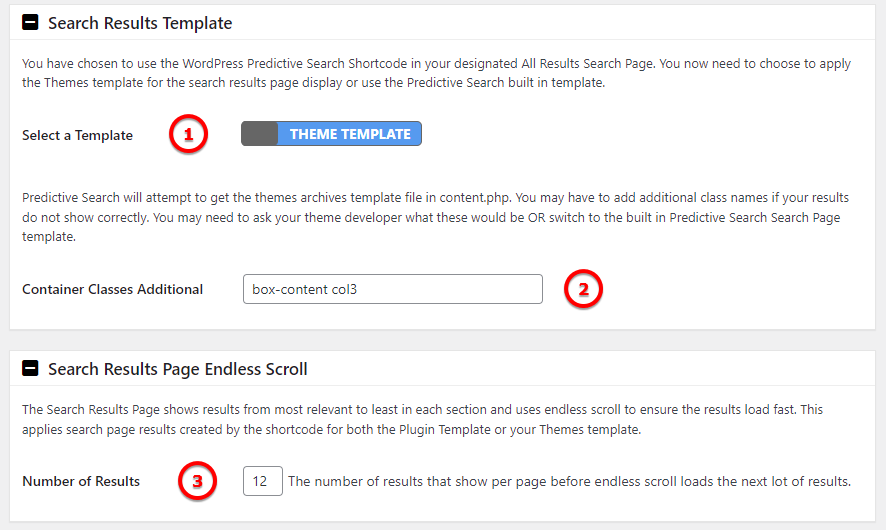
Image Legend:
1. Select a Template – Chose Theme Template
2. Container Classes Additional – Predictive Search will attempt to get the themes archives template file in content.php. You may have to add additional class names if your results do not show correctly. You may need to ask your theme developer what these would be OR switch to the built in Predictive Search Search Page template.
3. Search Results Page Endless Scroll – The Search Results Page shows results from most relevant to least in each section and uses endless scroll to ensure the results load fast. This applies search page results created by the shortcode for both the Plugin Template or your Themes template. The number of results that show per page before endless scroll loads the next lot of results.
Plugin Template
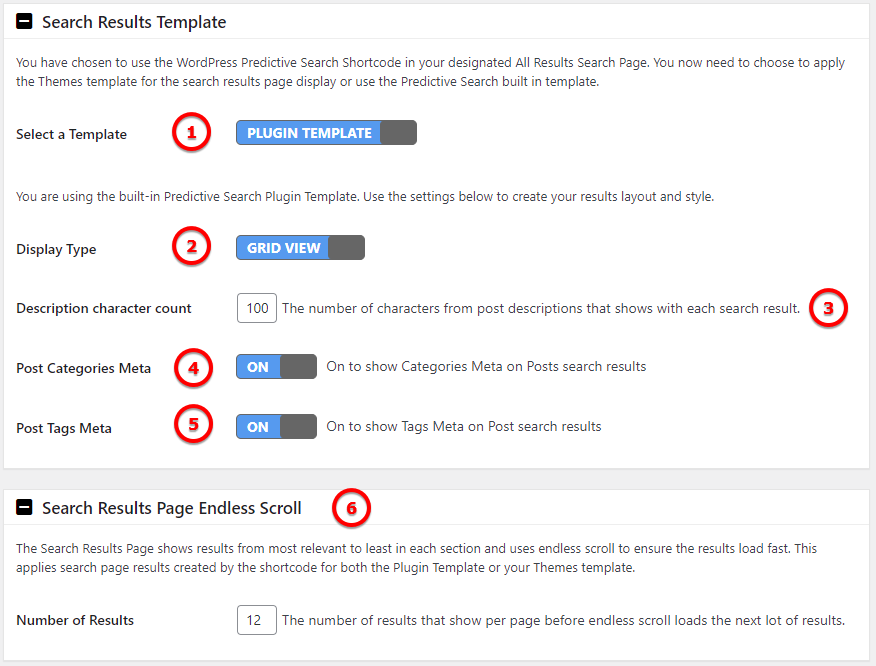
Image Legend:
1. Select a Template – Chose Plugin Template and use the settings below to create your results layout and style.
2. Display Type – The content can be Grid or List. Both have their individual settings witch will be explain bellow.
3. Description character count – The number of characters from post descriptions that shows with each search result.
4. Post Categories Meta – On to show Categories Meta on Posts search results
5. Post Tags Meta – On to show Tags Meta on Post search results
6. Search Results Page Endless Scroll – The Search Results Page shows results from most relevant to least in each section and uses endless scroll to ensure the results load fast. This applies search page results created by the shortcode for both the Plugin Template or your Themes template. The number of results that show per page before endless scroll loads the next lot of results.
Grid View Settings
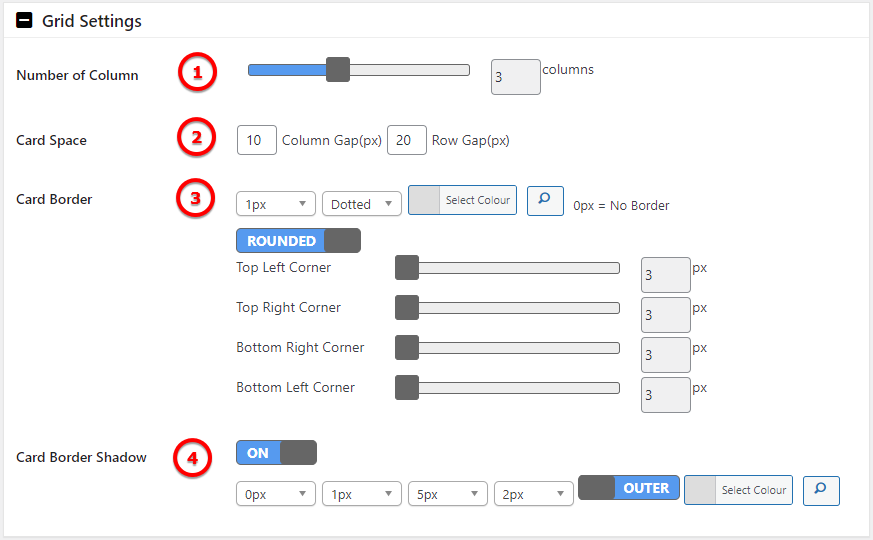
Image Legend:
1. Number of Column – Set the number of column to show min 1 max 6.
2. Card Space – Set the space for the Column and Row gap.
3. Card Border – Style the card border.
4. Card Border Shadow – Style the card border shadow.
List View Settings

Image Legend:
1. Item Image Size – Set the image size of the feature image in List View.
2. Divider – Chose a divider to separate the item
3. Divider Margin – Set the margin for the divider
List/Grid Template
From here will gonna style the templates for Grid and for Listing.
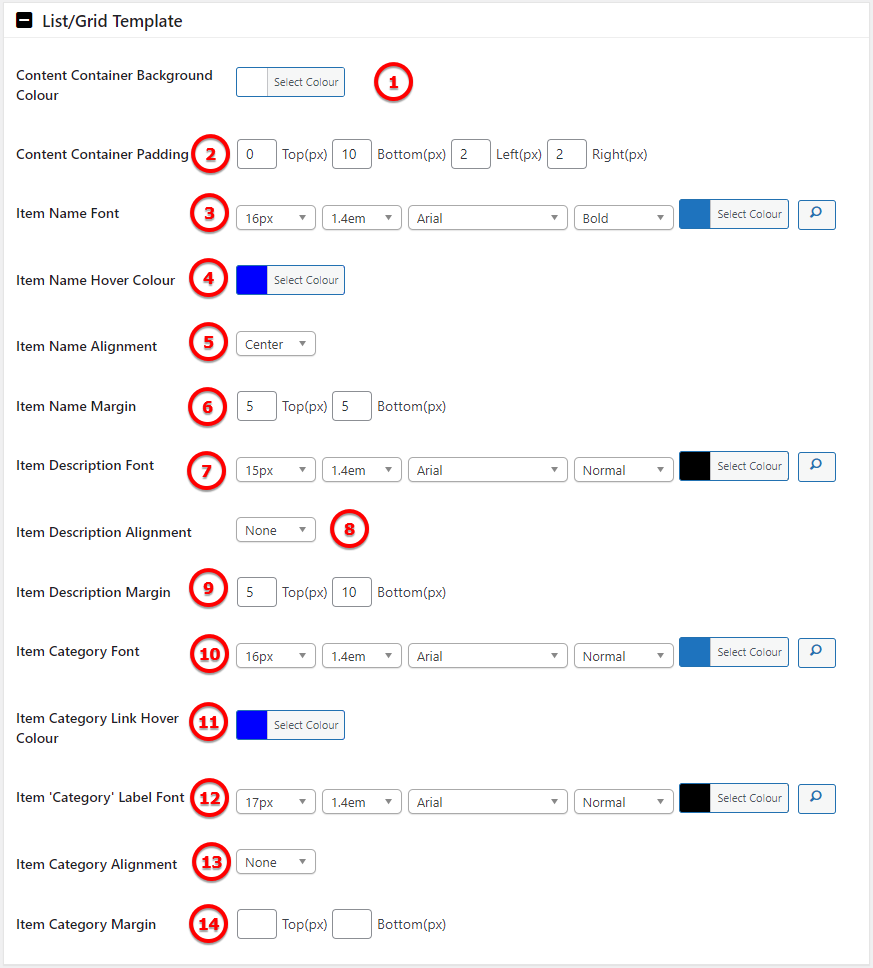
Image Legend:
1. Content Container Background Colour – Add a color to the content container.
2. Content Container Padding – Add space between the content and container margin.
3. Item Name Font – Set up the font for the item name.
4. Item Name Hover Colour – Set up a color for the item title when hovering with the mouse.
5. Item Name Alignment – Choose how the item title will be align: left/center/right .
6. Item Name Margin – Create extra space around the item name.
7. Item Description Font – Set up the font for the item description.
8. Item Description Alignment – Choose how the item description will be align: left/center/right .
9. Item Description Margin – Create extra space around the item description.
10. Item Category Font – Set up the font for the item category.
11. Item Category Link Hover Colour – Set up a color color for the item category link when hovering with the mouse.
12. Item ‘Category’ Label Font – Set up the font for the item category label.
13. Item Category Alignment – Choose how the item category will be align: left/center/right .
14. Item Category Margin – Create extra space around the item category container.
Blocks Search Results Template
With this selection you need to edit the Search Page, remove the shortcode , and use WordPress Predictive Search Block to build your post and page List or Grid search results style and layout.
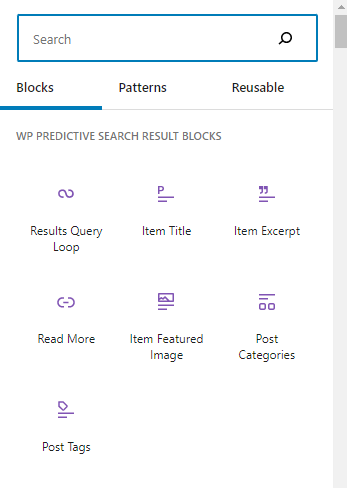
Predictive Search Result Blocks
The Predictive Search Result Blocks are a collection of blocks that will help you customize you Search Result Pages. Will gonna see bellow how to use them and the options.
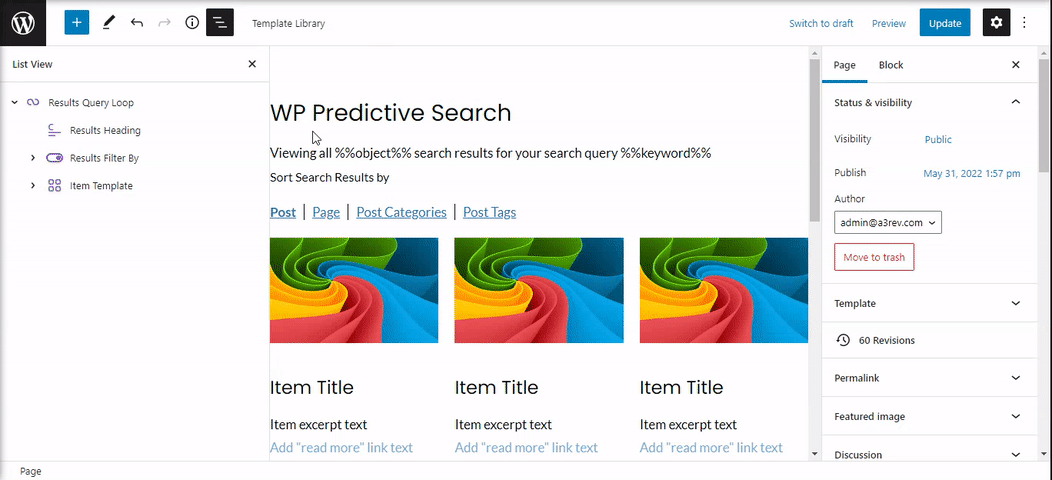
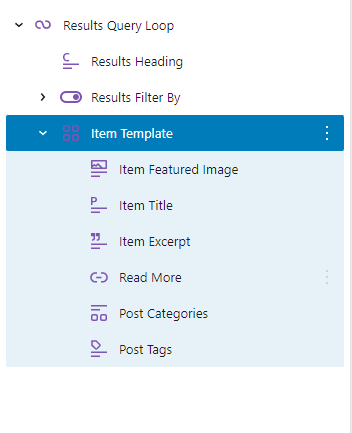
Results Query Loop Block
The Results Query Loop Block is an advanced block that allows you to display results posts based on specified parameters. Each Results Query Loop block is made up of various nested blocks, like the: Results Heading, Results Filter by and Item Templates that nest is own blocks: Item Featured Image, Post Title block, Post Excerpt, Read More, Post Categories and Post Tags block. Each block comes with is individual settings making your Results Page unique.
Add the Results Query Loop Block
To add the Results Query Loop block, click on the + Block Inserter icon and search for “Results Query”. Click it to add the block to the post or page.
Results Query Loop Settings
Every block has specific options in the editor sidebar in addition to the options found in the block toolbar. To access the settings simply click the ‘cog’ icon next to the Publish button.
The Results Query Loop block contains the following options:
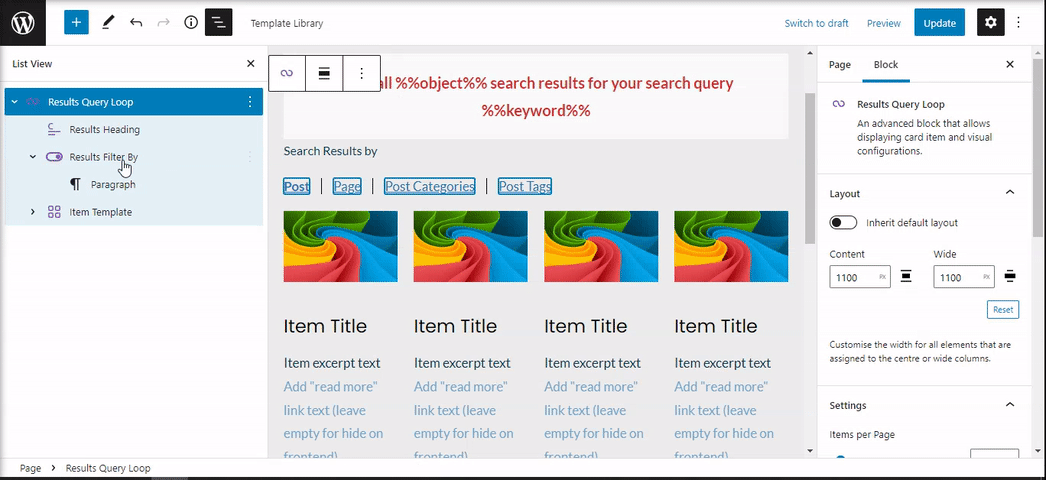
- Layout – Customise the width for all elements that are assigned to the centre or wide columns or Inherit default layout.
- Settings – Setup the item per page and the number of columns.
- Colour – The color options for the Results Query Loop block impact the entire Query. Keep in mind that you can also customize the individual blocks that are within the Results Query Loop block too.
Using List View, you can easily see the current structure of the blocks inside of the Query Loop block.
Results Heading
Show results heading with %%object%% and %%keyword%% that are fill dynamic. The text is customizable, just change the default one if you need it. Just be careful to not remove the “%%object%%” and “%%keyword%%”.
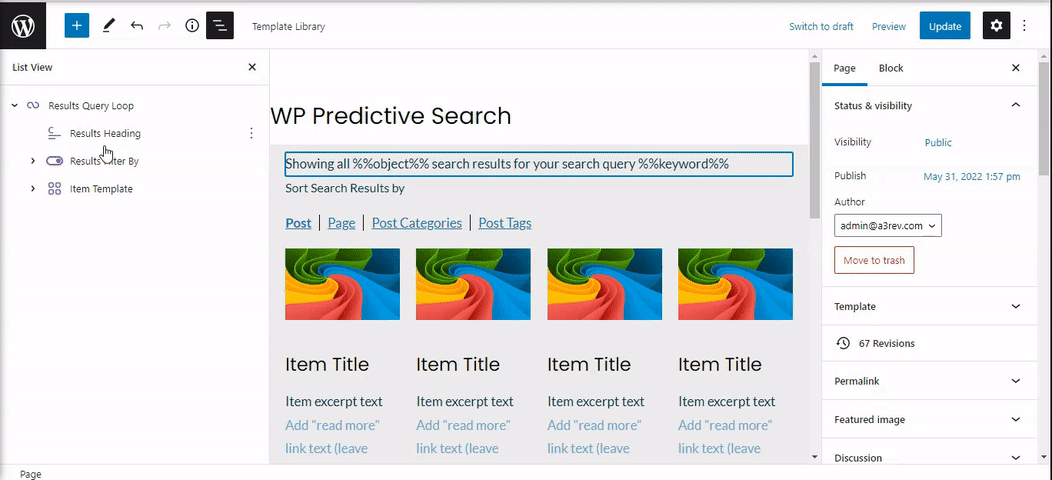
Results Filter By
From here you can customize the show results filter. The results filter by have nest a Paragraph text that can be change.
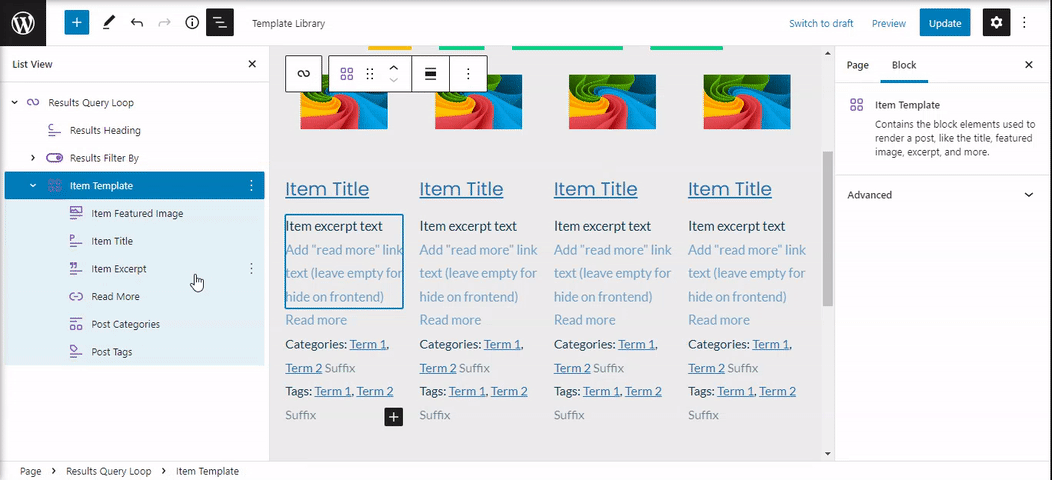
Item Template
Contains the block elements used to render a post, like the title, featured image, excerpt, and more.
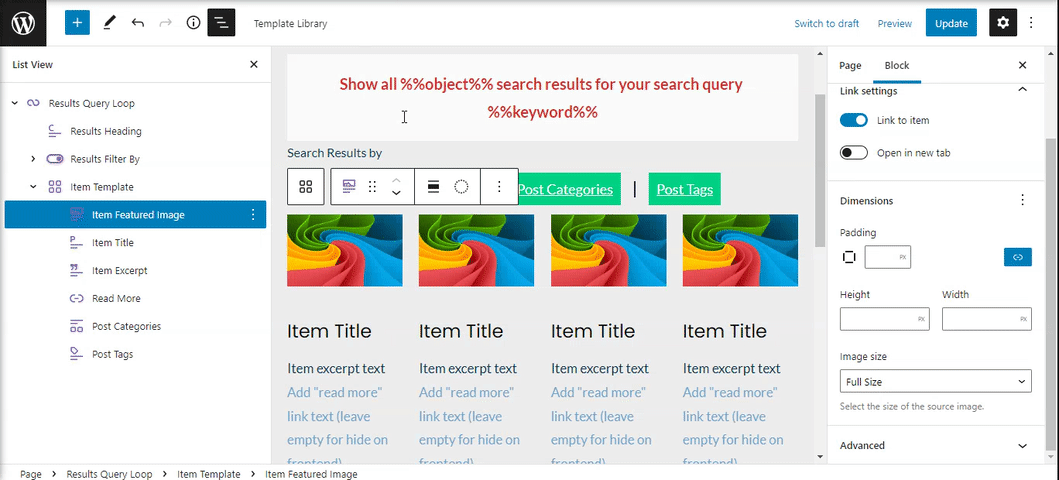
Item Featured Image
The Post Featured Image block will display the featured image you’ve set for your content.
Toggle the option for linking the image to the published content. This is toggled off by default.
Also you can set the dimension of the block as Image size, Height/Width and Select the size of the source image.
Item Title
The Post Title block will display the title of each piece of content you’ve published.
The block come with settings for:
- Settings – Set the Character Count or choose if the title will be a link.
- Colour – The text and background color for the Post Title. If the “Make title a link” option is checked in the next section, the Link color can also be set under Color.
- Typography – The Font Family to apply to the Post Title as well as the font size, and line height.
- Dimension – Setup the padding of the title.
Item Excerpt
Displays the excerpt of a post, page, or any other content-type on search result. The Post Excerpt block will display an excerpt for each published piece of content. You can control how much of the excerpt is displayed by Character Count.
The block come with settings for:
- Settings – Set the Character Count or Show link on new line if you have one in your description.
- Colour – The text, background, and link color for the post excerpt.
- Typography – The Font Family to apply to the post excerpt as well as the font size and line height
- Dimensions – Setup the padding of the excerpt.
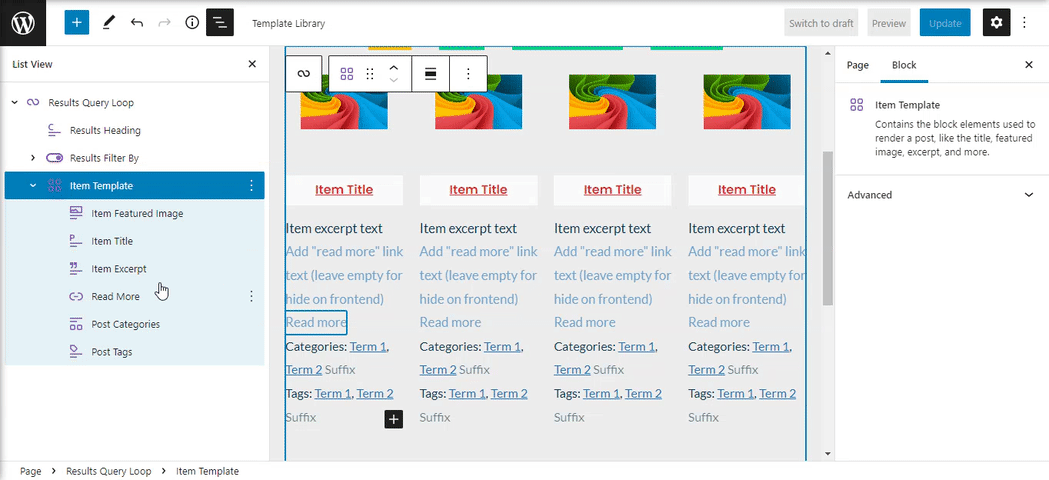
Read More
Displays the link of a post, page, or any other content-type on search result. It can be a link or customize to look like a button.
- Link Settings – Open in new tab.
- Colour – The text and background color.
- Typography – The Font Family to apply to the Read more as well as the font size and line height.
- Dimension – Setup the padding of the content.
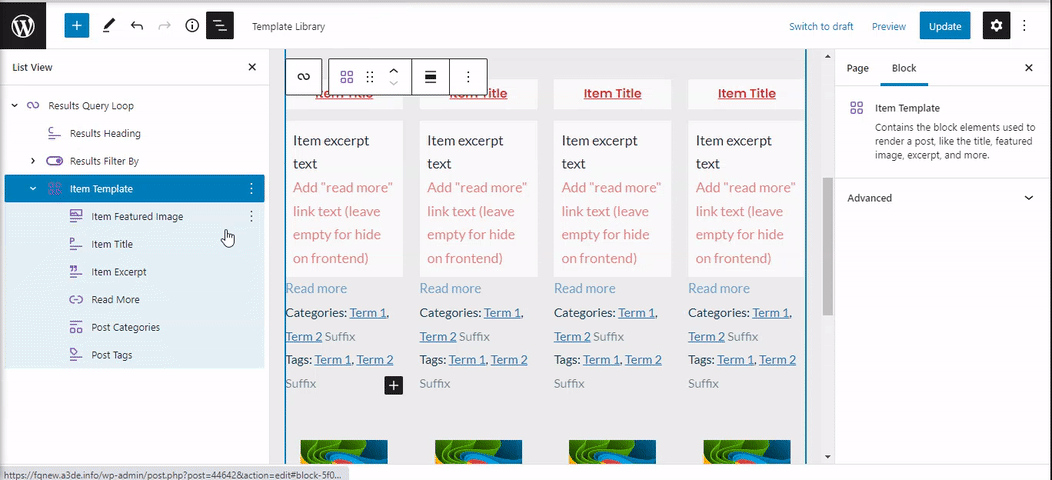
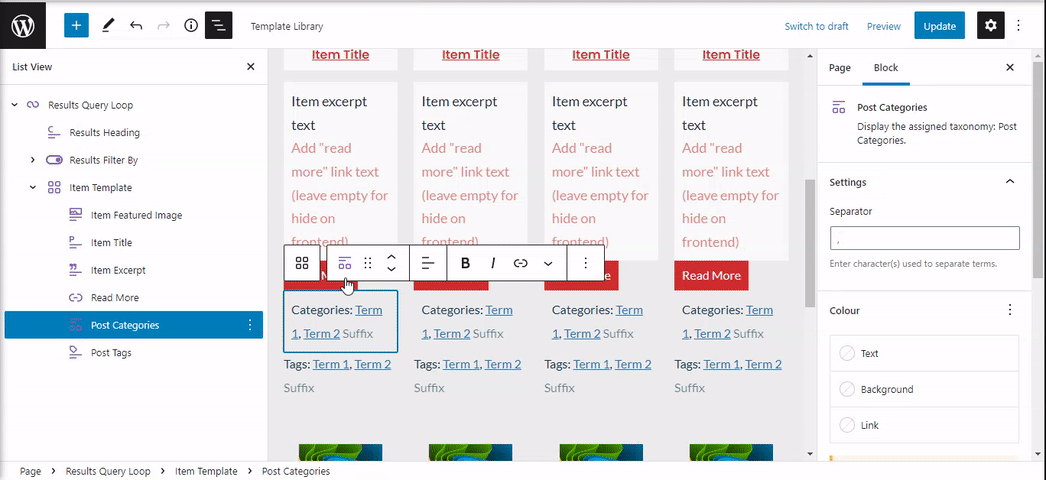
Post Categories
Display the assigned taxonomy: Post Categories.
The block comes with next settings:
- Settings – Enter character(s) used to separate terms.
- Colour – The text, background, and link color for the categories.
- Typography – The Font Family to apply to the Post Excerpt as well as the font size and line height.
- Dimension – Setup the padding of the content.
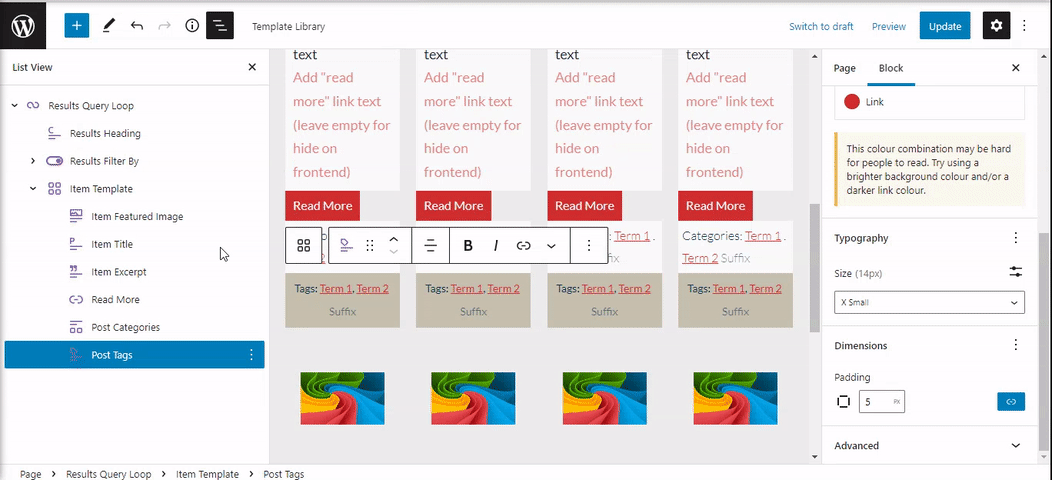
Post Tags
Display the assigned taxonomy: Post Tags.
The block comes with next settings:
- Settings – Enter character(s) used to separate terms.
- Colour – The text, background, and link color for the categories.
- Typography – The Font Family to apply to the Post Excerpt as well as the font size and line height.
- Dimension – Setup the padding of the content.

Search Result Blocks Tips
Some tips when using our blocks. You can add, change position or remove any of the nested blocks. The results blocks can be used individual or combine with others blocks.
Add Search Box Methods
Explore various methods to seamlessly integrate the search box widget into your website or application. Whether you prefer legacy widgets, modern blocks, PHP functions, or shortcodes, we offer versatile solutions to meet your integration needs. Choose the method that best fits your development workflow and user experience goals to enhance search functionality across your platform.
Legacy Widget
The search box can be added to your website as a legacy widget. This method involves using the widget functionality provided by your platform or framework to integrate the search box into predefined widget areas. While considered a legacy option, it remains a reliable method for incorporating the search box into your site’s layout.
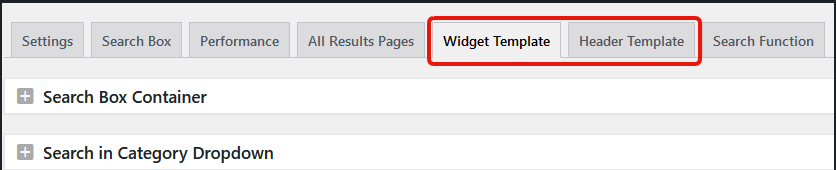
Widget / Header Template
Widget and Header Templates have same settings.
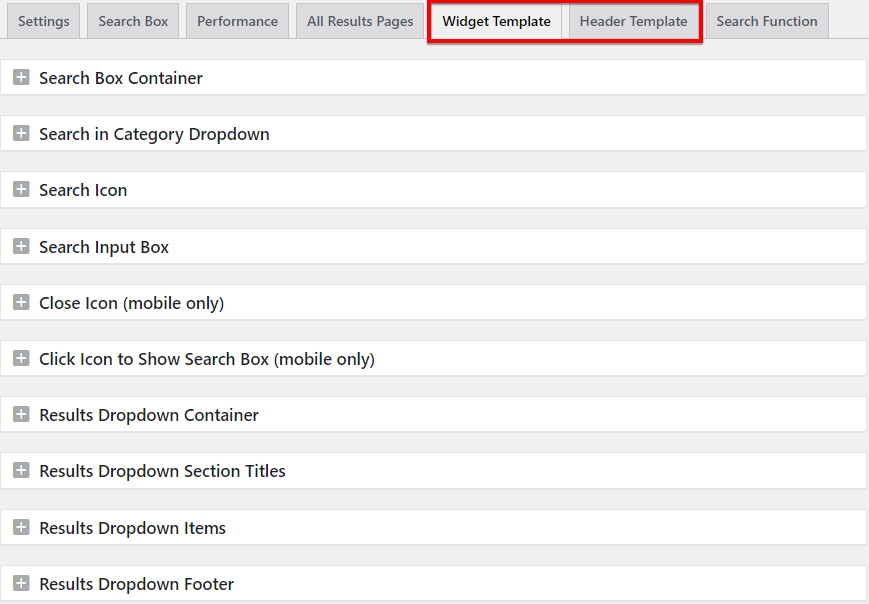
Search Box Container
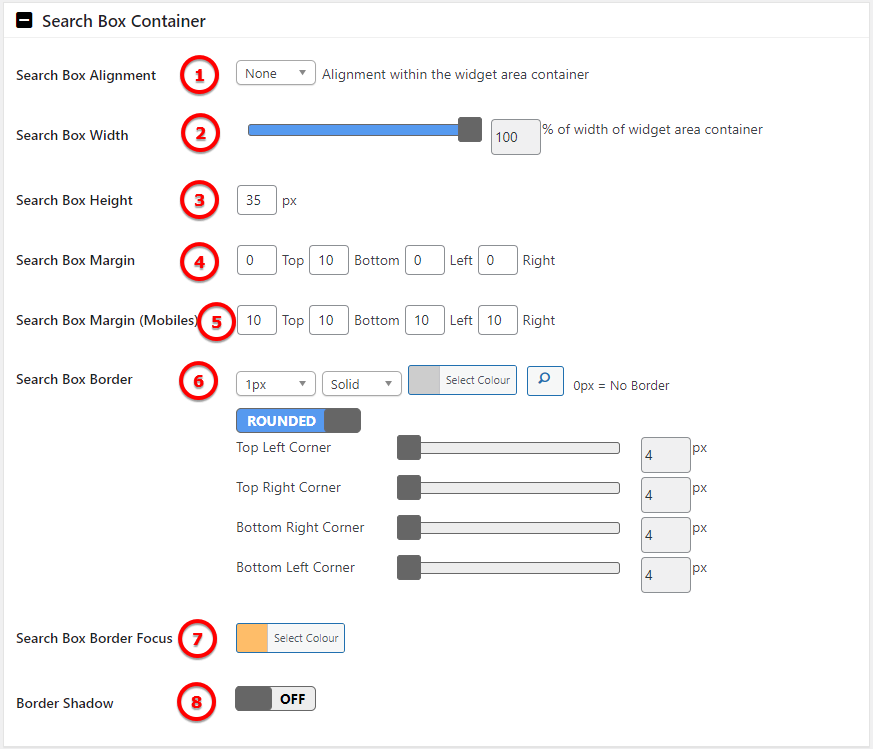
Image Legend
1. Search Box Alignment – Alignment within the widget area container
2. Search Box Width – % of width of widget area container
3. Search Box Height – The height of the container box
4. Search Box Margin – Margin or space outside of the container box border in px.
5. Search Box Margin (Mobiles) – Margin or space outside of the container box border in px. in mobile devices.
6. Search Box Border – Add a border to the container.
7. Search Box Border Focus – When click on box text area the border color will change.
8. Border Shadow – Add a shadow to the container box.
Search in Category Dropdown
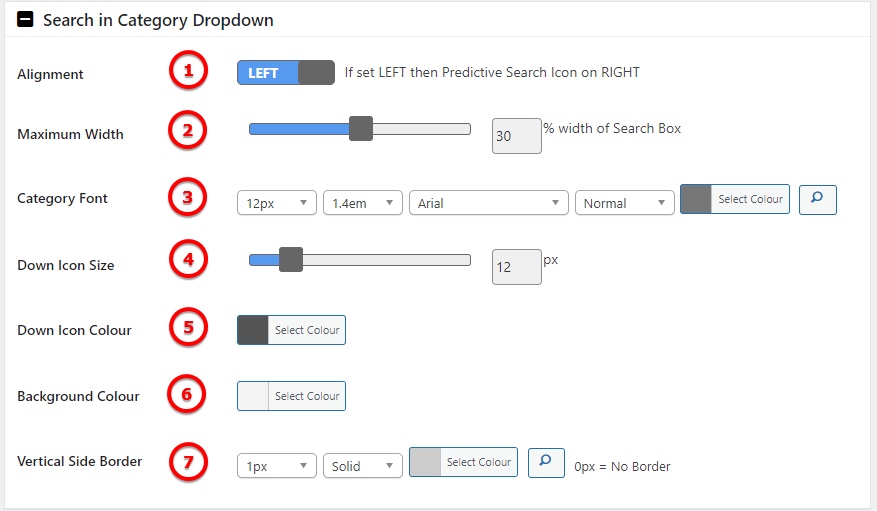
Image Legend:
1. Alignment – If set LEFT then Predictive Search Icon on RIGHT.
2. Maximum Width – % width of Search Box.
3. Category Font – Select what font to be use in Dropbox.
4. Down Icon Size – The size of the down icon.
5. Down Icon Colour – Select the color for the down icon.
6. Background Colour – Choose a background color for the dropdown container.
7. Vertical Side Border – Customize the vertical side border.
Search Icon
Image Legend:
1. Search Icon Size – Scale the icon by dragging the bar.
2. Search Icon Colour – Choose a color for the icon.
3. Search Icon Hover Colour – Set up a color for the search icon when hovering with the mouse.
4. Background Colour – Choose a color for the background icon container
5. Background Hover Colour – Choose a color for the background icon container when hovering with the mouse.
6. Vertical Side Border – Style the vertical side border with a color, type and thick.
Search Input Box
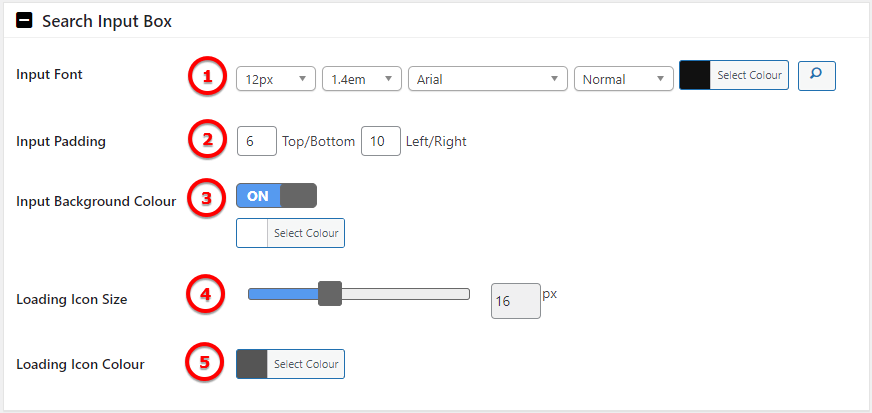
Image Legend:
1. Input Font – Setup the font style for the input search box.
2. Input Padding – Add a space between the text and the container border.
3. Input Background Colour – Choose a color for the input background box.
4. Loading Icon Size – Drag the bar to adjust the loading icon size.
5. Loading Icon Colour – Style the loading icon color.
Close Icon (mobile only)
Image Legend:
1. Close Icon Size – Adjust the close icon size.
2. Close Icon Colour – Style the close icon color.
3. Close Icon Margin – Add space between the close icon and the container border.
Click Icon to Show Search Box (mobile only)
Image Legend:
1. Search Icon On Mobile – Turn On or Off the search icon on mobile devices.
2. Search Icon Alignment – Align the icon in mobile devices to left, center or right.
3. Search Icon Size – Adjust the size of the search icon on mobiles.
4. Search Icon Colour – Style the icon color for mobile devices.
Results Dropdown Container
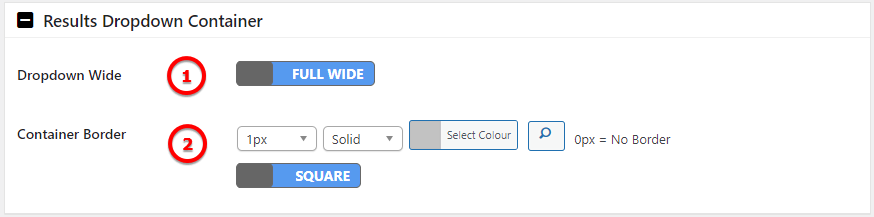
Image Legend:
1. Dropdown Wide – Setup the results dropdown container wide.
2. Container Border – Style a border to the results dropdown container.
Results Dropdown Section Titles
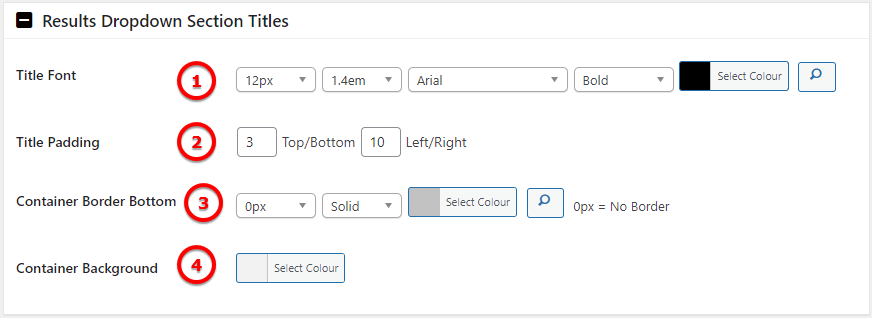
Image Legend:
1. Title Font – Select the Family font, line height, size and color of the Section Title
2. Title Padding – Adds padding (space) between the title and the content.
3. Container Border Bottom – Add a border to the bottom of the container.
4. Container Background – Setup a background for the title container.
Results Dropdown Items
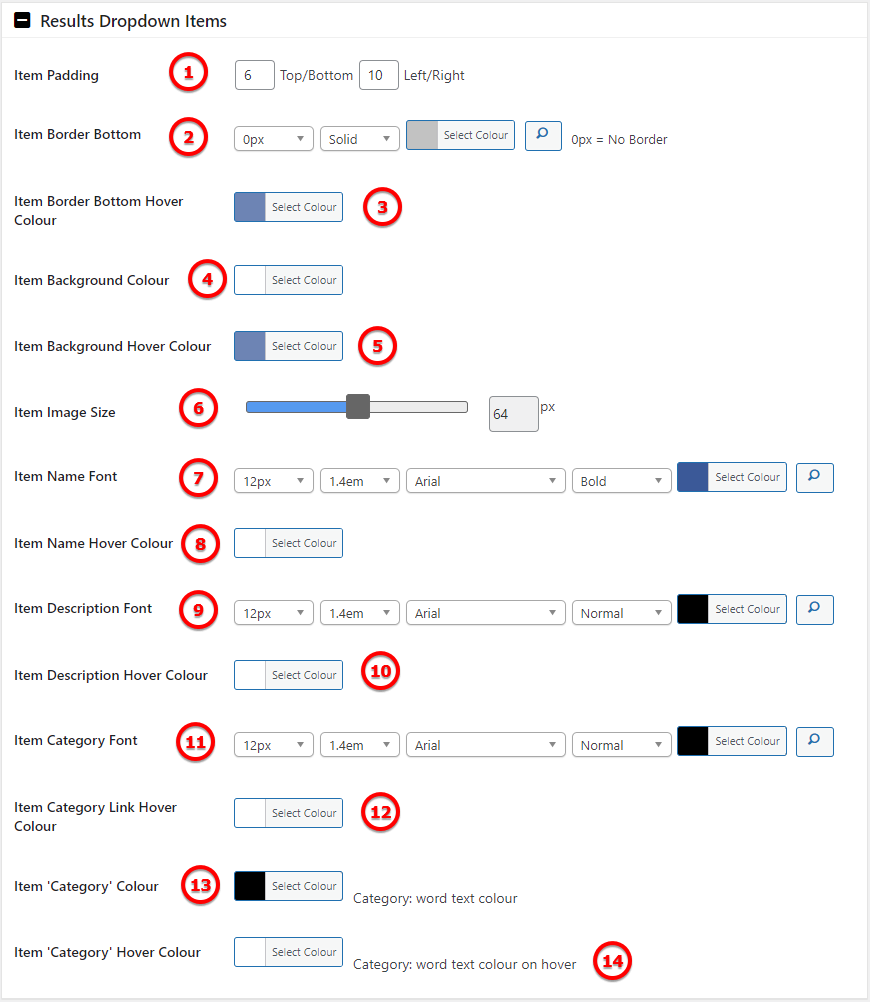
Image Legend:
1. Item Padding – Select the item space between the text and item container.
2. Item Border Bottom – Choose a border for the results bottom container, select a width, type and a colour.
3. Item Border Bottom Hover Colour – When cross with mouse pointer over the bottom border you can choose a colour for it.
4. Item Background Colour – Set a custom background colour for the results container.
5. Item Background Hover Colour – When cross with mouse pointer over the results container you can choose a colour for it.
6. Item Image Size – Drag the slider to choose the image size to show on search results dropdown.
7. Item Name Font – Set a custom font and style the Item Name.
8. Item Name Hover Colour – When cross with mouse pointer over the item name the colour will change. Set a custom colour.
9. Item Description Font – Set a custom font and style for the item description that show on results dropdown.
10. Item Description Hover Colour – When cross with mouse pointer over the description item text the colour will change. Set a custom colour.
11. Item Category Font – Can have a custom font for the category text.
12. Item Category Link Hover Colour – When cross with mouse pointer over category link name the colour will change. Set a custom colour.
13. Item ‘Category’ Colour – Category: word text colour.
14. Item ‘Category’ Hover Colour – Category: word text colour on hover.
Results Dropdown Footer
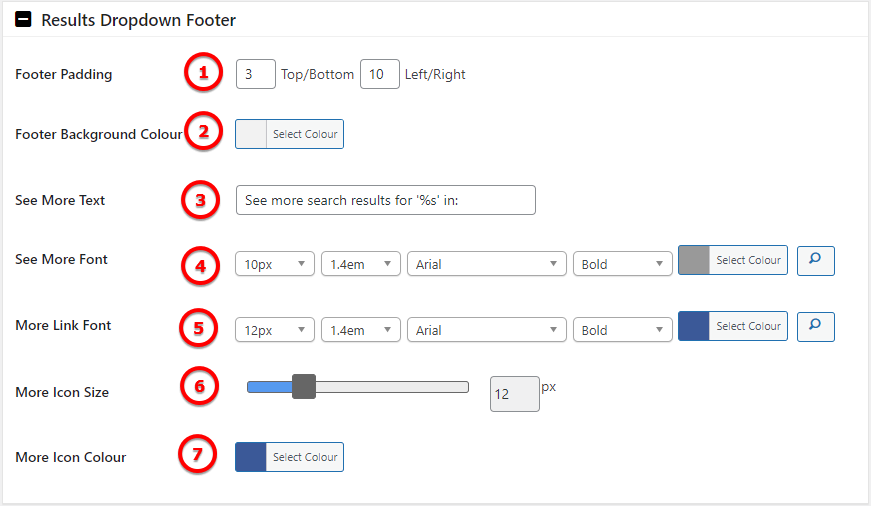
Image Legend:
1. Footer Padding – Add space between its content and its border.
2. Footer Background Colour – Add a color to your footer.
3. See More Text – Change the text for the See More.
4. See More Font – Customize the Font for See More link
5. More Link Font – Customize the Font for More link
6. More Icon Size – Drag the bar to setup the icon for More
7. More Icon Colour – Select a color for the More Icon
Block
You can incorporate the search box into your website by using a block. Blocks are modular components commonly used in modern content management systems (CMS) such as WordPress. By adding the search box as a block, you have the flexibility to place it within specific areas of your site’s layout, offering a customizable and visually appealing integration solution.
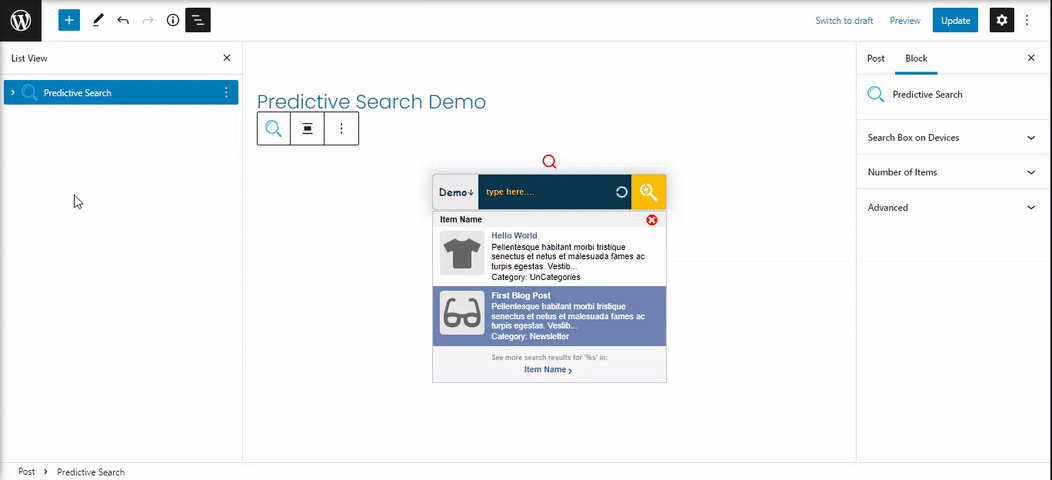
To see the Predictive Search bar on front end you will need to insert the block. The block can be used in header, any type of post or page, sidebar or footer. This block is created with many functions and options, making your search bar highly customizable.
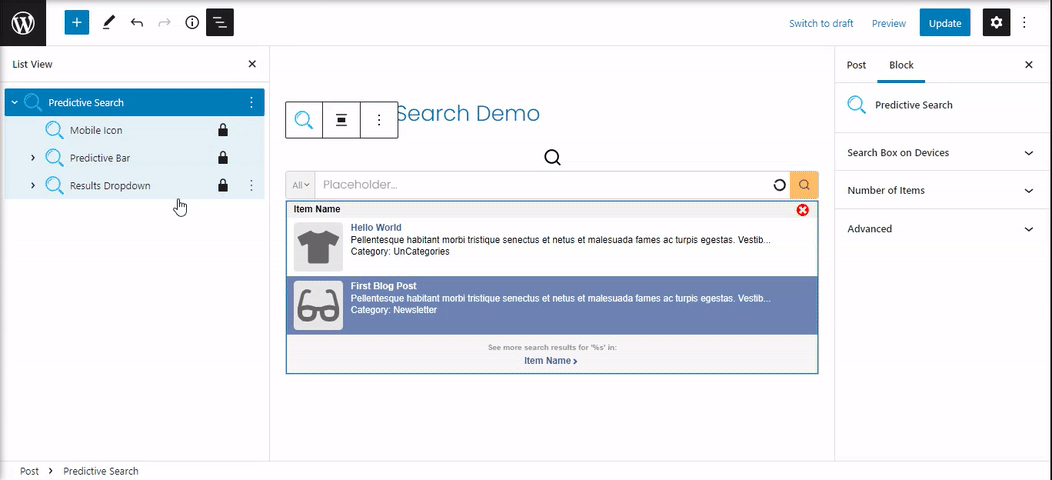
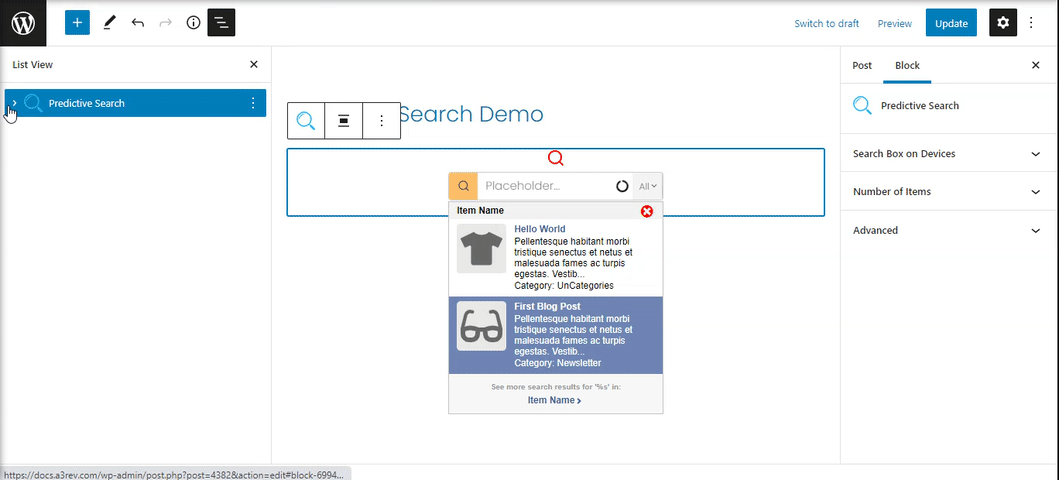
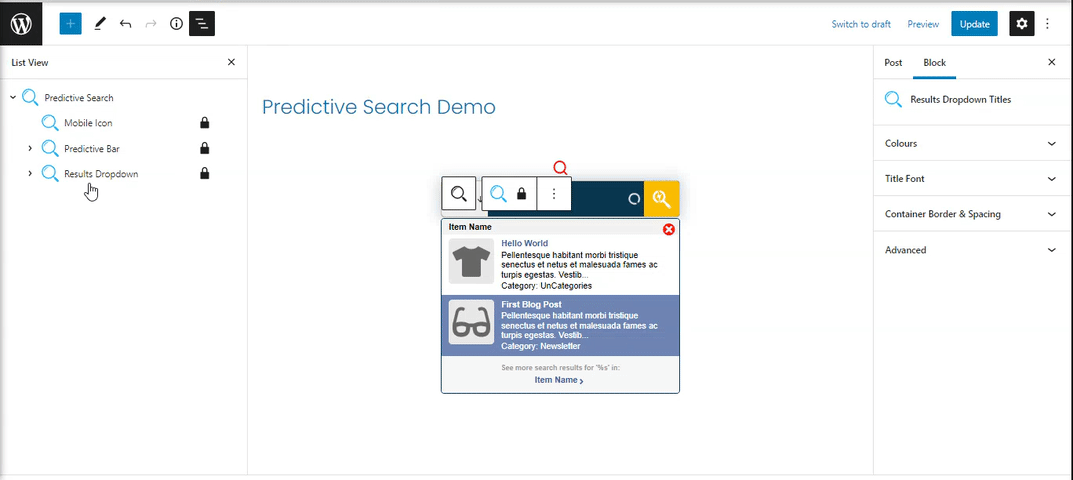
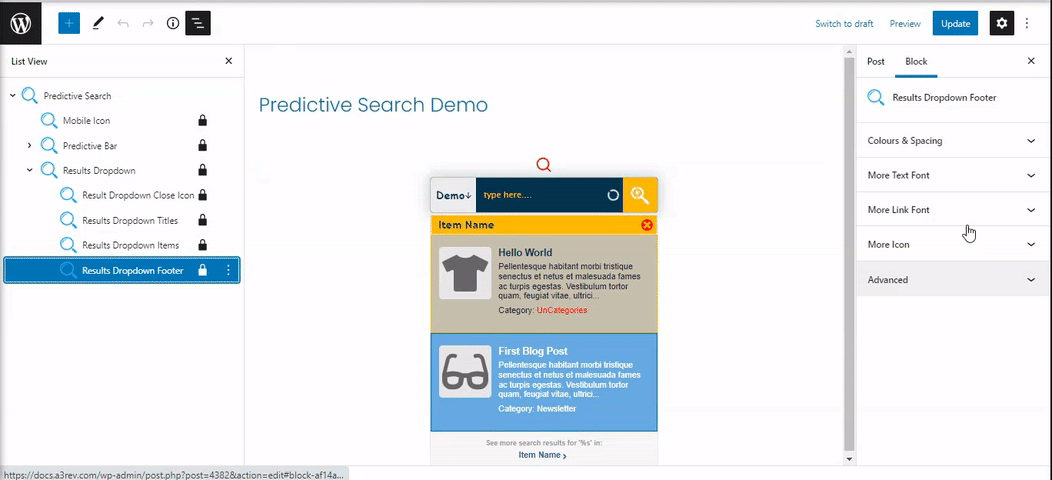
Once inserted use the List View to see the block. Inside the main block are nested the blocks for the Mobile Icon, Predictive Bar with it’s blocks and the blocks for Results Dropdown.
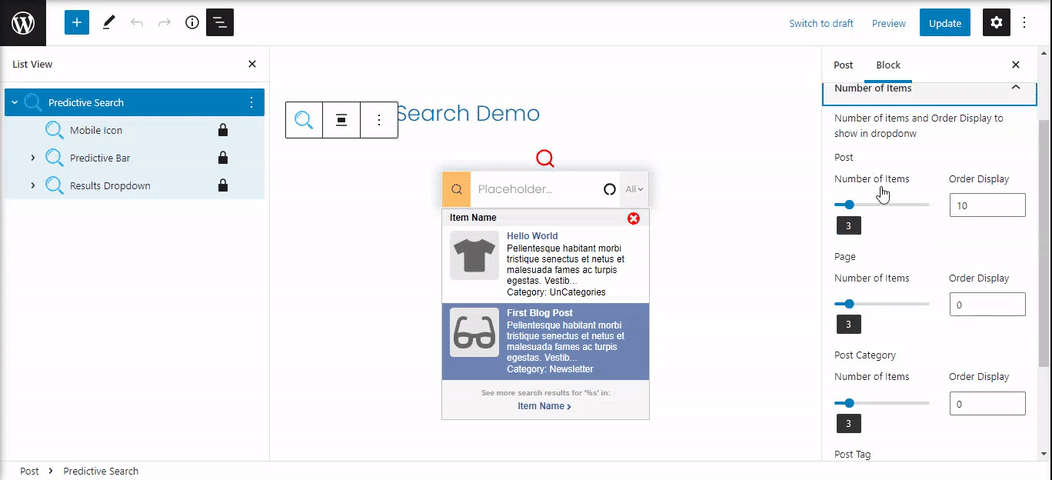
Predictive Search Block
The main block will control the box settings for Search box on devices and the Number of items and Order Display to show in dropdown.
- Search box on devices – Choose the Search Box Width (percent or pixels) and the Margin for Desktop, Tablet and Mobile devices. On desktop devices you have the option to show only the search icon.
- Number of Items – Number of items and Order Display to show in dropdown
Mobile Icon
Show mobile icon on desktop ( if it’s turn On from general block settings ), tablet or mobile devices.
The Icon can be style using the settings from the left sidebar. Choose a icon, set the icon size and the color when hover or it’s active.

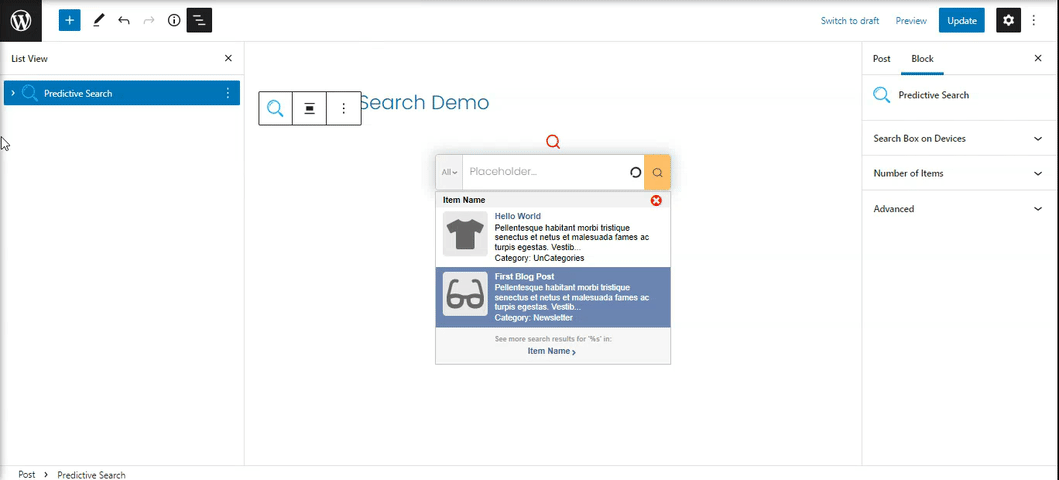
Predictive Search Bar
From here you setup and style the bar and it’s component: Category Dropdown, Search Icon Button and Search Input. The parent Block have nested 3 blocks for each component.
The Predictive Bar block allows you to customize the box container, having settings for:
- Layout – Choose a Layout for the search box. Category Dropdown on LEFT and Predictive Search Button on RIGHT or Predictive Search Button on LEFT and Category Dropdown on RIGHT. Also you can setup a Search Bar Height.
- Border – Style the search box container by adding a border. Enable Custom Border or use the default one. The border can be style by type, color, size and radius. Add a color for the Border Color and Border Focus Color.
- Shadow – Enable the shadow to add effects around the box container.
Category Dropdown
Enable and style the Category Dropdown in Search Box.
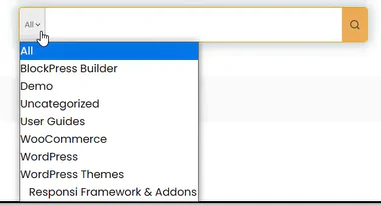
A popular way to integrate search is to allow visitors to control the results pool on their own. This usually comes in the form of allowing them to choose a specific Category from a dropdown (select box) to go along with their search. Here how you can enhance your Dropdown:
- Category Dropdown Settings – Select a taxonomy for Category Dropdown, set a default category as default selected category and adjust the width of Search Box dropdown container.
- Colours – Customize the dropdown style by adding colors for: text, background and border.
- Category Custom Fonts – Enable Custom Font.
- Container Border – Add a custom border to the dropdown container.
- Down Icon – Change the appearance of the down icon. Have option to change it, adjust the size and color.
- Advanced – The advanced tab lets you add a CSS class to your block, allowing you to write custom CSS and style the block as you see fit.
Search Icon Button
Next to make sure we match the Search Bar with the website design we will style the Search Icon Button block.
The block comes with settings for:
- Search Icon – You can replace the default icon and adjust it’s size.
- Colours – Set up the colors for the icon, background and borders. It have options for Normal and for Hover.
- Container Border – Enable Custom Borders for the search icon container, set radius, size, colour and style.
Search Input
Customize the style for the input box and add a placeholder.

The block offers many options for the input field. You can take full control of how your input field should look.
You can choose the spacing and colors, add a custom placeholder with custom fonts and style the loading icon to make it attractive for users.
- Colours and Spacing – Set up the background color of the box type a custom placeholder text, space and text color.
- Search Text Fonts – Enable Custom Font and choose a font family, font size, font weight, line height for the input box text.
- Loading Icon – Customize the loading icon that show when a query is type into the input text box.
Results Dropdown
From here we will setup a fancy search results populate into a dropdown box. The Results Dropdown is show only after something is type into the input text box. This is the main block for it, having nested another 4 blocks for each section of the dropdown.
From here we can set up the wide and the borders of the Dropdown container.
Result Dropdown Close Icon
This icon show on mobile only. It will let you easily close the dropdown in mobile devices.
Results Dropdown Titles
Customize the title of the dropdown results. Setup custom font, color, border and space.
Results Dropdown Items
Style how the items layout show on dropdown results. Customize the container, item name, item image, item description and item categories. Each section have their ones option.
Results Dropdown Footer
From here you can customize the footer of the dropdown results. colours & spacing, more text & link font and more icon.
Shortcode
The search box can be integrated into your content using a shortcode. Shortcodes provide a simple and efficient way to embed dynamic content, such as the search box, directly into posts, pages, or other content areas of your website or application. This method allows for flexible placement and customization of the search box within your content, ensuring seamless integration with your site’s design and functionality.
You can add the Predictive Search Box by shortcode anywhere in a theme or page builder that accepts shortcodes. Copy the shortcode below and paste it where you want the saerch box to show. You just need to edit the shortcode terms.
Free Version Shortcode
[woocommerce_search_widget widget_template="sidebar" product_items="6" post_items="0" page_items="0" show_image="0" show_price="1" show_desc="1" show_in_cat="1" character_max="100" style="float:none;width:400px;padding-top:10px;padding-bottom:10px;padding-left:0px;padding-right:0px;" search_box_text="Search here .." ]The variables in the shortcode are:
widget_template=”sidebar” – This is the Widget Template selector from the plugins settings. Set to “header” to use the Header Template (see screenshot)
product_items=”6″ – the number of products to show in the search box results dropdown. Set to 0 to disable.
post_items=”0″ – the number of posts to show in the results dropdown. “0” is disabled.
page=items=”0″ – the number of pages to show in the results dropdown. “0” is disabled.
show_image=”0″ – binary, 0 = disabled, change to “1” to activate show thumbnail image with result.
show_price=”1″ – change to “0” to not show prices on product results.
show_description=”1″ – change to “0” to not show the result description excerpt.
show_in_cat=”1″ – change to “0” to not show the categories the result is assigned to.
character_max=”100″ – the number of characters including white spaces. Note show_description must be “1” for this to take effect.
style= this is the horizontal alignment and width of the search box. The alignment options are
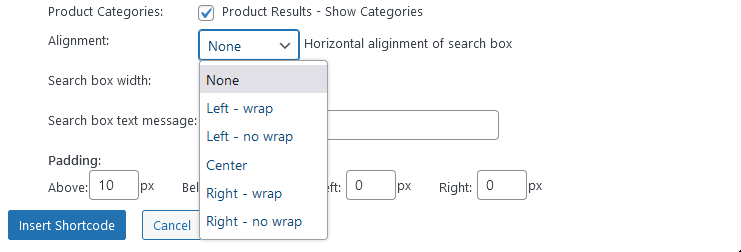
This is the None variable from the image above with 400px maximum width, 10px padding above, 10px below and 0px padding left and right
style="float:none;width:400px;padding-top:10px;padding-bottom:10px;padding-left:0px;padding-right:0px;"Left – wrap (wrap is the same as image wrap – the search box will be aligned to the left with other content on a page or post, (most likely text) will wrap around the right of the search box..
style="float:left;width:200px;padding-top:10px;padding-bottom:10px;padding-left:0px;padding-right:0px;" wrap="true"Left – no wrap
style="float:left;width:200px;padding-top:10px;padding-bottom:10px;padding-left:0px;padding-right:0px;"Centre
style="float:none;margin:auto;display:table;width:200px;padding-top:10px;padding-bottom:10px;padding-left:0px;padding-right:0px;"Right – Wrap
style="float:right;width:200px;padding-top:10px;padding-bottom:10px;padding-left:0px;padding-right:0px;" wrap="true"Right – No Wrap
style="float:right;width:200px;padding-top:10px;padding-bottom:10px;padding-left:0px;padding-right:0px;"PHP Function
Integrating the search box via a PHP function involves directly embedding the search box functionality into your site’s PHP codebase. This method provides precise control over the search box’s behavior and appearance, making it ideal for developers seeking a tailored integration solution. By calling the PHP function at desired locations within your code, you can seamlessly integrate the search box into your site’s frontend or backend processes.
Search Box – Insert by Search Function is a Premium Version feature!
Predictive Search Function
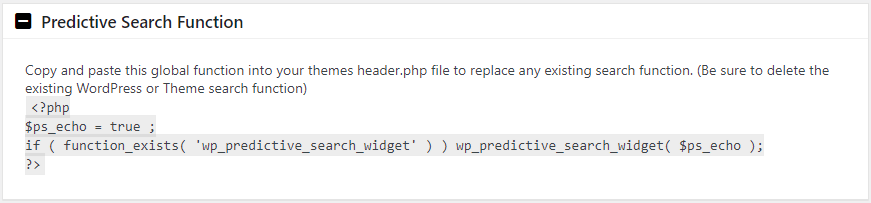
Copy and paste this global function into your themes header.php file to replace any existing search function. (Be sure to delete the existing WordPress or Theme search function)<?php
$ps_echo = true ;
if ( function_exists( 'wp_predictive_search_widget' ) ) wp_predictive_search_widget( $ps_echo );
?>
Customize Search Function values :
The values you set here will be shown when you add the global search function to your header.php file. After adding the global function to your header.php file you can change the values here and ‘Update’ and they will be auto updated in the function.
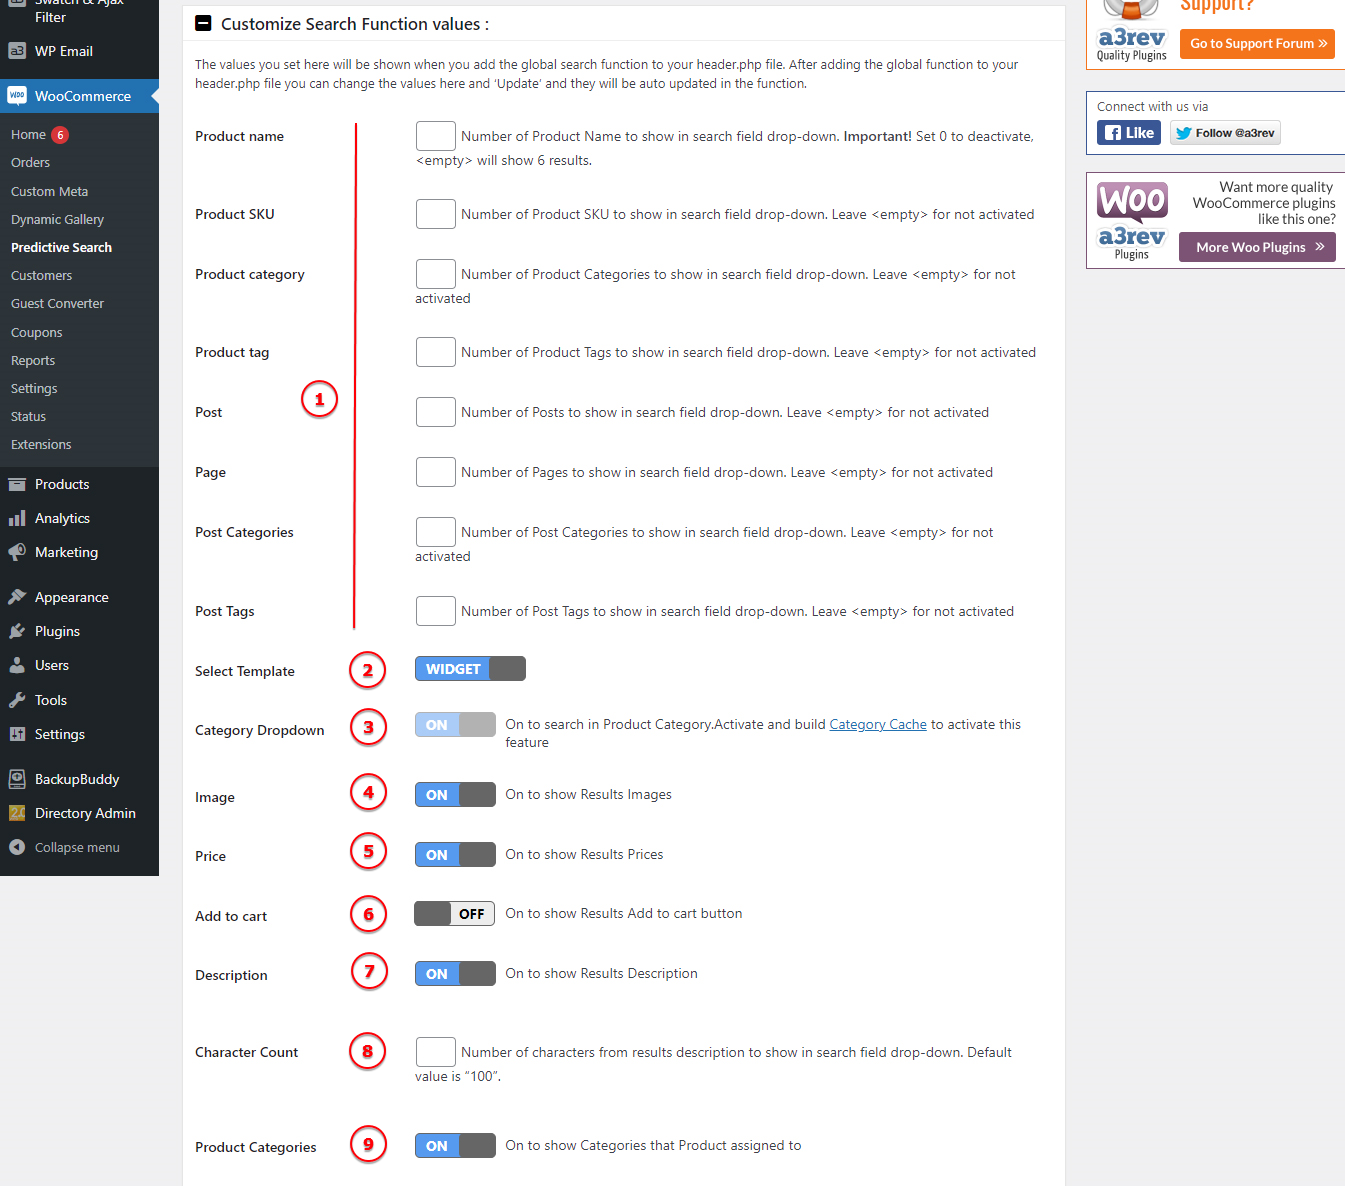
Image Legend:
1. Product Name – Number of Product Name to show in search field drop-down. Important! Set 0 to deactivate, <empty> will show 6 results.
*Number of Product items to show in search field drop-down. Leave <empty> for not activated
2. Template – Select the template you want these settings to take effects > Widget or Header.
3. Category Dropdown – On to search in Post Category.
3.1 Select Taxonomy – Select a taxonomy for Category Dropdown.
4. Image – On to show Results Images.
5. Price – On to show Results Prices
6. Add to cart – On to show Results Add to cart button
7. Description – On to show Results Description.
8. Character Count – Number of characters from results description to show in search field drop-down. Default value is “100”.
9. Post Categories – On to show Categories that Post assigned to.
Troubleshooting
Issue: Predictive Search Category Dropdown Not Working with Redis Object Cache
Symptoms:
When using Redis Object Cache (e.g., with Varnish), users may experience an issue where the Predictive Search plugin’s category dropdown becomes inactive or invisible after site cache is cleared (both Varnish and Redis).
Cause:
Some elements of the WooCommerce Predictive Search plugin are cached via Redis, which can prevent updated or dynamic elements (like the category dropdown) from functioning correctly.
Solution:
To exclude the relevant plugin data from Redis Object Cache, add the following code snippet to the functions.php file of your active theme:
add_filter( 'redis_object_cache_ignored_groups', function( $ignored_groups ) {

// Category cache keys
$ignored_groups[] = 'ps_cat_dropdown';
$ignored_groups[] = 'ps_cat_dropdown_*';

// Translation and textdomain related
$ignored_groups[] = 'woocommerce-predictive-search';
$ignored_groups[] = 'woocommerce-predictive-search_*';

return $ignored_groups; });
What this does:
This code tells Redis to ignore caching the category dropdown and certain internal groups used by the Predictive Search plugin, ensuring they remain functional even after the site cache is cleared.