Installation
To Install and Activate the Email Inquiry Ultimate plugin access the a3 Dashboard > Plugins > WooCommerce tab and scroll till you find it.
After installation and activation look for the WooCommerce navigation on your wp-admin dashboard. Put your mouse over it and you will see in the available sections > Email & Cart.
Overview
WooCommerce Email Inquiry Ultimate integrates with the Premium Gravity Forms plugin and Free Contact Form 7 plugins to create powerful WooCommerce product inquiry contact forms.
The plugin panel is divide on 3 section.
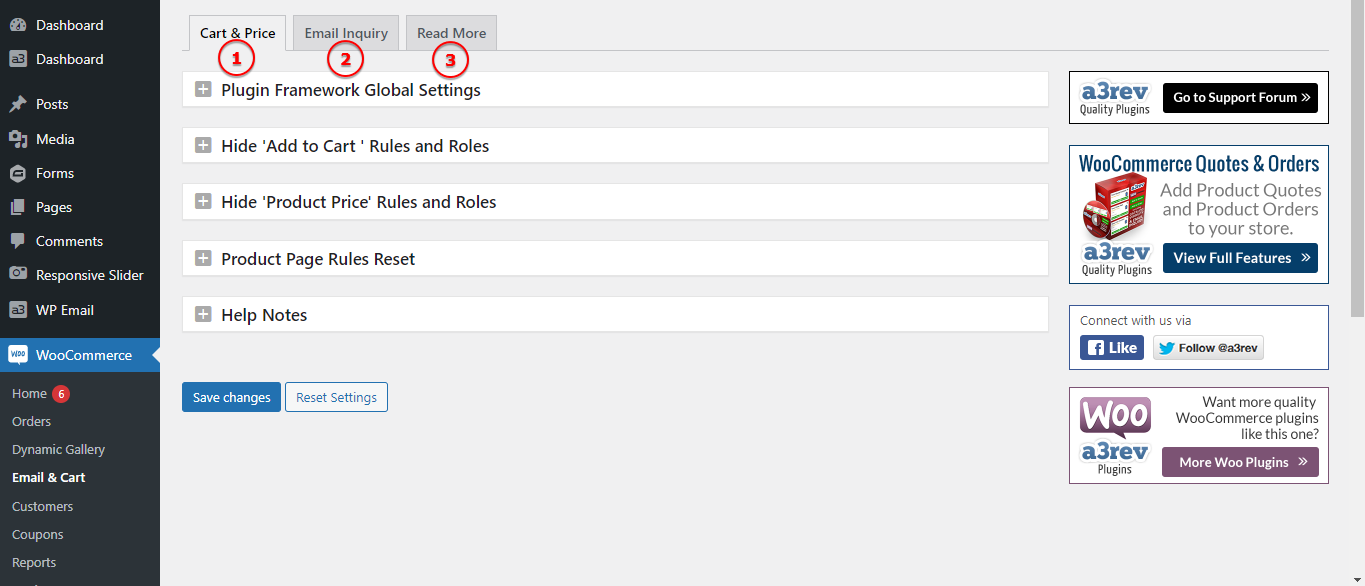
Image Legend:
1. Cart & Price – The plugins admin landing page. Setup the Hide cart and Hide Price rules and roles.
2. Email Inquiry – Customize how the Email Inquiry and Catalog Visibility options that apply for any individual product. This allows admins to create a mixed Catalog store with Products that are ‘Brochures’ and products that are able to be Purchased. Gives store owner maximum flexibility.
3. Read More – Customize the read more button or Hypertext link.
Cart & Price
From here we setup the Hide cart and Hide Price rules and roles.
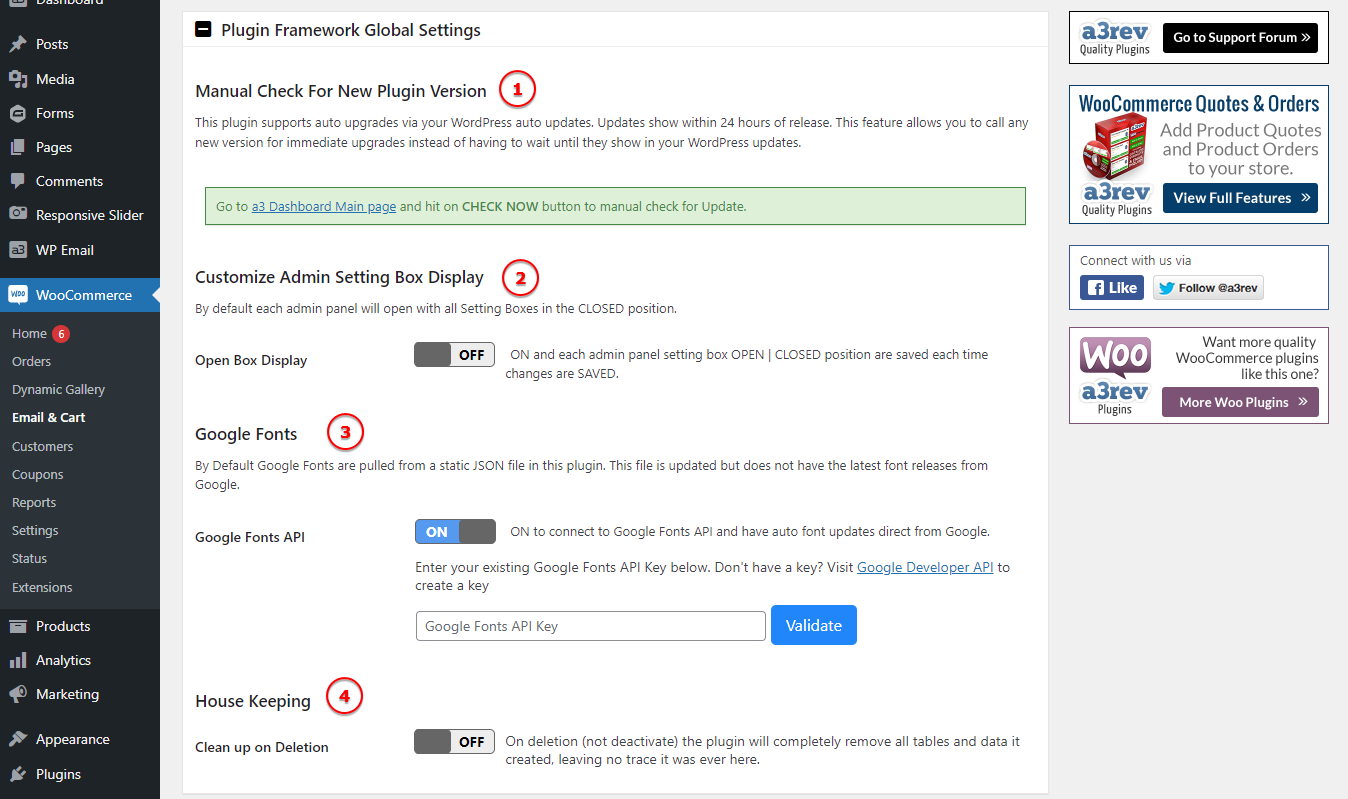
Image Legend:
1. Manual Check For New Plugin Version – This plugin supports auto upgrades via your WordPress auto updates. Updates show within 24 hours of release. This feature allows you to call any new version for immediate upgrades instead of having to wait until they show in your WordPress updates.
2. Customize Admin Setting Box Display – ON and each admin panel setting box OPEN | CLOSED position are saved each time changes are SAVED.
3. Google Fonts – Enter your existing Google Fonts API Key below. Don’t have a key? Visit Google Developer API to create a key
4. House Keeping – On deletion (not deactivate) the plugin will completely remove all tables and data it created, leaving no trace it was ever here.
Hide ‘Add to Cart ‘ Rules and Roles
This Rule hides the add to cart button on all products. Hide or show add to cart can be set independently of these global settings from each product edit page.
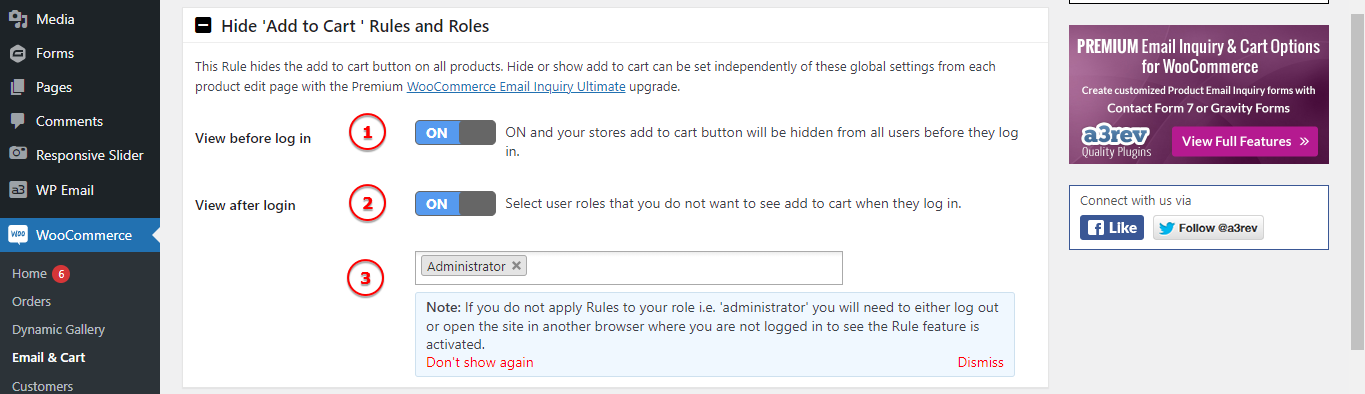
Image Legend:
1. View before log in – Select this to remove the add to cart button on every product in your store. This Rule applies to visitors who are NOT logged in. Create a ‘mixed catalog’ site by using the ‘Email & Cart” meta editor on each products page to make the Add to Cart function visible on that product.
2. View after login – Select user roles that you do not want to see add to cart when they log in.
3. Note: If you do not apply Rules to your role i.e. ‘administrator’ you will need to either log out or open the site in another browser where you are not logged in to see the Rule feature is activated.
Hide ‘Product Price’ Rules and Roles
This Rule hides product prices on all products. Hide or show price can be set independently of these global settings from each product edit page.
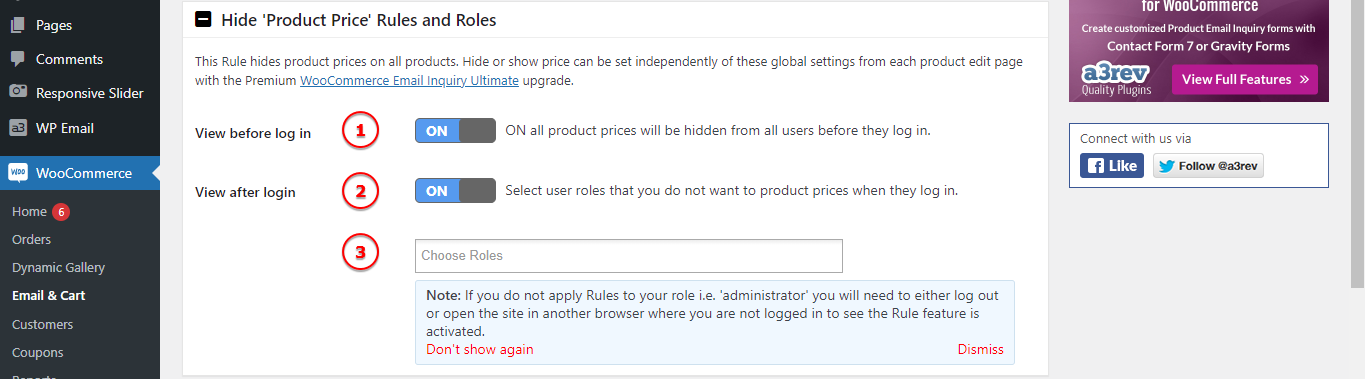
Image Legend:
1. View before log in – ON all product prices will be hidden from all users before they log in. It is a quirk of WooCommerce that Products and Product Variations must have a Price entered for the Add to Cart button to show. Also if you enter a price of $0 any user that can see the Prices will see Price: Free which is not ideal. If you intent to over-ride the hide the Price Rule on any single product best to make sure you have it correctly priced.
2. View after login – Select user roles that you do not want to product prices when they log in.
3. Note – If you do not apply Rules to your role i.e. ‘administrator’ you will need to either log out or open the site in another browser where you are not logged in to see the Rule feature is activated.
Product Page Rules Reset
Allows you set Rules and Roles here that apply to all products, but gives the additional functionality of being able to change these on any products from the Email and cart Meta box. The Global Re-Set feature allows you to Re-Set every product back to the Global setting create here on the admin panel. This is very handy as it saves you having to go to each products and change it individually if that is what you want to do.

Image Legend:
1. Reset All Products – Switch ON and Save Changes to reset all custom Hide cart and Hide Price rules and roles that have been set from product edit pages back to the settings here on this tab. Important Clear your cache after so that visitors see changes.
Help Notes

Image Legend:
1. Rules & Roles Help Notes – Product Page Rules apply a single action Rule to all product pages which can be filtered on a per User Role basis. These Rules can also be varied on a product by product basis from each product edit page * Set Rules that apply to Product Pages or your entire store. * The Rules are applied to users who are NOT Logged in and Rules for when they login in. * Different Rules can be applied to logged in users based upon their user Role e.g. what users with the Customer Role see verses what users with the Subscriber role see. Important! When an admin sets a Rule for NOT logged in users if they then check the front end to see the new Rule they will not see it, because they are logged in as administrator and have not applied that Rule to their role (this catches a lot of first time users who think the plugin is not working because they can’t see the rule applied while they are logged in but can when they log out).
2. Troubleshooting – Below is a list of common issues we see Don’t See Rules Applied on front end. * This is because you have not applied the Rule to your logged in user role (administrator). Either apply your role to the rule or check it in another browser where you are not logged in.
Email Inquiry
Setup and style the email inquire Rules and Roles, Features, Contact Form Type and much more.
‘Email Inquiry’ Rules and Roles
Globally set Email Inquiry feature for all Products for not logged in users and users when they log in. Option to independently set these options for each products edit page.
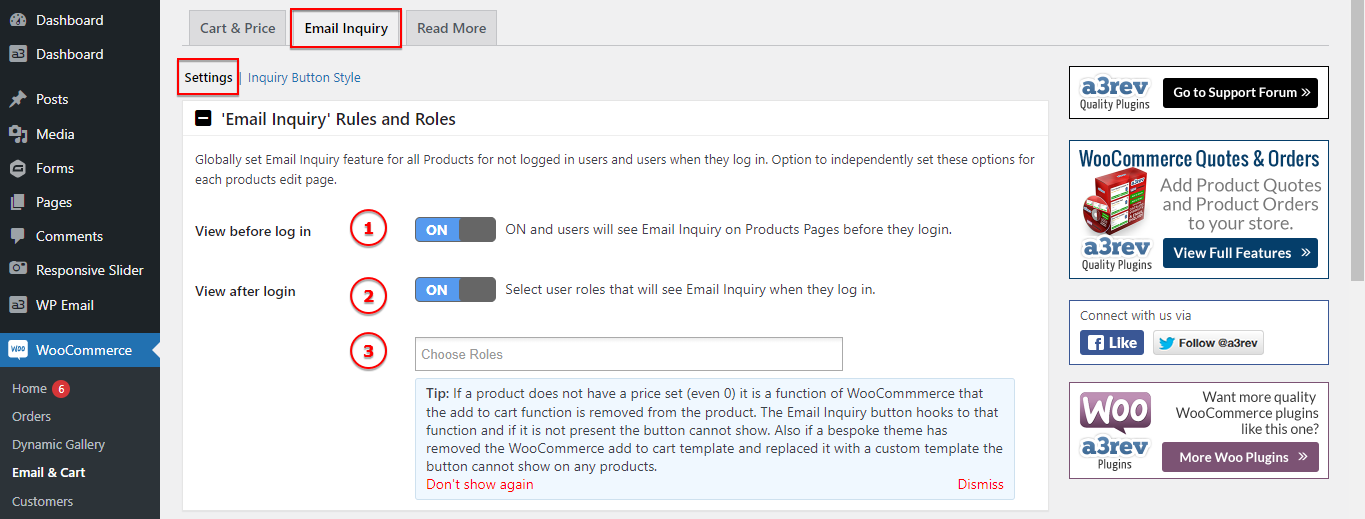
Image Legend:
1. View before log in – ON and users will see Email Inquiry on Products Pages before they login.
2. View after login – Select user roles that will see Email Inquiry when they log in.
3. Tip: If a product does not have a price set (even 0) it is a function of WooCommmerce that the add to cart function is removed from the product. The Email Inquiry button hooks to that function and if it is not present the button cannot show. Also if a bespoke theme has removed the WooCommerce add to cart template and replaced it with a custom template the button cannot show on any products.
Product Cards

Image Legend:
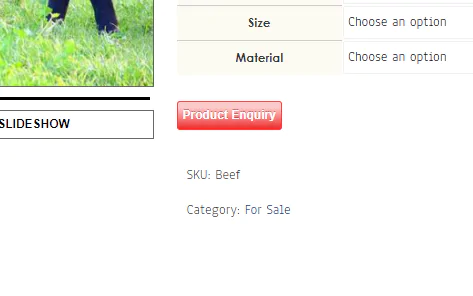
Email Inquiry Feature – ON to show Email Inquiry feature on your Product Cards on Shop, category and tags pages.
Contact Form Type
From here we select what kind of form to use. There are 2 options, each with their own settings.
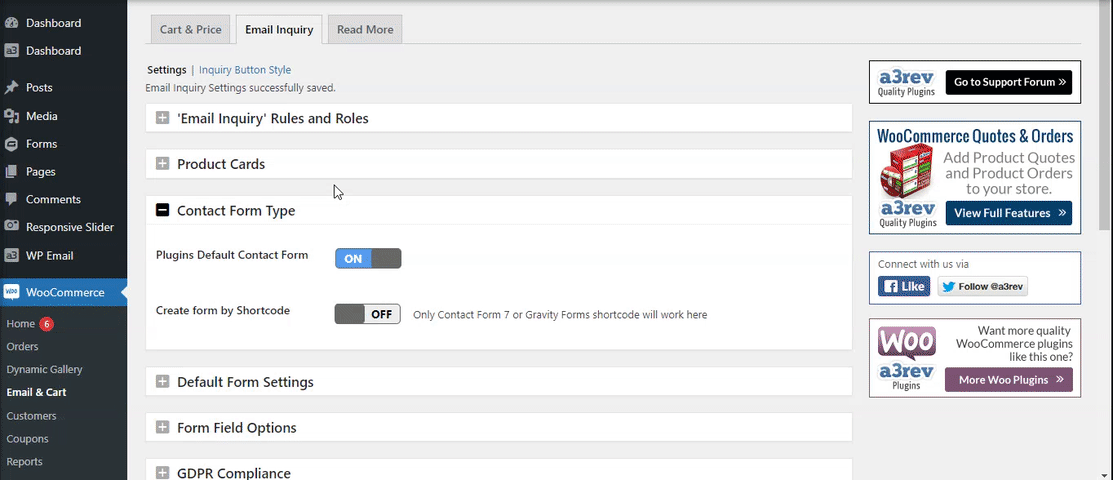

Image Legend:
1. Plugins Default Contact Form – This is the default form to use, the settings for it are bellow.
2. Create form by Shortcode – Turn this option On and you will be able to use a 3th part form like Contact Form 7 or Gravity Forms.
Plugins Default Contact Form
Default Form Settings
Email ‘From’ Settings
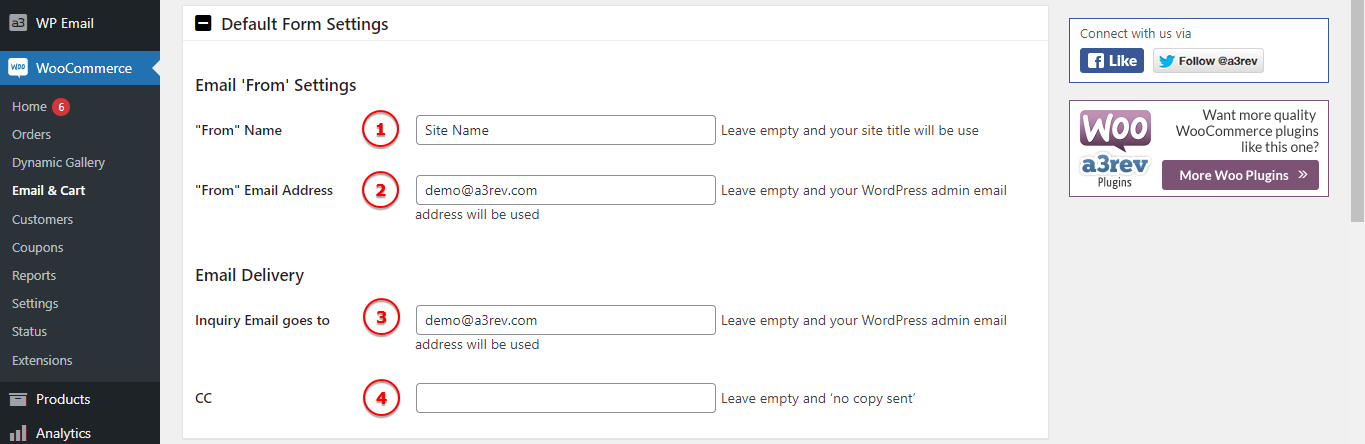
Image Legend:
1. “From” Name – Leave empty and your site title will be use.
2. “From” Email Address – Leave empty and your WordPress admin email address will be used.
3. Inquiry Email goes to – Leave empty and your WordPress admin email address will be used.
4. CC – Leave empty and ‘no copy sent’.
Form Field Options
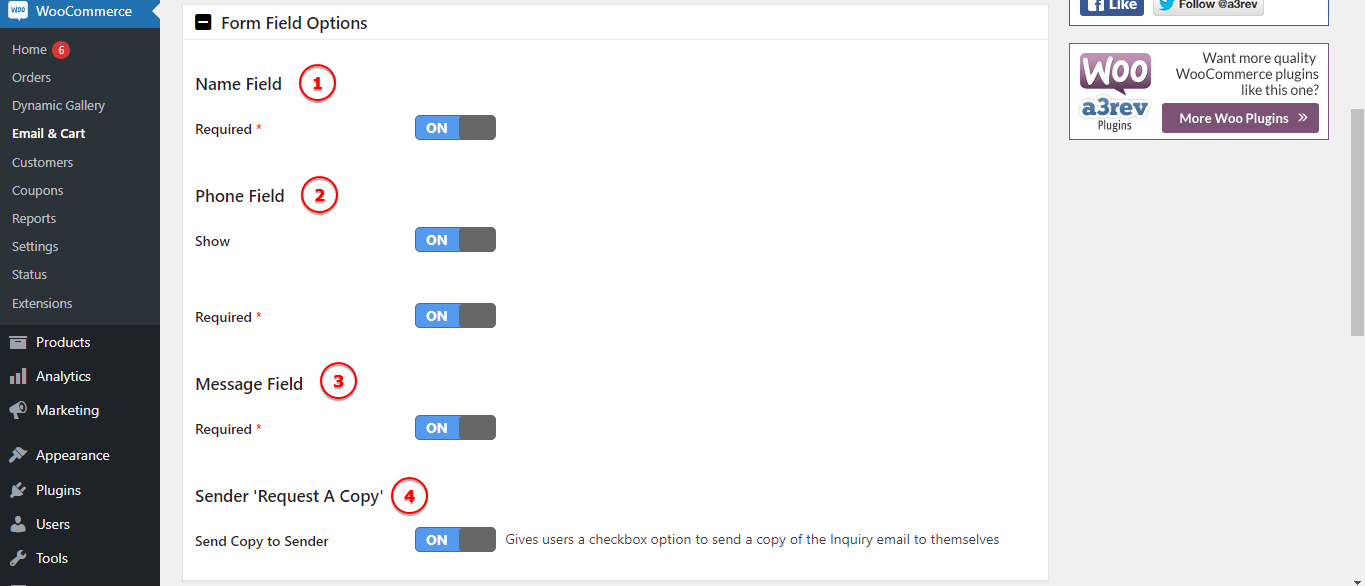
Image Legend:
1. Name Field – Make the name field from required.
2. Phone Field – Make the phone field from required.
3. Message Field – Make the message field from required.
4. Sender ‘Request A Copy’ – Gives users a checkbox option to send a copy of the Inquiry email to themselves.
GDPR Compliance
Gives users a checkbox to agree terms and conditions, this field is required if you turn it ON.
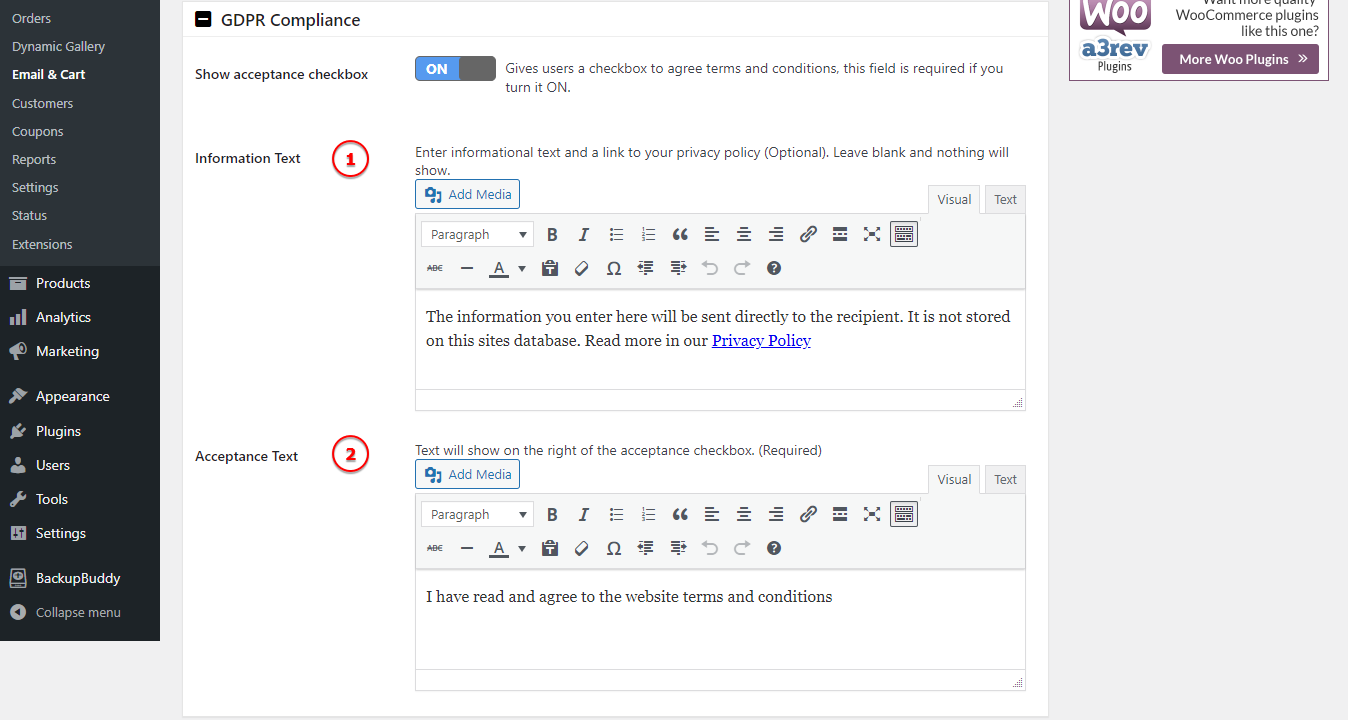
Image Legend:
1. Information Text – Enter informational text and a link to your privacy policy (Optional). Leave blank and nothing will show.
2. Acceptance Text – Text will show on the right of the acceptance checkbox. (Required).
Form Background Colour
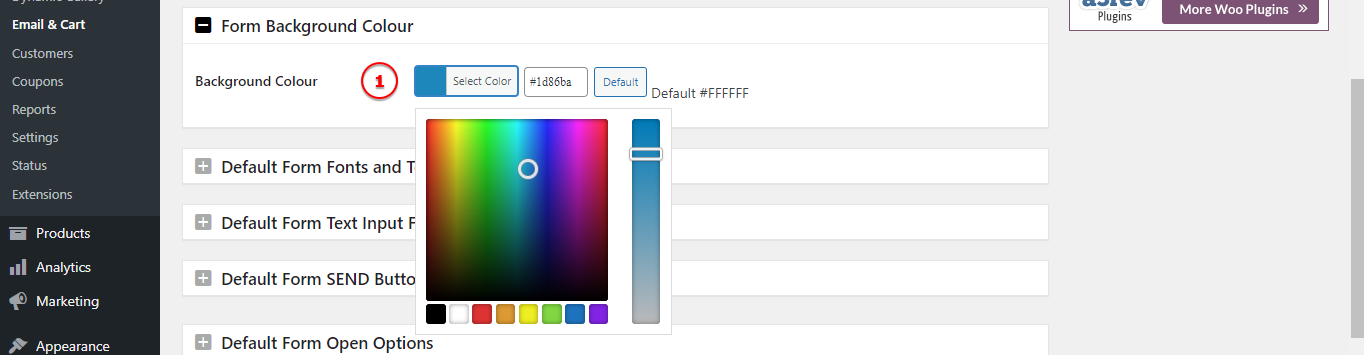
Image Legend:
1. Background Colour – Select a background colour for the form.

Default Form Fonts and Text
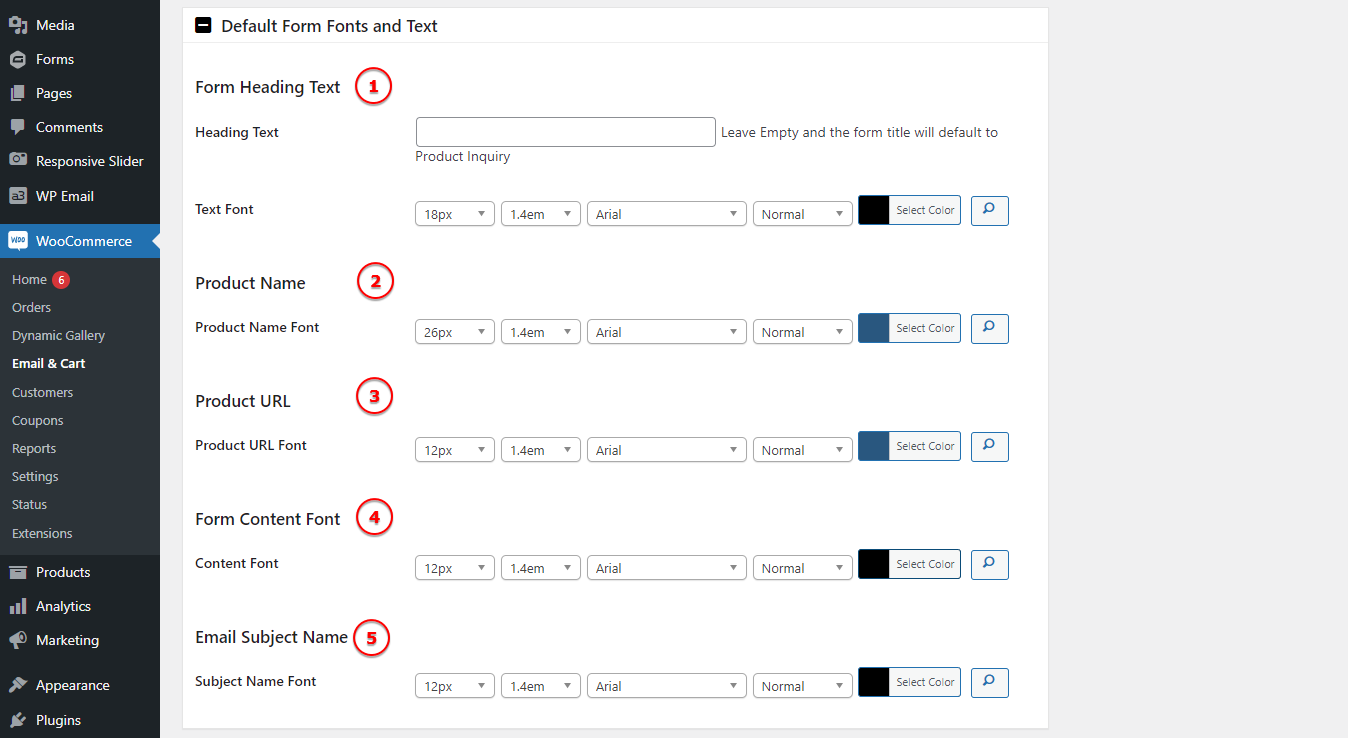
Image Legend:
Choose custom fonts for the next sections of the form:
1. Form Heading Text
2. Product Name
3. Product URL
4. Form Content Font
5. Email Subject Name
Default Form Text Input Fileds
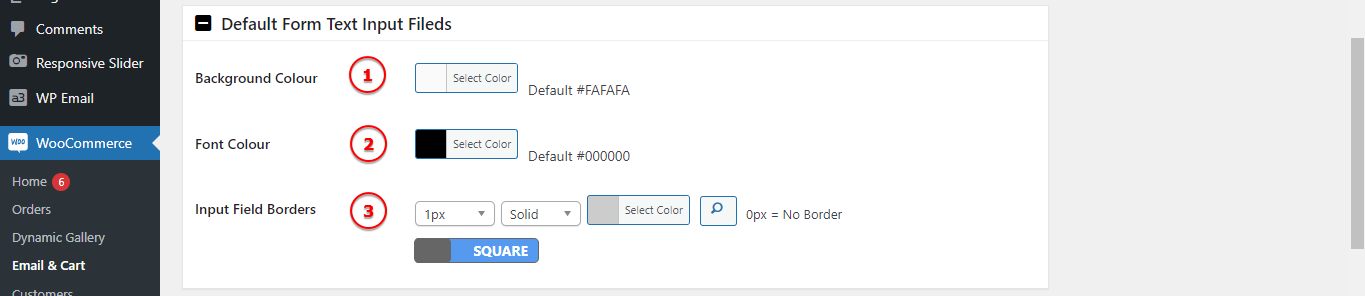
Image Legend:
1. Background Colour – Select the background colour for the input fields.
2. Font Colour – Choose a font colour for the form text.
3. Input Field Borders – Add a custom border colour, size and type for the input fields.
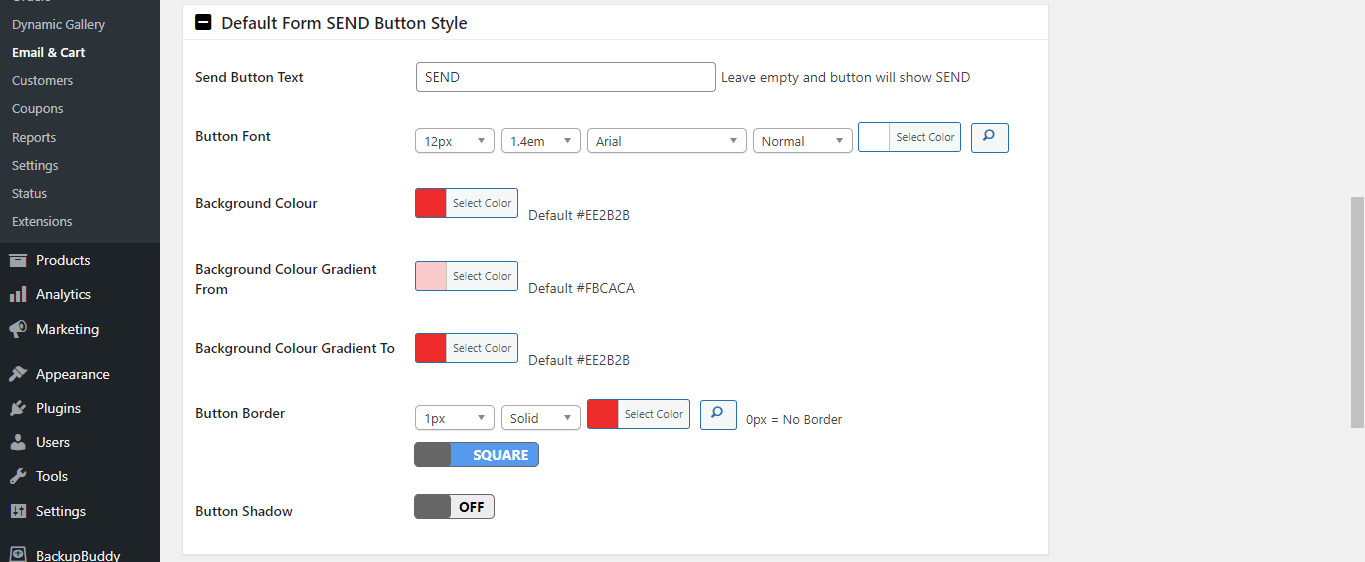
Default Form SEND Button Style
Style the forum default button. Change the default text, add a custom font, change the background colour, add a border or a shadow for the button container.
Default Form Open Options

Image Legend:
1. Product Page – Open contact form by Pop-up.
2. Form opens by ajax under the inquiry button – Open contact form on page.
3. Product Card – Email Inquiry Form opens by pop up when the feature is activated on product cards.
Default Form Success Message
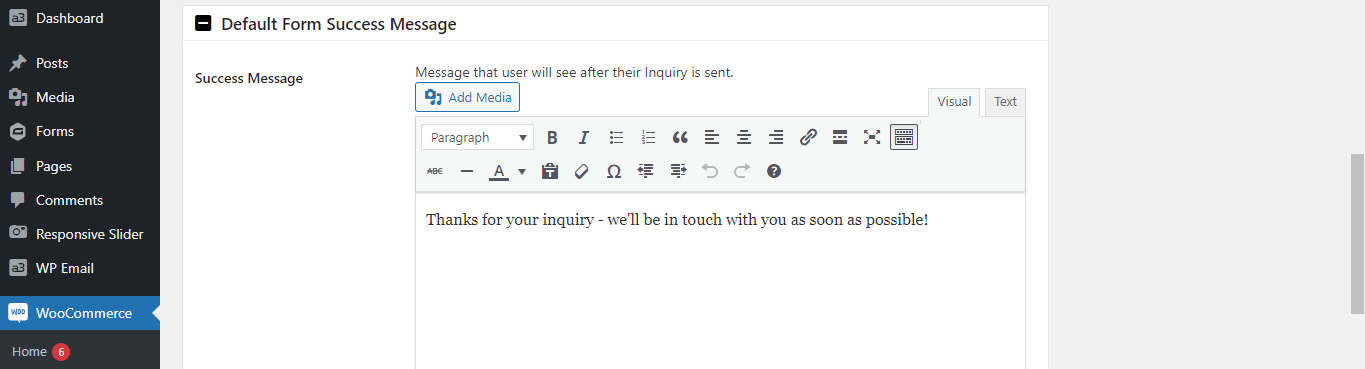
Image Legend:
Success Message – Message that user will see after their Inquiry is sent.
Email Inquiry Global Reset

Image Legend:
Email Inquiry Global Reset – Switch ON and Save changes to update all Products email inquiry settings back to the Global settings created on this page.Important Clear your cache after so that visitors see changes.
Create form by Shortcode
Create a contact form that applies to all Products by adding a form shortcode from the Contact Form 7 or Gravity Forms plugins.

Image Legend:
1. Enter Global Form Shortcode – Can add unique form shortcode on each product page.
Button / Hyperlink Shortcode
Shortcode description goes here
Email Inquiry Page Shortcode
A ‘Email Inquiry’ page with the shortcode [wc_email_inquiry_page] inserted should have been auto created on install. If not you need to manually create a new page and add the shortcode. Then set that page below so the plugin knows where to find it.

Image Legend:
Email Inquiry Page – Page contents: [wc_email_inquiry_page]
Form Header Message

Image Legend:
1. Header Meassage – Empty and no message will show at the top of the form.
2. Message Font – Set a custom font for the header text.
Form Open Options
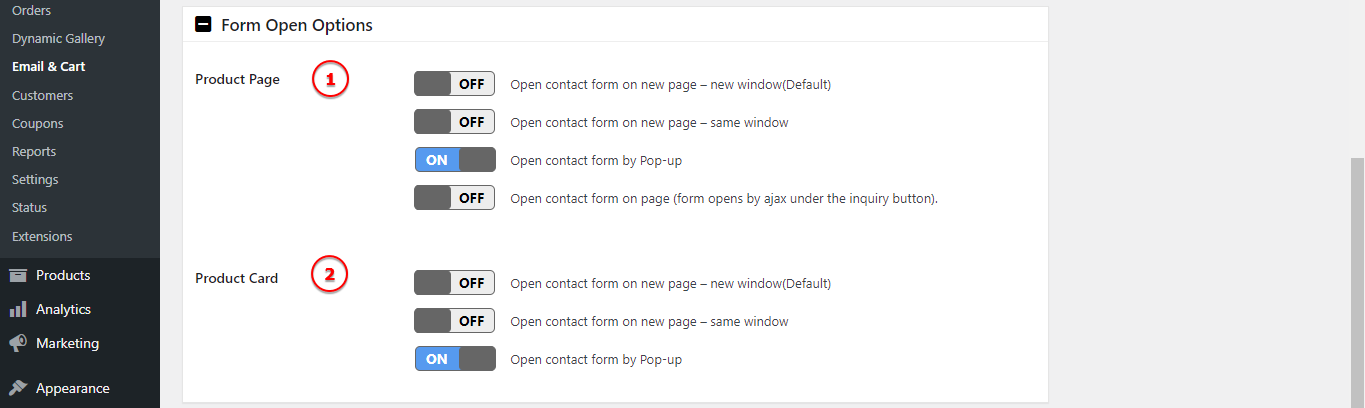
Image Legend:
1. Product Page – Will have 4 option to choose how the forum will open from product page: Open contact form on new page – new window(Default), Open contact form on new page – same window, Open contact form by Pop-up, Open contact form on page (form opens by ajax under the inquiry button).
2. Product Card – Will have 3 option to choose how the forum will open from product page: Open contact form on new page – new window(Default), Open contact form on new page – same window, Open contact form by Pop-up.
Email Inquiry Global Reset

Image Legend:
Reset All Products – Switch ON and Save changes to update all Products email inquiry settings back to the Global settings created on this page.Important Clear your cache after so that visitors see changes.
Inquiry Button Style
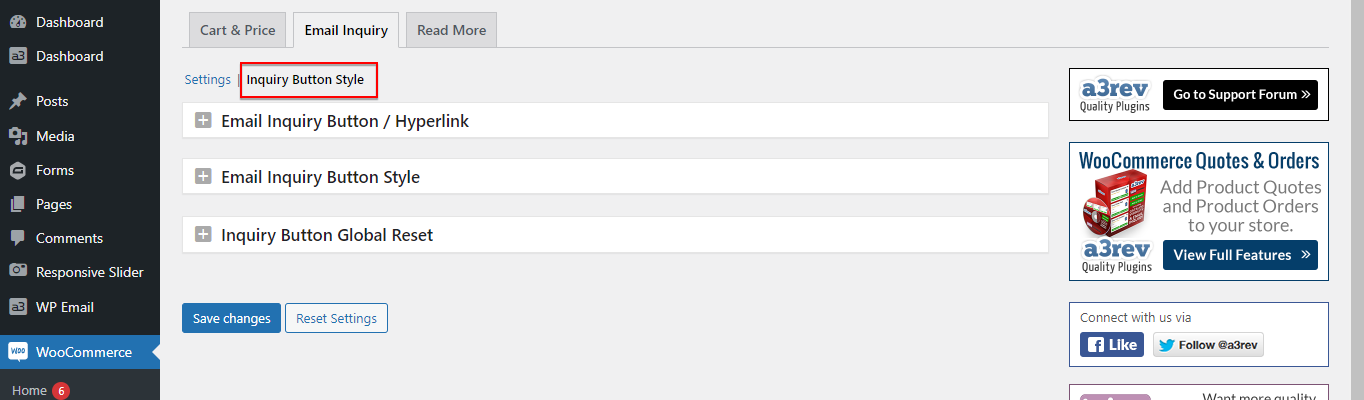
Image Legend:
Customize the button for the Inquiry. Choose from Button or Hyperlink Text, Position relative to add to cart button location, add Margin, style the font and the button colour.
Read More
Creates Read More button or linked text on Product Cards that links through to the product page. Option to independently set these options from each products edit page.
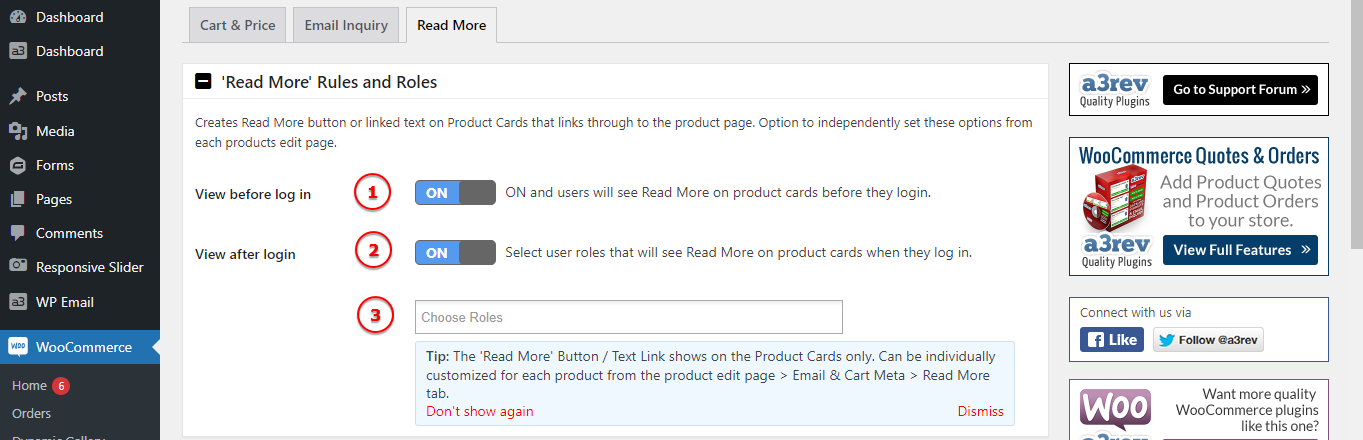
Image Legend:
1. View before log in – ON and users will see Read More on product cards before they login.
2. View after login – Select user roles that will see Read More on product cards when they log in.
3. Tip: The ‘Read More’ Button / Text Link shows on the Product Cards only. Can be individually customized for each product from the product edit page > Email & Cart Meta > Read More tab.
Set Display Type
Show Read More Button as:

Image Legend:
1. Button that shows on mouse hover on product image.
2. Show as button or link text above or below the Add to Cart button position.
Troubleshooting
This section deals with all know issues that users have or have had and the fixes for those.
The Email Inquiry Button does not show.
See the Global Store Visibility Settings section 3
3. Apply to Logged in Users – *Tip – if you do not select this remember that you will have to log out of the site to see any setting you have made. If you don’t you won’t see them and you’ll think the plugin is not working.
If that is not the issue – in other words you have Apply to logged in users checked then try changing the position of the button as some themes may block the button from showing in the default position which is below where the ‘add to cart’ is or would be. From the Global Visibility Settings section:
5. Relative Position – The relative position is relative to to the add to cart button position. Default is below. Choices are ‘above’ or ‘below’.
If that still does not solve the issue you have a conflict with the theme you are using. This can happen on some bespoke themes and the WooCommerce Email Inquiry & Cart Options plugin is coded to WordPress and WooCommerce codex and as such works on any Wootheme but some bespoke theme devs don’t always follow the codex.