Navigation
Getting Started
a3 BlockPress Post Blocks is a collection of blocks made to displaying content dynamically and allow you to build layouts using blocks. You can display dynamic lists of posts, products, pages or custom post types from elsewhere on your site. Because the lists you create are dynamic, they update automatically as you add, edit, or remove content from your site. Each block have individual settings.
Where to use them ?
- Show recent posts / products on your homepage
- Show posts / products with same category or tag
- Show content from custom post types
- Create templates for the post / products cards
You can use these blocks individually or nested together inside a query loop and a post template. In our demonstration will create a new loop of posts and style the cards.
Why to use a3 BlockPress Blocks Post Collection ?
Our blocks comes with more option and settings than the core ones. a3 team is working daily on update them and create new features and blocks to add in our collection.
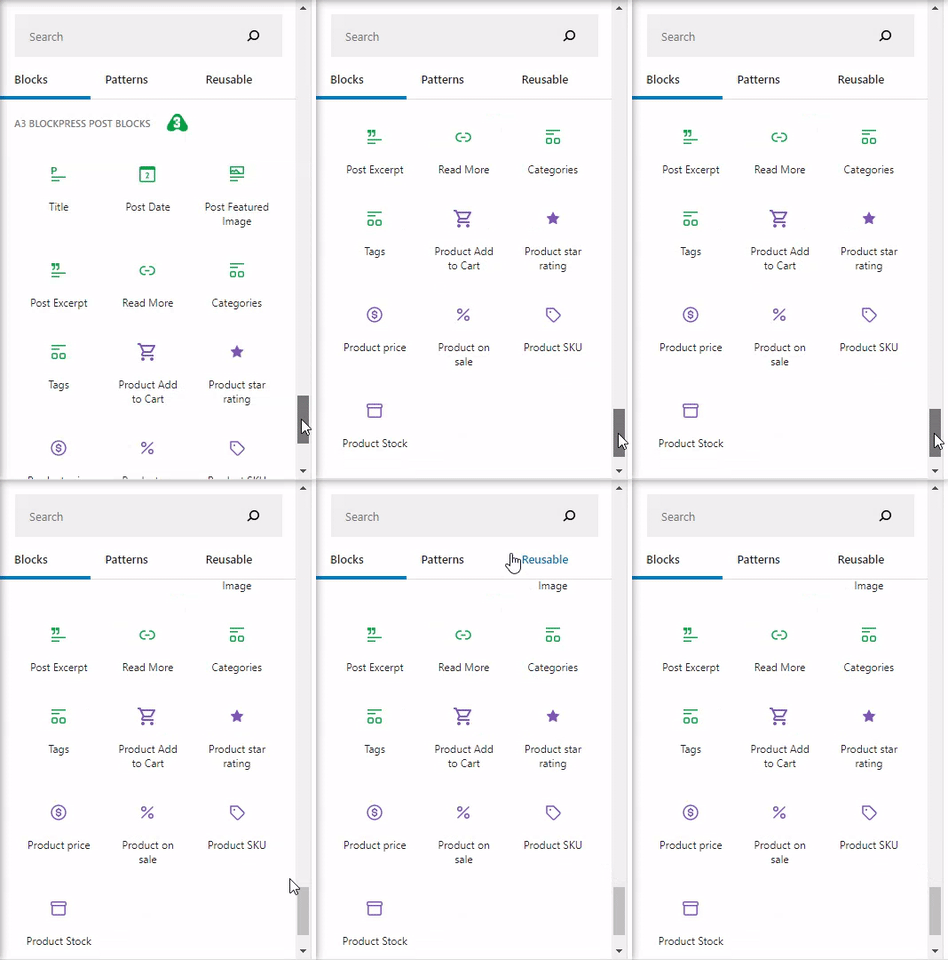
Post Blocks Collection:
- a3 Post Template
- a3 Post Feature Image
- a3 Post Title
- a3 Post Date
- a3 Post Excerpt
- a3 Read More
- a3 Post Categories
- a3 Post Tags
- a3 Product Add to Cart
- a3 Product Sku
- a3 Product Stock
- a3 Product Star Rating
- a3 Product Price
- a3 Product on Sale
Display Posts
In order to display posts will need the Query Loop Block and Post Template. In our demo will gonna display the latest posts into the body of a page. If you are using Full Site Editor can create/modify the templates for archive posts, products archive or products category’s in the same way.
Steps:
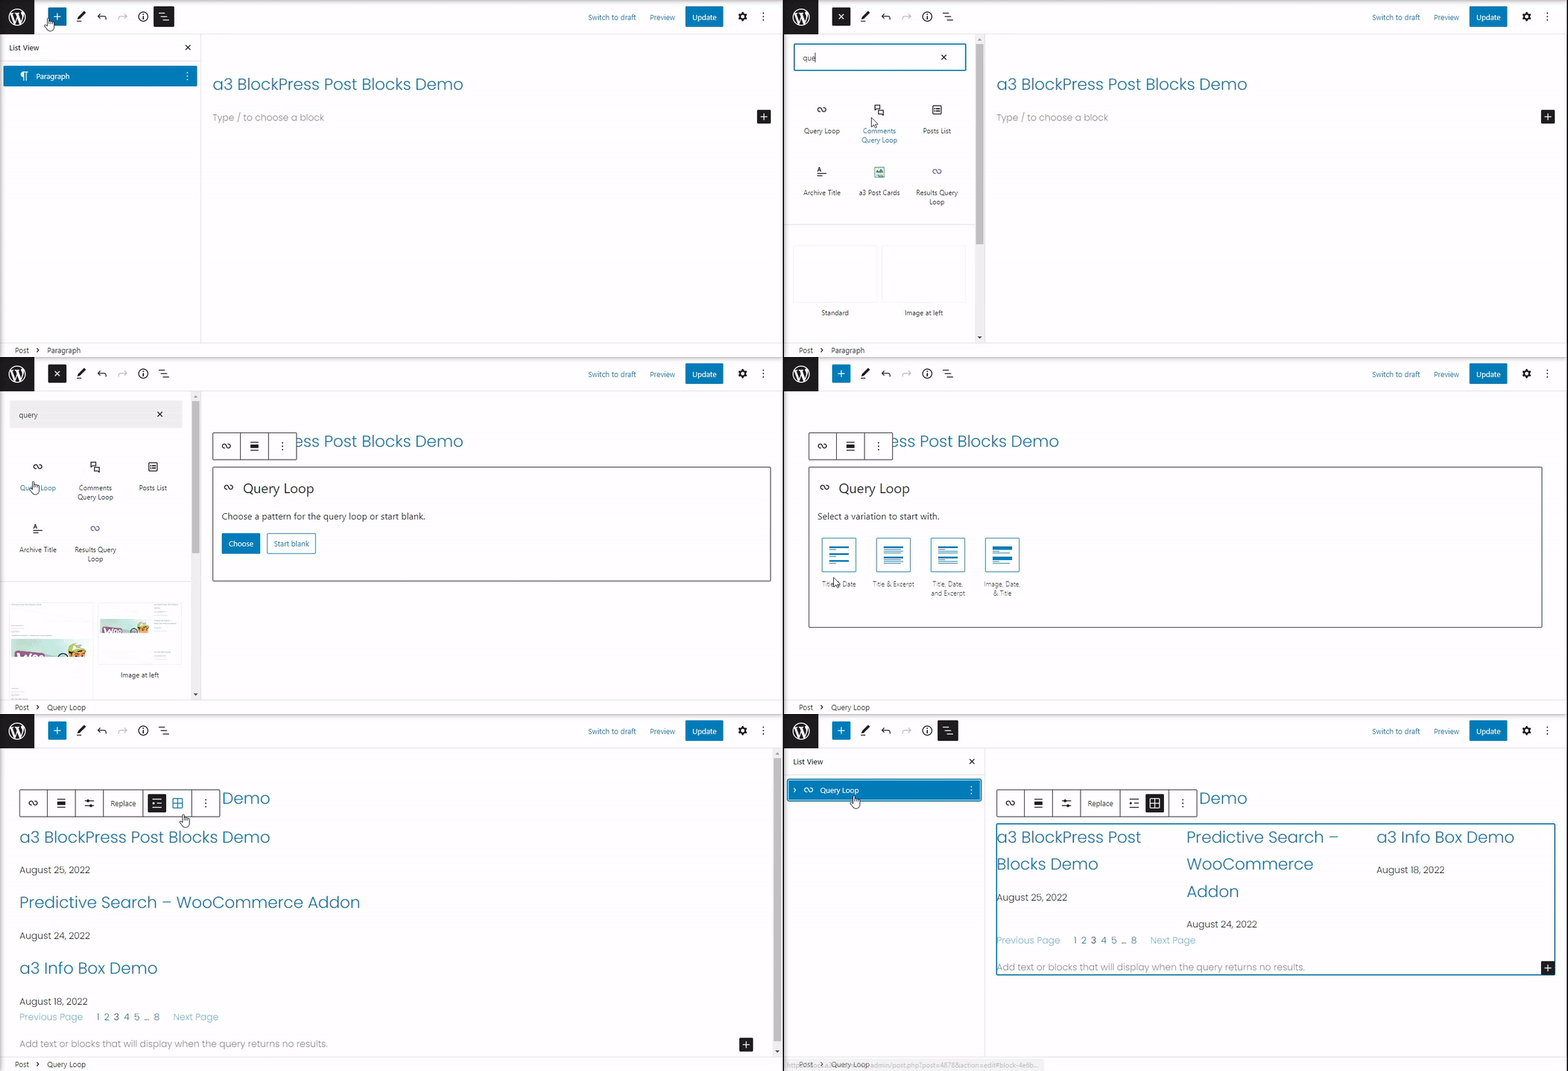
- Step – First thing is to add the Query Loop core block and choose a pattern for the query loop or start blank.
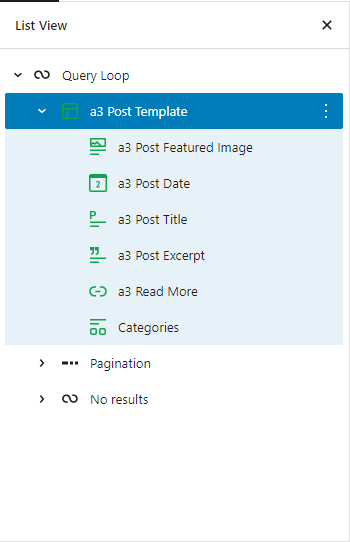
2. Step – Next we will add the a3 Post Template (in order to find it on block list you need to make sure you select one of the blocks nested inside the Query Loop). Then remove from Query Loop block tree the core Post template.
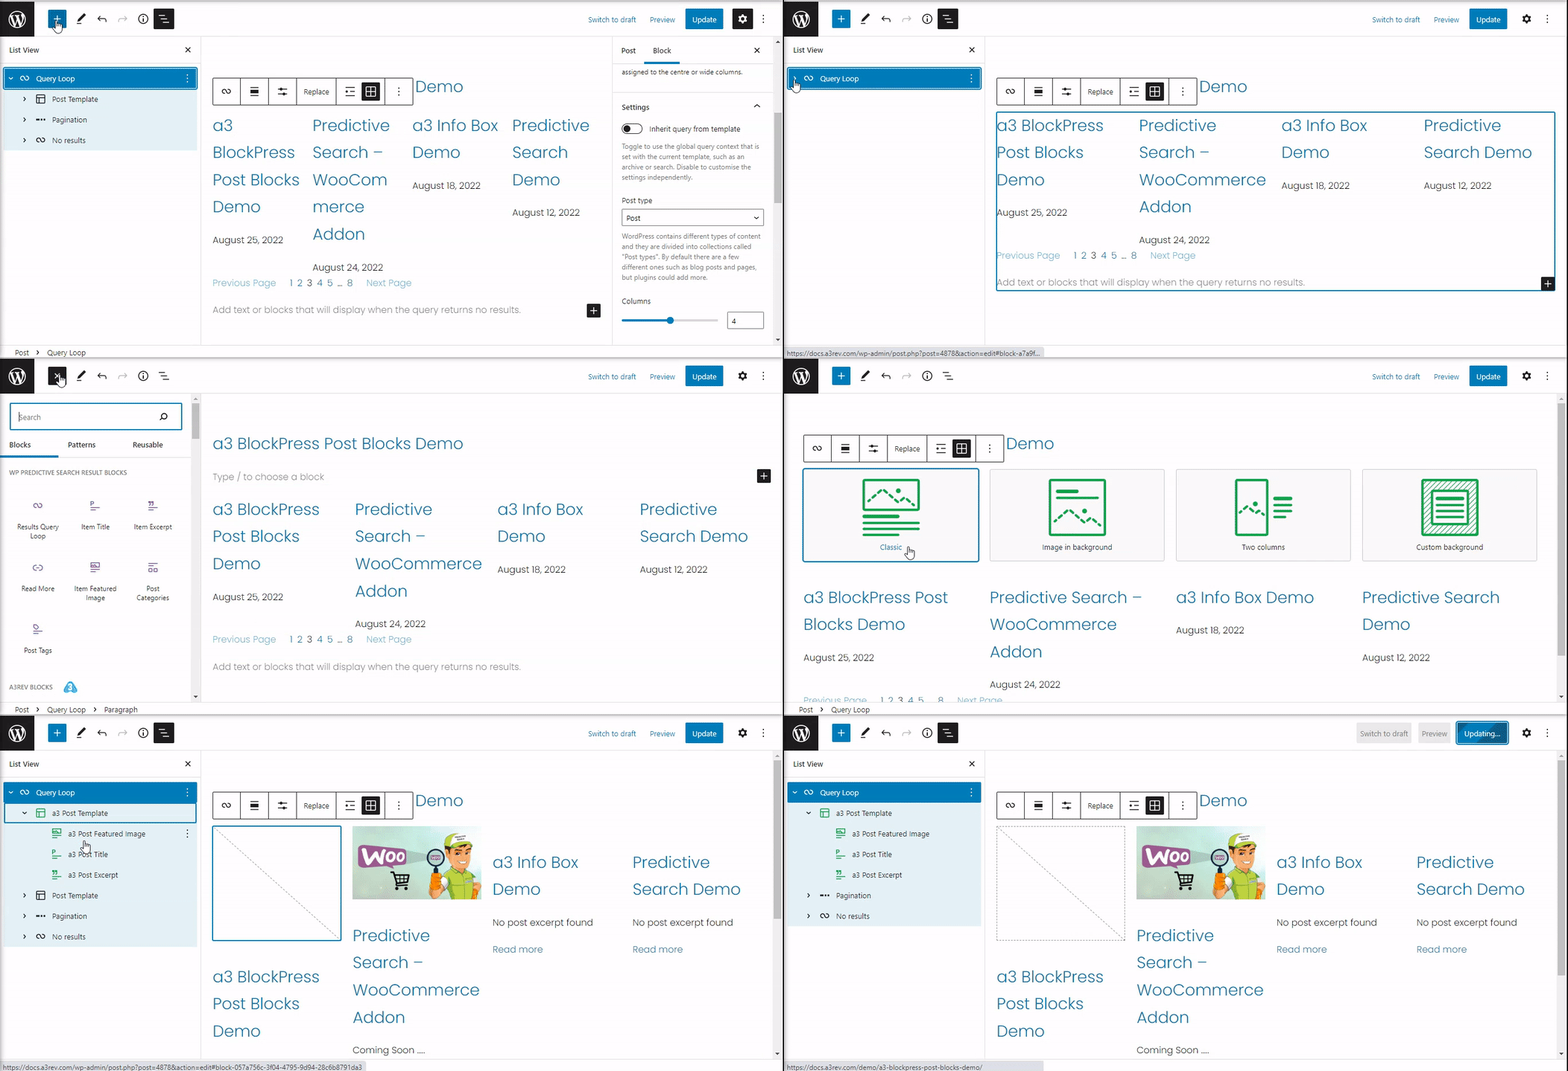
3. Step – Add, remove or order the blocks inside the a3 Post Template tree.
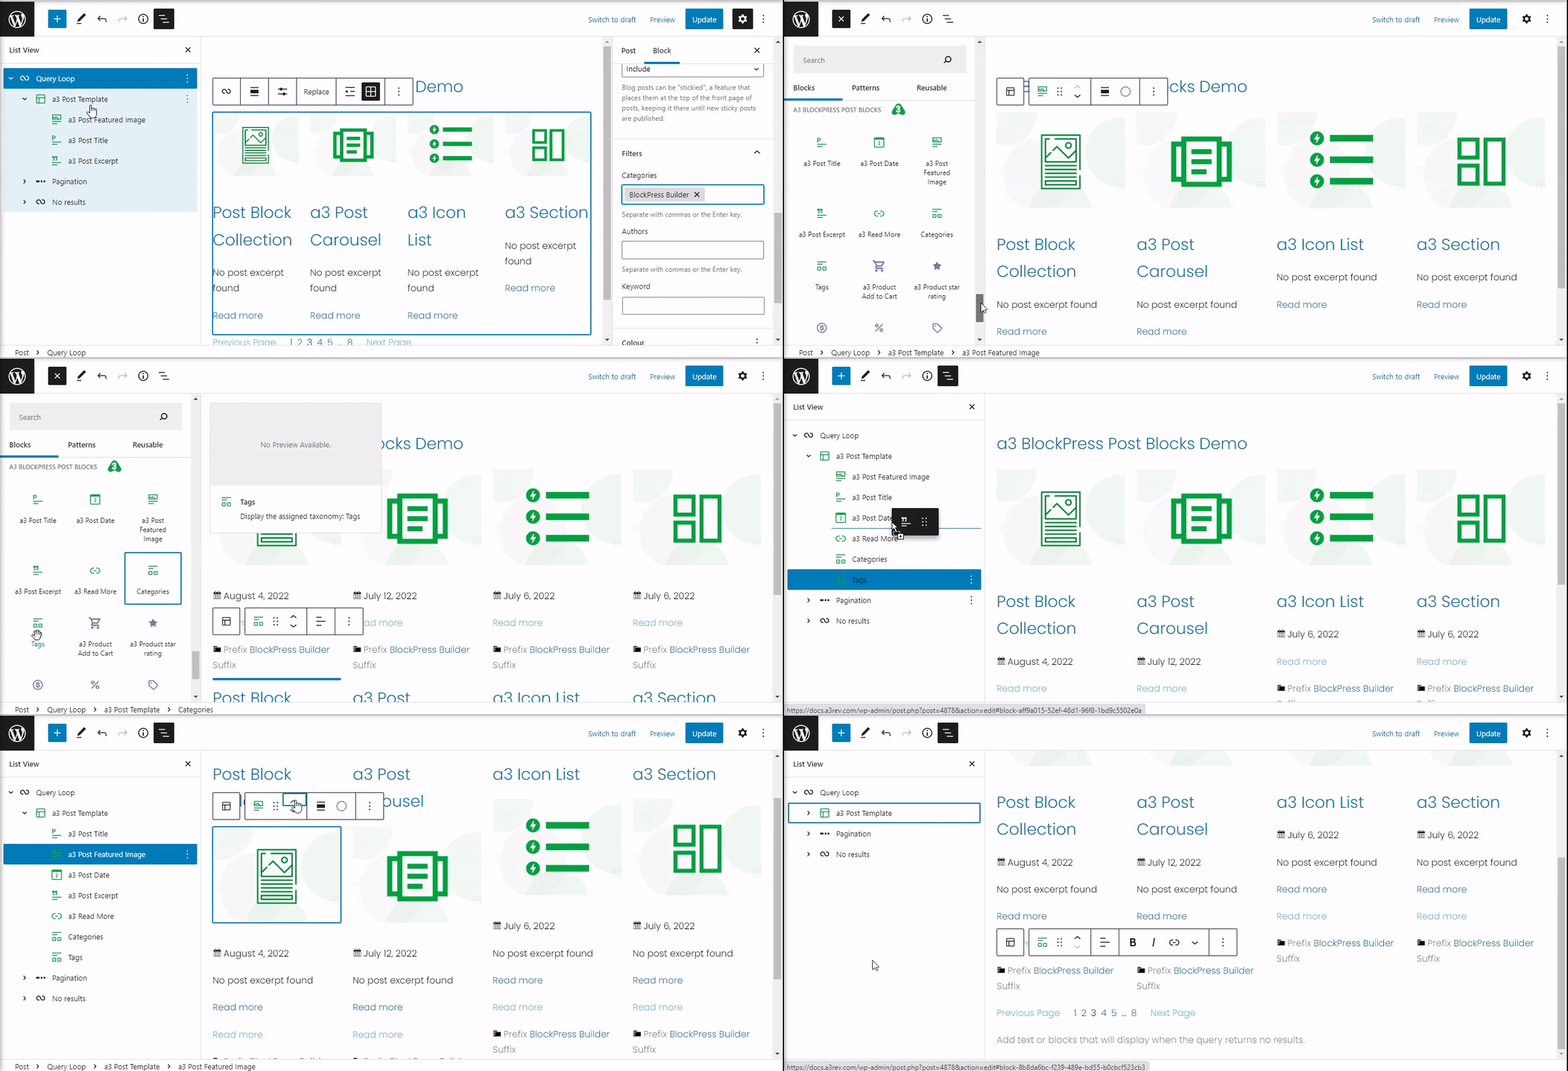
a3 Post Blocks vs. Core Post Blocks
Why to use our blocks instead of core one ? Well our blocks have more settings and options than the core ones. We keep them update and we are open to any suggestion to enhance them.
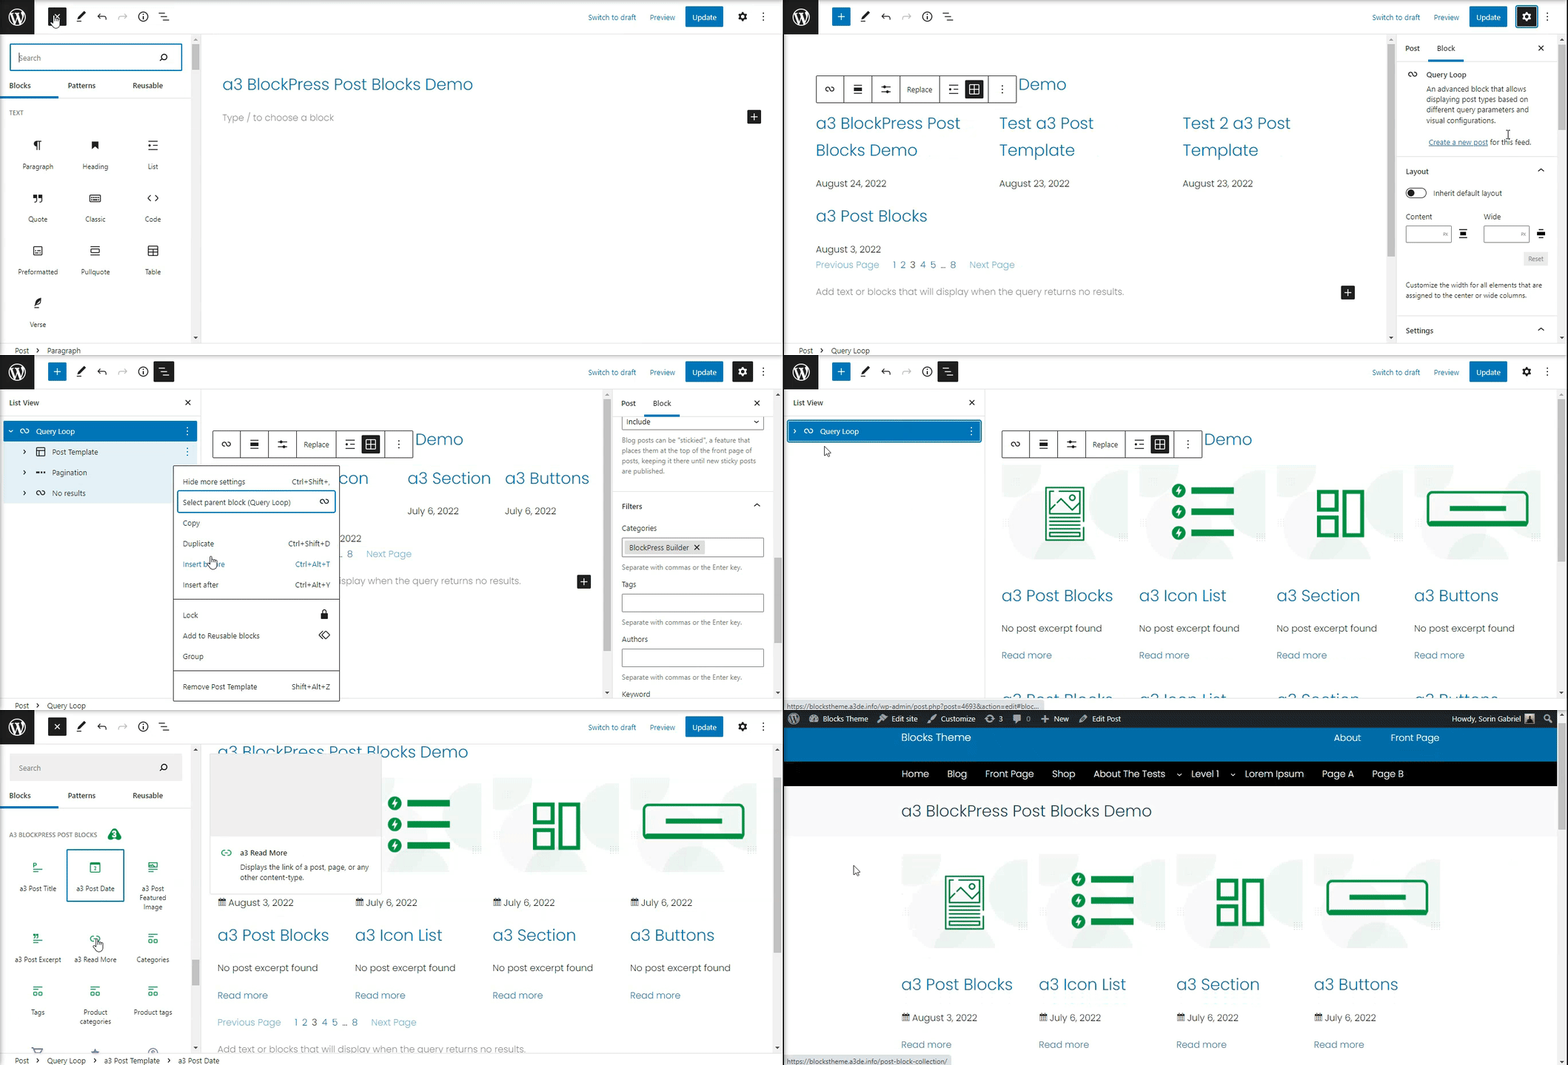
Query Loop Block
The purpose of the new Query Loop block is to load content from the database and display it as a list of items. Query Loop displays posts or products from any post type on your site, including custom post types.
To use the Query Loop block, simply add the block to the page or post where you want the list to appear. Query Loop block acts as a container into which you insert blocks. Because of this, the List view panel on the left shows you the tree with blocks nested inside the Query Loop block.
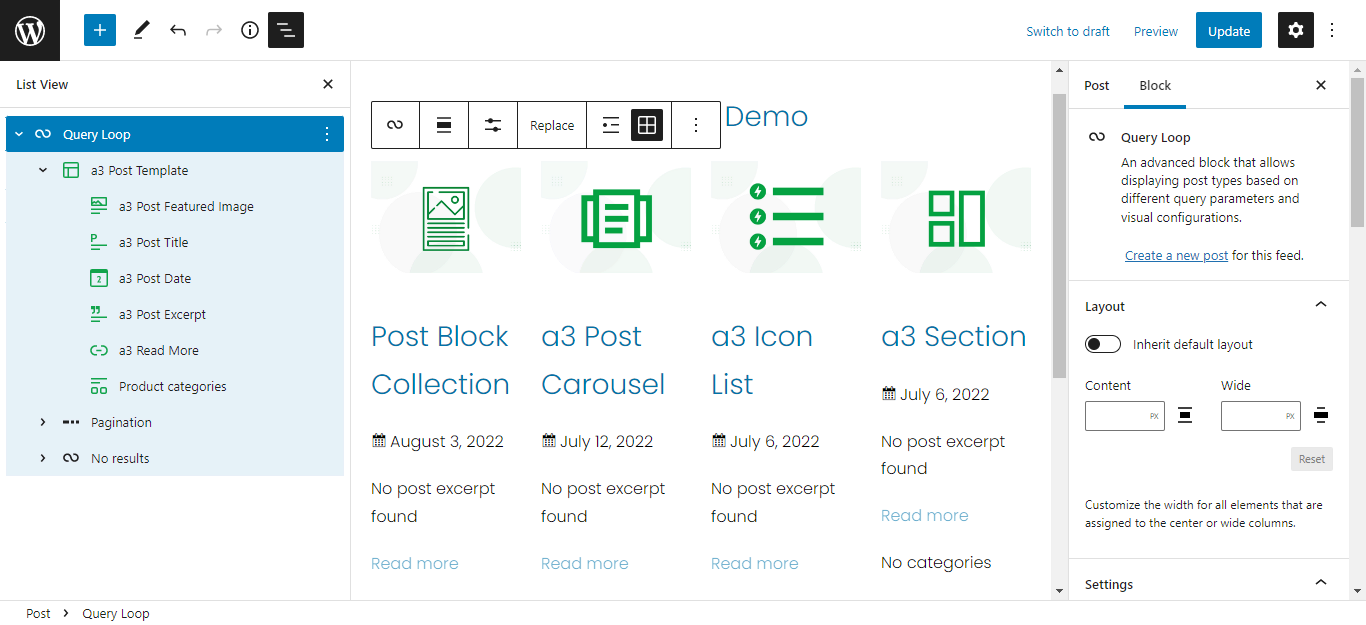
As you can see, there is a special block called a3 Post Template. It is nested just under the Query Loop block. In essence, the Query Loop block pulls content from the database and the Post Template block handles the output. There are numerous ways to customize the Query Loop block partially because it’s made up of nested blocks that you can rearrange, add to, and more.
When you insert the Query Loop block, it displays the core WordPress Post Blocks by default. First, you select the layout for displaying the posts or click to start designing from scratch.
The Query Loop block settings include ways to further customize what gets displayed. You can also choose how to order the items in your list, add filters to only show certain post and choose to include or exclude sticky posts.
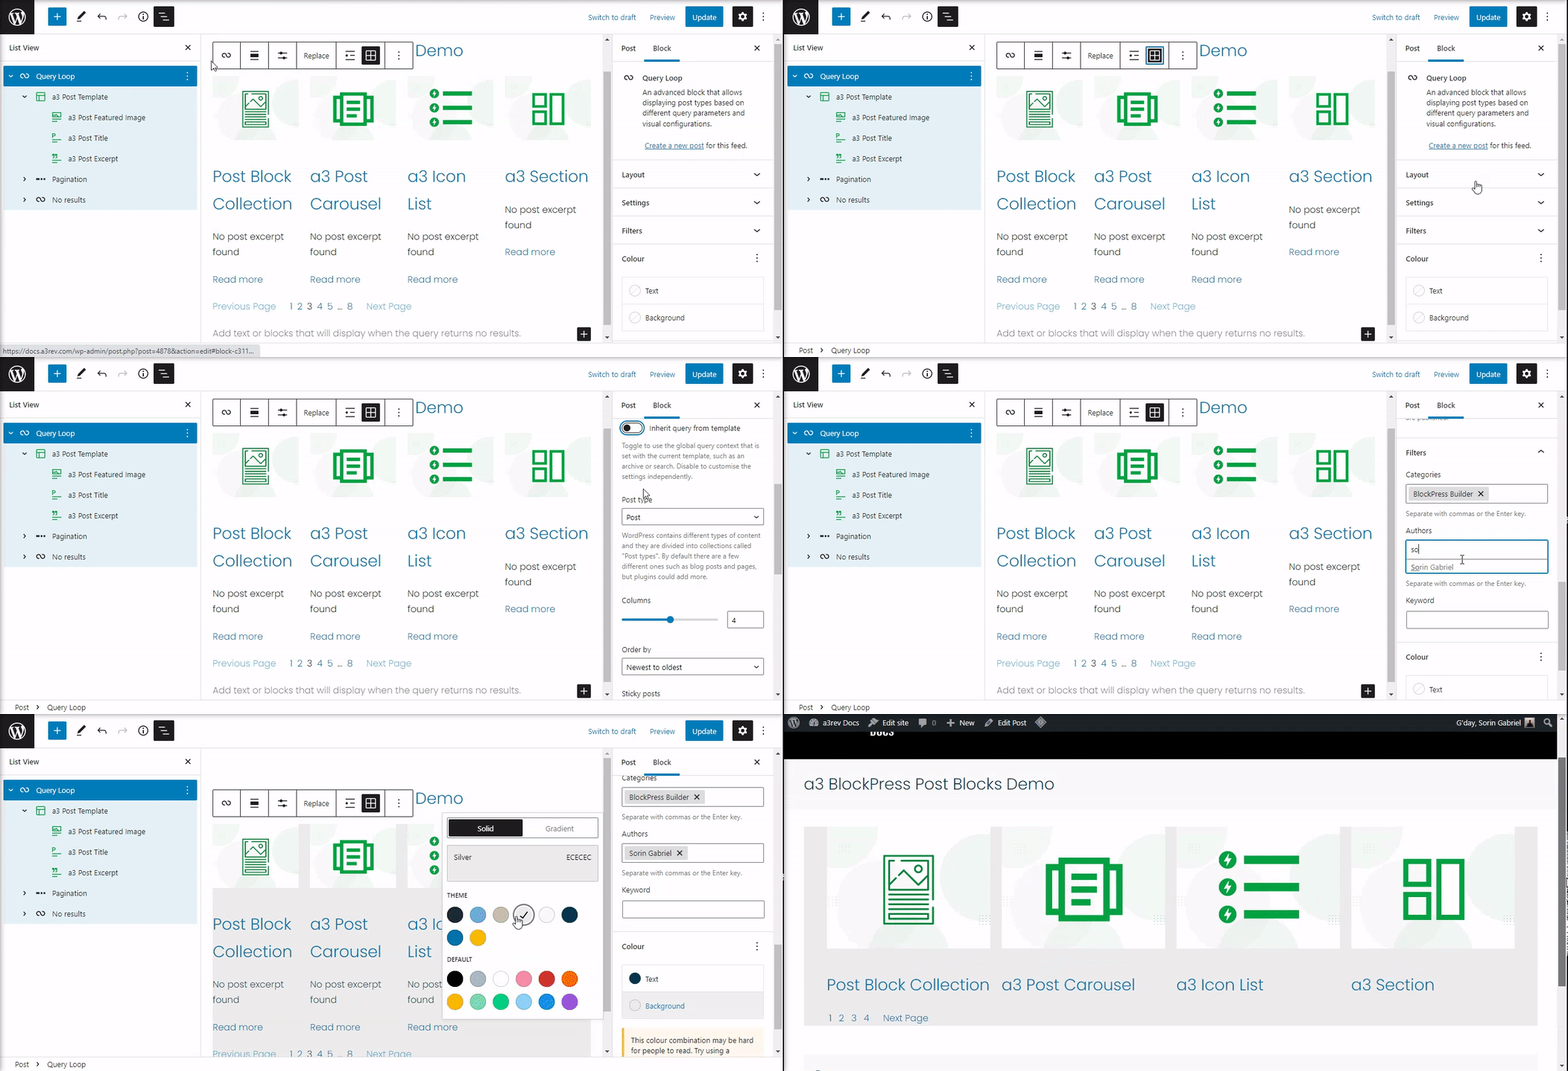
Post Template Block
Directly inside the Query Loop Block is the a3 Post Template Block. Contains the block elements used to render a post, like the title, date, featured image, content, excerpt and more.
A post template is the design that your content uses when you publish it. For example, let’s say you write a post, add a title, upload a featured image, etc. The post template is what controls where the post title displays, where the featured image is (above or below the post title), where the main content displays, where to display the author name and so on.
Post Featured Image Block
The a3 Post Featured Image block allows you to display the featured image of a post or product. It is primarily used within a Query Loop block, helping to customize the appearance of query results. This block is now versatile and can be used for both posts and WooCommerce product cards, making it ideal for blogs, product listings, and other dynamic content sections.
Every block has specific options in the editor sidebar.
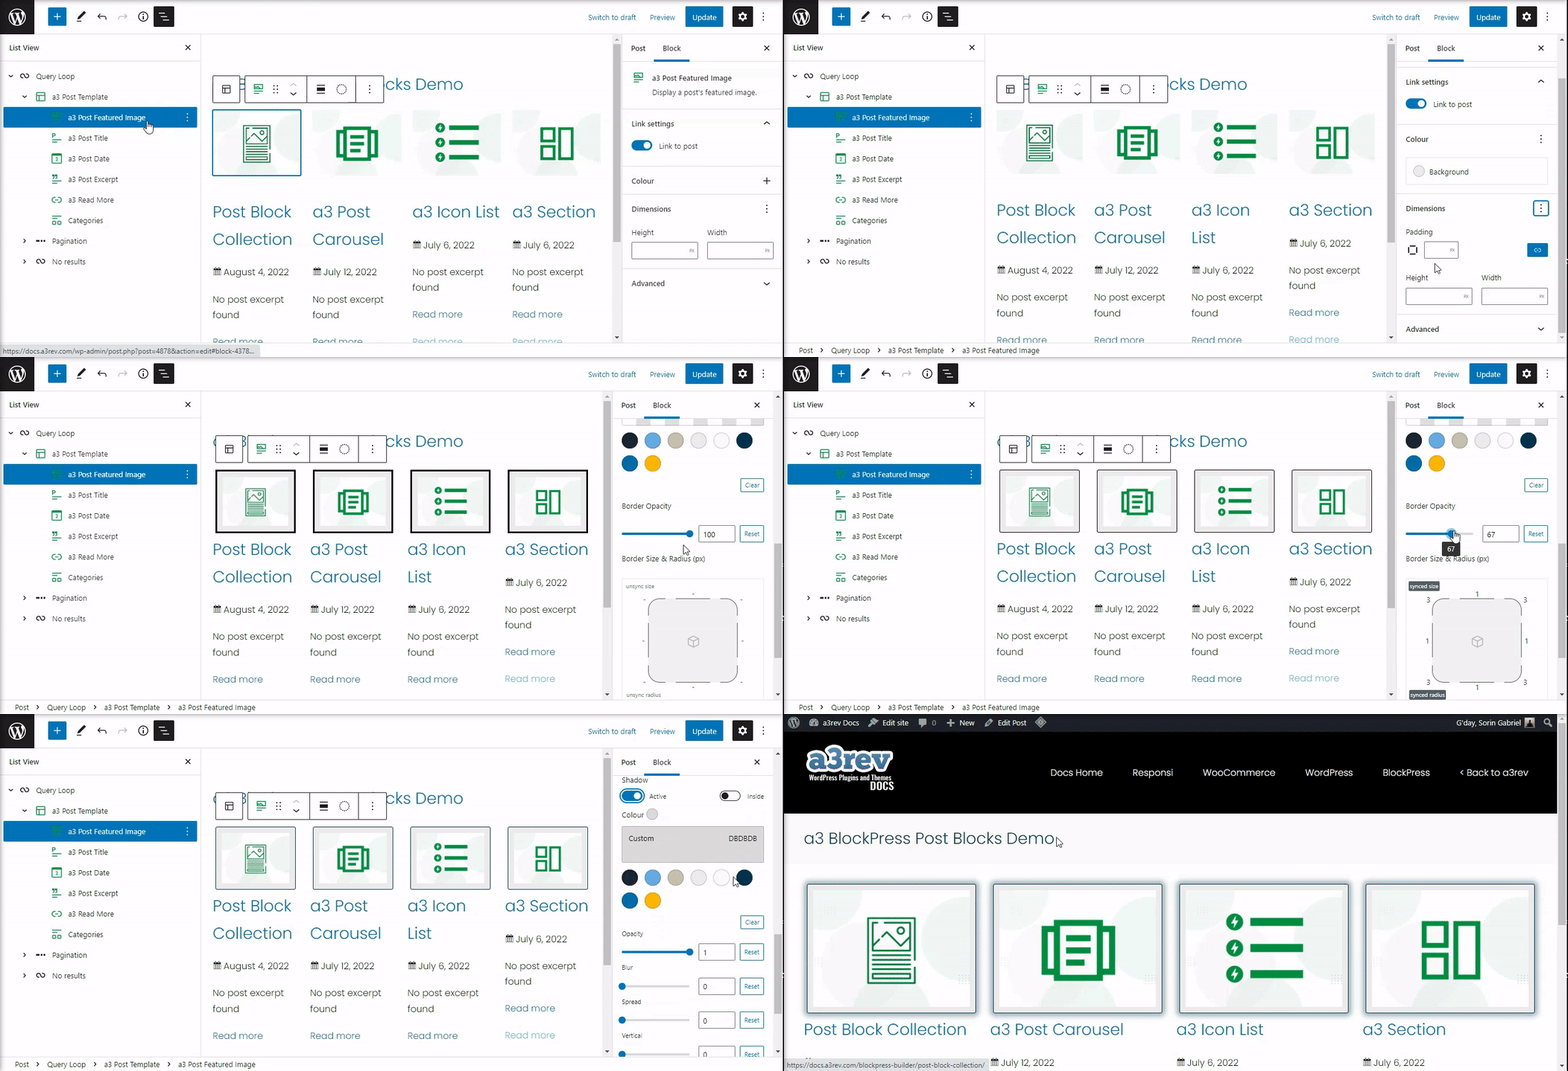
- Link Settings – Turn on the ‘Link to post’ button in the Block Settings to link the featured image to the URL of the post. This enables the website visitor to go to the post by clicking on the Featured image.
- Colour – Add a background color for you image feature container
- Dimension – Click on the ‘+” icon to the right of Dimensions to explore the Dimensions Settings for the block. The settings are for: Padding, Margin, Border, Shadow and Image Size
Custom ‘No Image’ Placeholder
When a post or product does not have a featured image set, the Post Featured Image block would typically leave an empty space. With this new feature, you can upload a custom ‘No Image’ placeholder to display whenever a featured image is missing. This helps maintain a visually consistent layout and prevents gaps in your query loop.
This feature is particularly useful for:
- Custom post types that support featured images.
- Blog posts where a featured image may not always be assigned.
- WooCommerce product listings to avoid empty image slots in product cards.
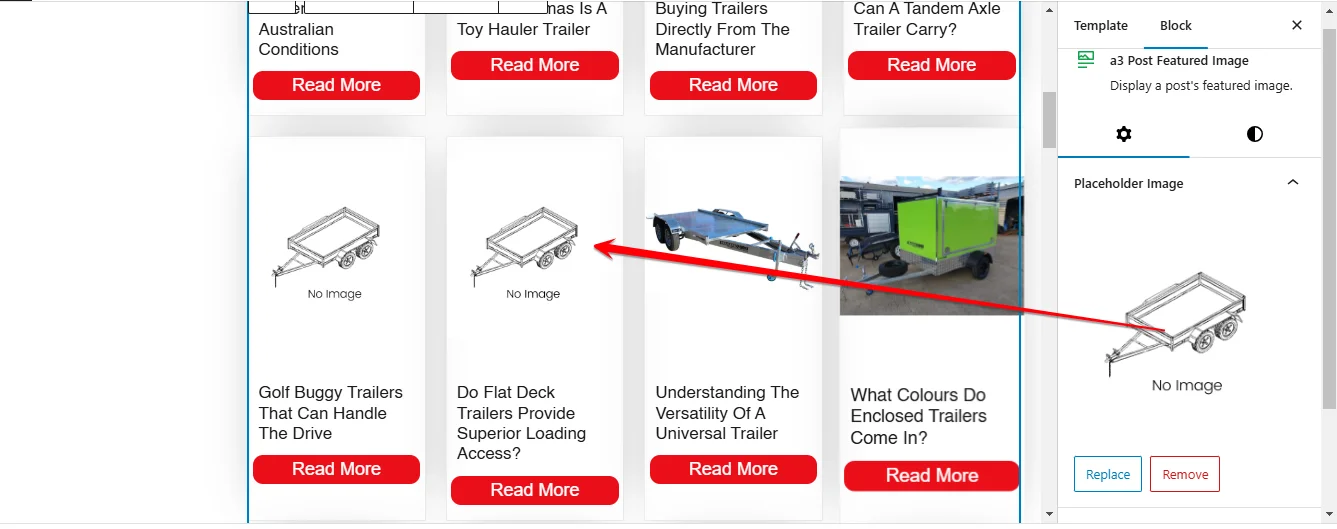
This feature is especially useful for blogs, news sites, or any content-heavy websites where posts might not always include a featured image. Instead of displaying a blank space or breaking the layout, you can set a default placeholder that aligns with your website’s branding or design.
How to Set a Custom ‘No Image’ Placeholder
- Select the Post Featured Image block within your query loop.
- Open the Block Settings in the editor sidebar.
- Locate the ‘No Image’ Placeholder option.
- Click Upload Image to select a placeholder image from your media library or upload a new one.
- The selected image will now display for any post or product that does not have a featured image set.
- To change the placeholder image, repeat the process and upload a new one.
Image Size Selection
A new Image Size option has been added, allowing you to select the source image size displayed within the block. This helps optimize performance and layout by choosing the appropriate image resolution.
How to Set Image Size
- Select the Post Featured Image block.
- In the Block Settings, navigate to the Image Size option.
- Choose from available image sizes such as:
- Thumbnail (smallest size, ideal for compact layouts).
- Medium (recommended for blog posts and product listings).
- Large (high-resolution images for full-width displays).
- Full (original image size, may affect performance).
- The selected size will be applied dynamically to match your layout needs.
Post Title Block
Use the a3 Post Title block to display the title of a post or page. This block is primarily nested inside a query loop block and helps to customize the appearance of the query loop.
Every block has specific options in the editor sidebar.
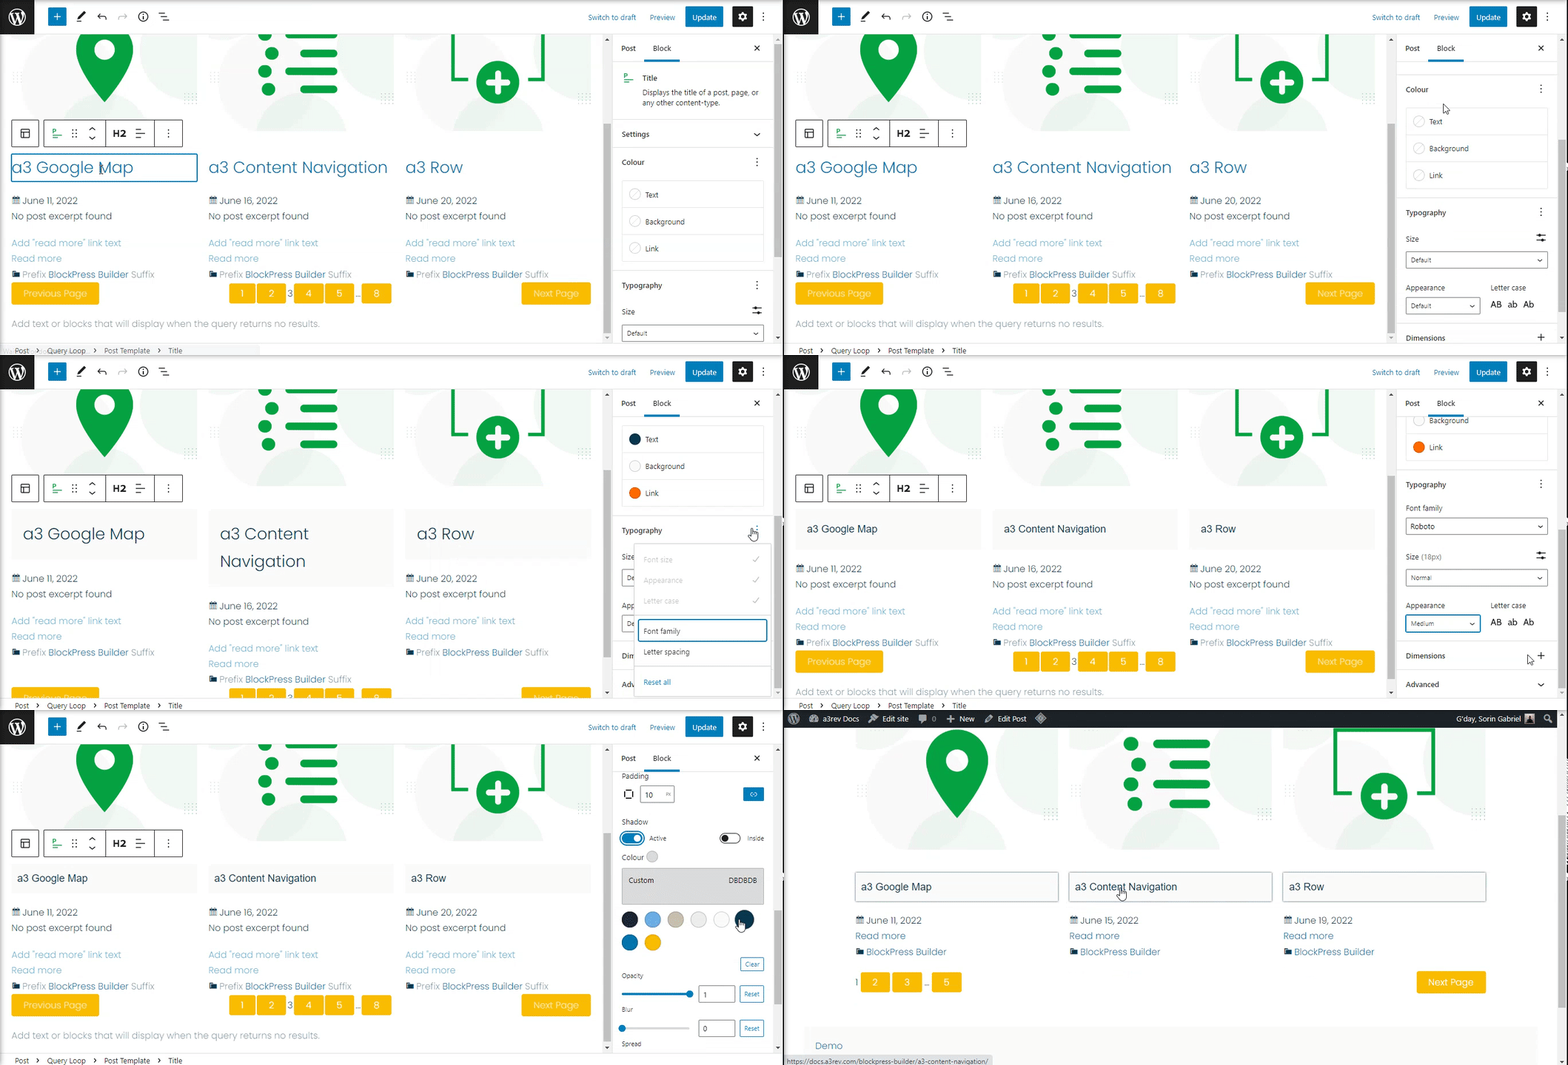
- Make title a link – Turn on ‘Make title a link’ button in the Block Settings to link the post title to the URL of the post. This enables the website visitor to go to the post by clicking on the Post Title.
- Colour – You can customize the text color, background color, and link color for the Post Title block. The color options available will vary based on the theme.
- Typography – On this tab, you can adjust the Font size, Appearance, Letter case, Font family, Line height and Letter-spacing. To access all the typography options click on the + button in the right corner of the Typography tab.
- Dimension – Click on the ‘+” icon to the right of Dimensions to explore the Dimensions Settings for the block. The dimension settings are: Margin, Padding, Border and Shadow.
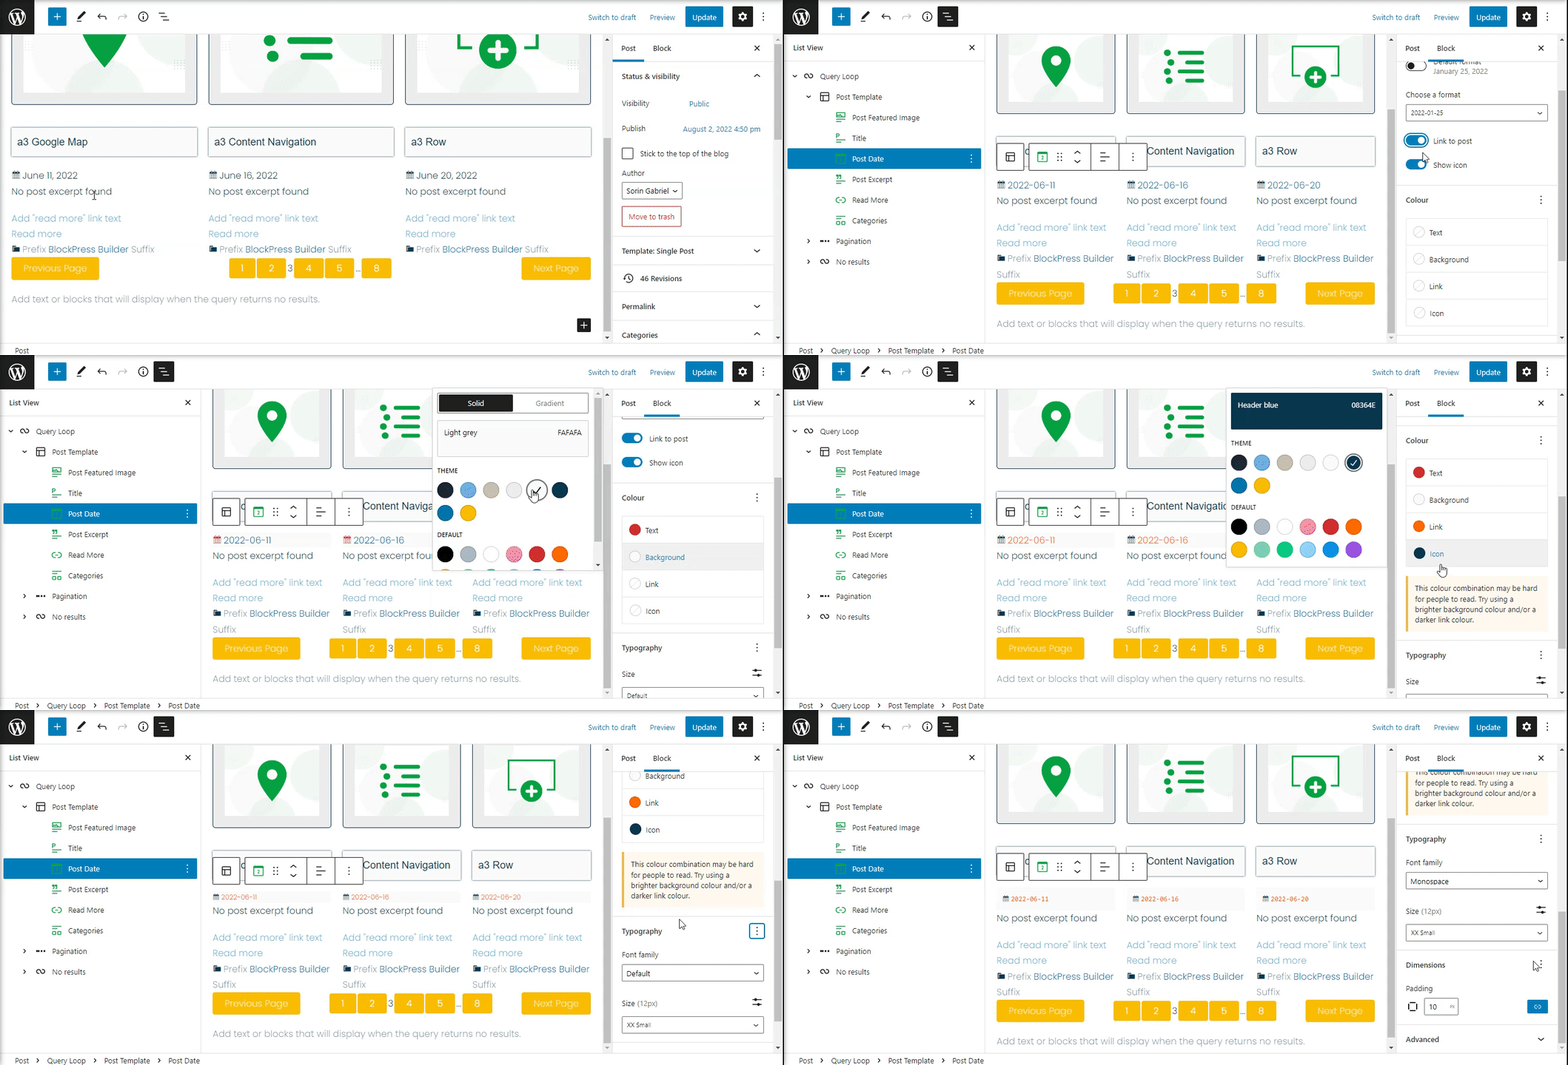
Post Date Block
Use the a3 Post Date block to display the date of the post. This block is primarily nested inside a query loop block and helps to customize the appearance of the query loop.
Every block has specific options in the editor sidebar.
- Settings – On this tab, you can select the format to display the date from the dropdown as shown below or use the default format.
- Link Setting – Turn on the ‘Link to post’ button in the Block Settings to link the post date to the URL of the post. This enables the website visitor to go to the post by clicking on the Post Date.
- Colour – You can customize the text color, background color, and link color for the Post Date block. The color options available will vary based on the theme.
- Typography – On this tab, you can adjust the Font size, Font family, Appearance, Line height, Letter case, and Letter-spacing. To access all the typography options click on the + button in the right corner of the Typography tab.
- Dimension – Add a margin or a padding to the date container
Post Excerpt Block
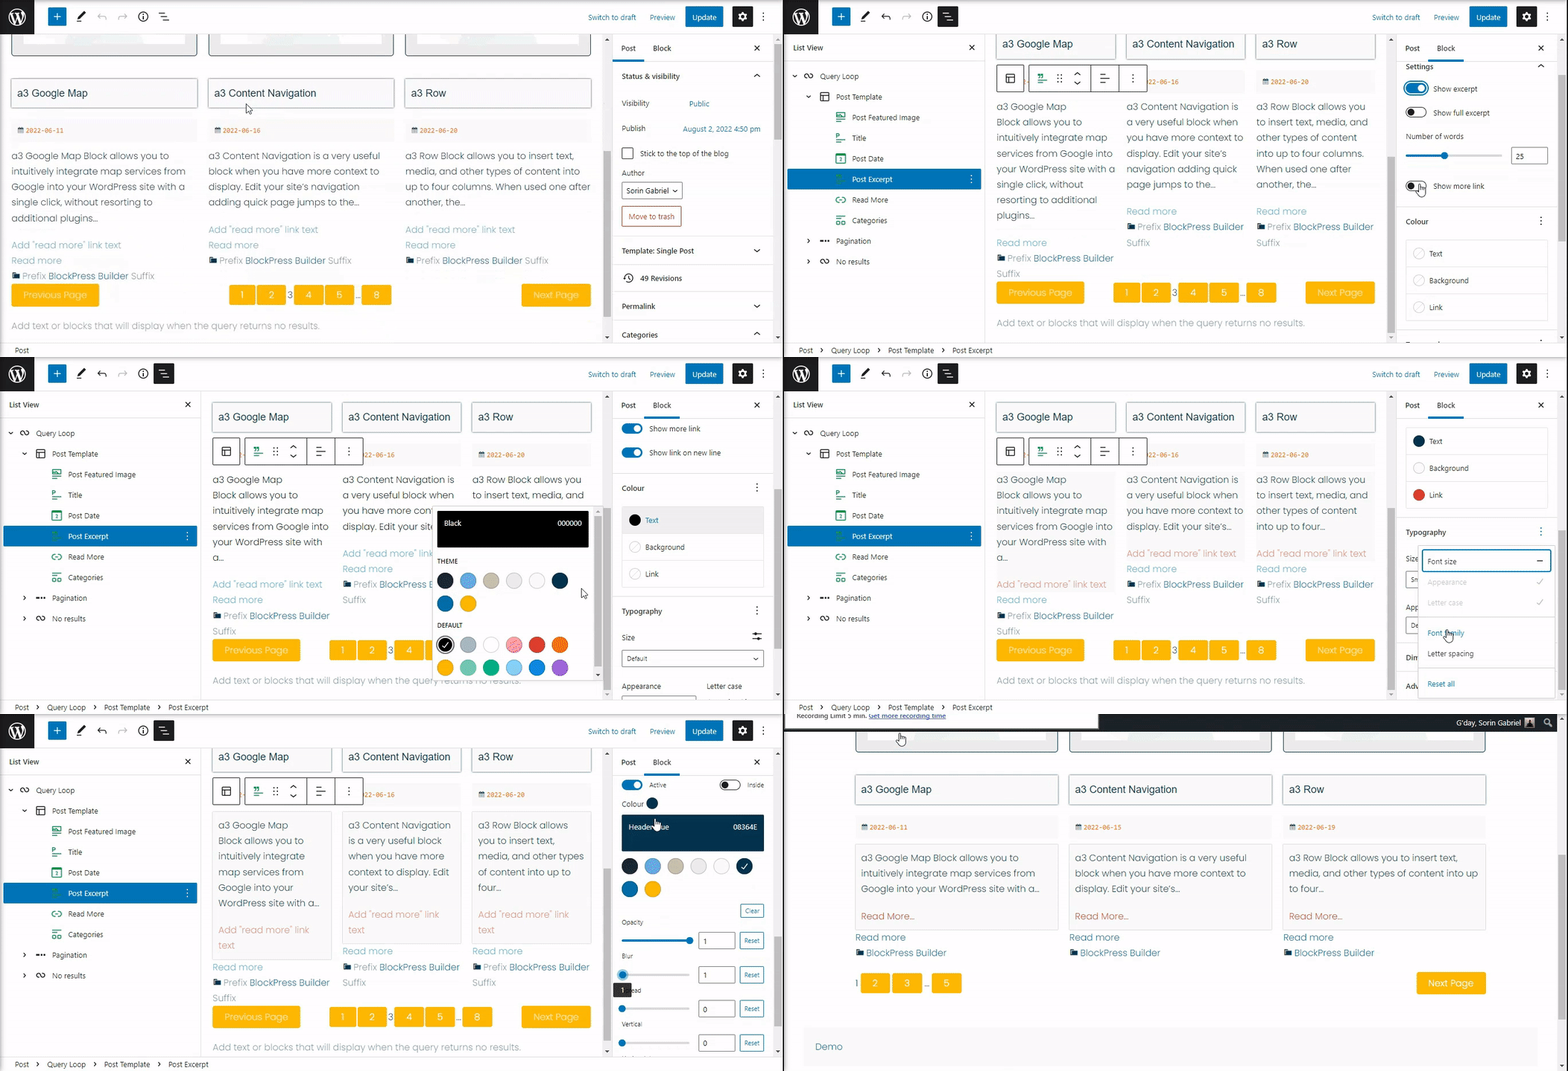
Use the a3 Post Excerpt block to display the excerpt of a post. This block is primarily nested inside a query loop block and helps to customize the appearance of the query loop.
The block has an optional Read More link which will direct the website visitor to the URL of the full post. You can customize this link text to anything you like. The Read More link can be styled independently or be remove and use the Read More block.
Every block has specific options in the editor sidebar. Post Excerpt settings:
- Show Excerpt – Turn On/Off the excerpt from the post card
- Show Full Excerpt – Turn this Off and you will be able to control the number of the words used as excerpt.
- Number of Word – Set up the number of the work will be display as excerpt.
- Show More Link – Turn On/Off the Read More link .
- Show Link on New Line – Turn on ‘Show link on new line’ button in the Block Settings to show the Post Excerpt Read More link on a new line instead of inline next to the excerpt text.
- Colour – You can customize the text color, background color, and link color for the Post Excerpt block. The color options available will vary based on the theme.
- Typhography – On this tab, you can adjust the Font size, Appearance, Line height, Letter case, and Letter-spacing. To access all the typography options click on the + button in the right corner of the Typography tab.
- Dimension – Click on the ‘+” icon to the right of Dimensions to explore the Dimensions Settings for the block.
Read More Block
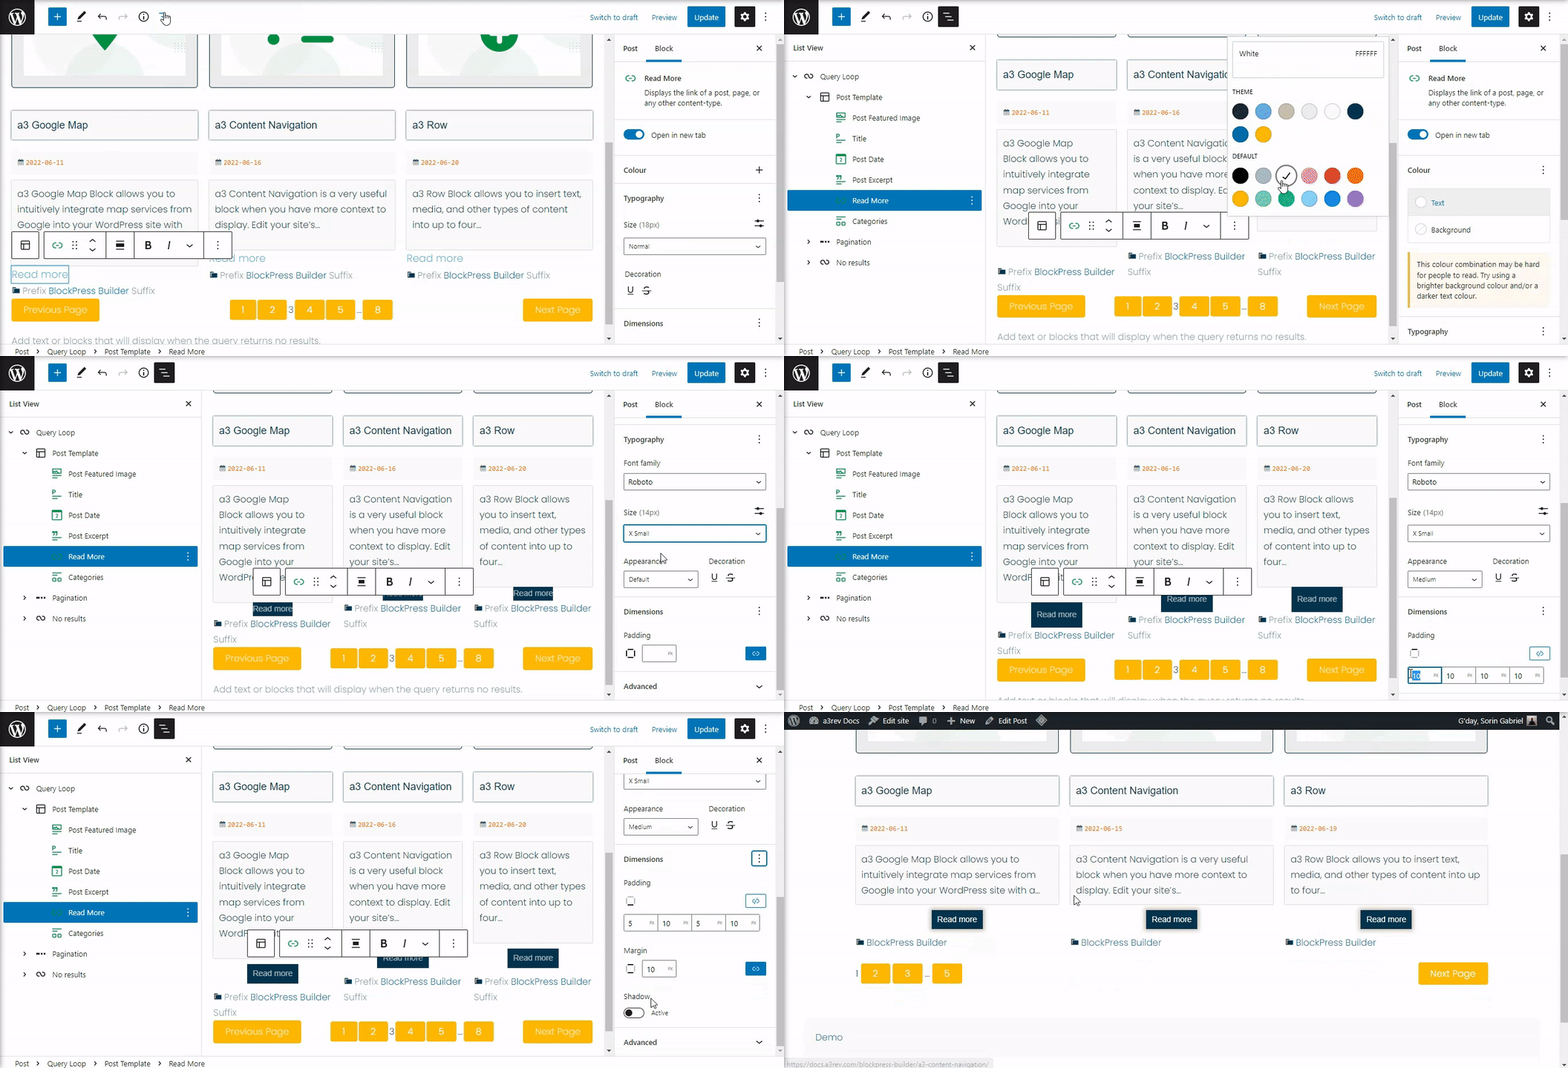
The a3 Read More block allows you to add links in the query loop block that direct visitors to the posts. With this block, you get more flexibility to customize the Read More links and make them look appealing.
Every block has specific options in the editor sidebar. Post Excerpt settings:
- Link Settings – If you enable the Open in new tab option, the link will load the post in a new tab.
- Colour – The Read More block provides options to customize the text and background color. A small pop-up will appear when you click on the text or background option. Choose from the default color or click the upper rectangle area to pick a custom color using the color picker.
- Typography – The Typography settings let you change the font size using the four preset options or the custom size option. You can add more typography options by opening the View options and checking the settings you want to use. These are the available options: Font family, Appearance, Line height, Letter case, Letter spacing
- Dimensions – The Dimensions settings allow you to customize the padding and margin for the block. Also have settings for: Border and Shadow.
Category Block
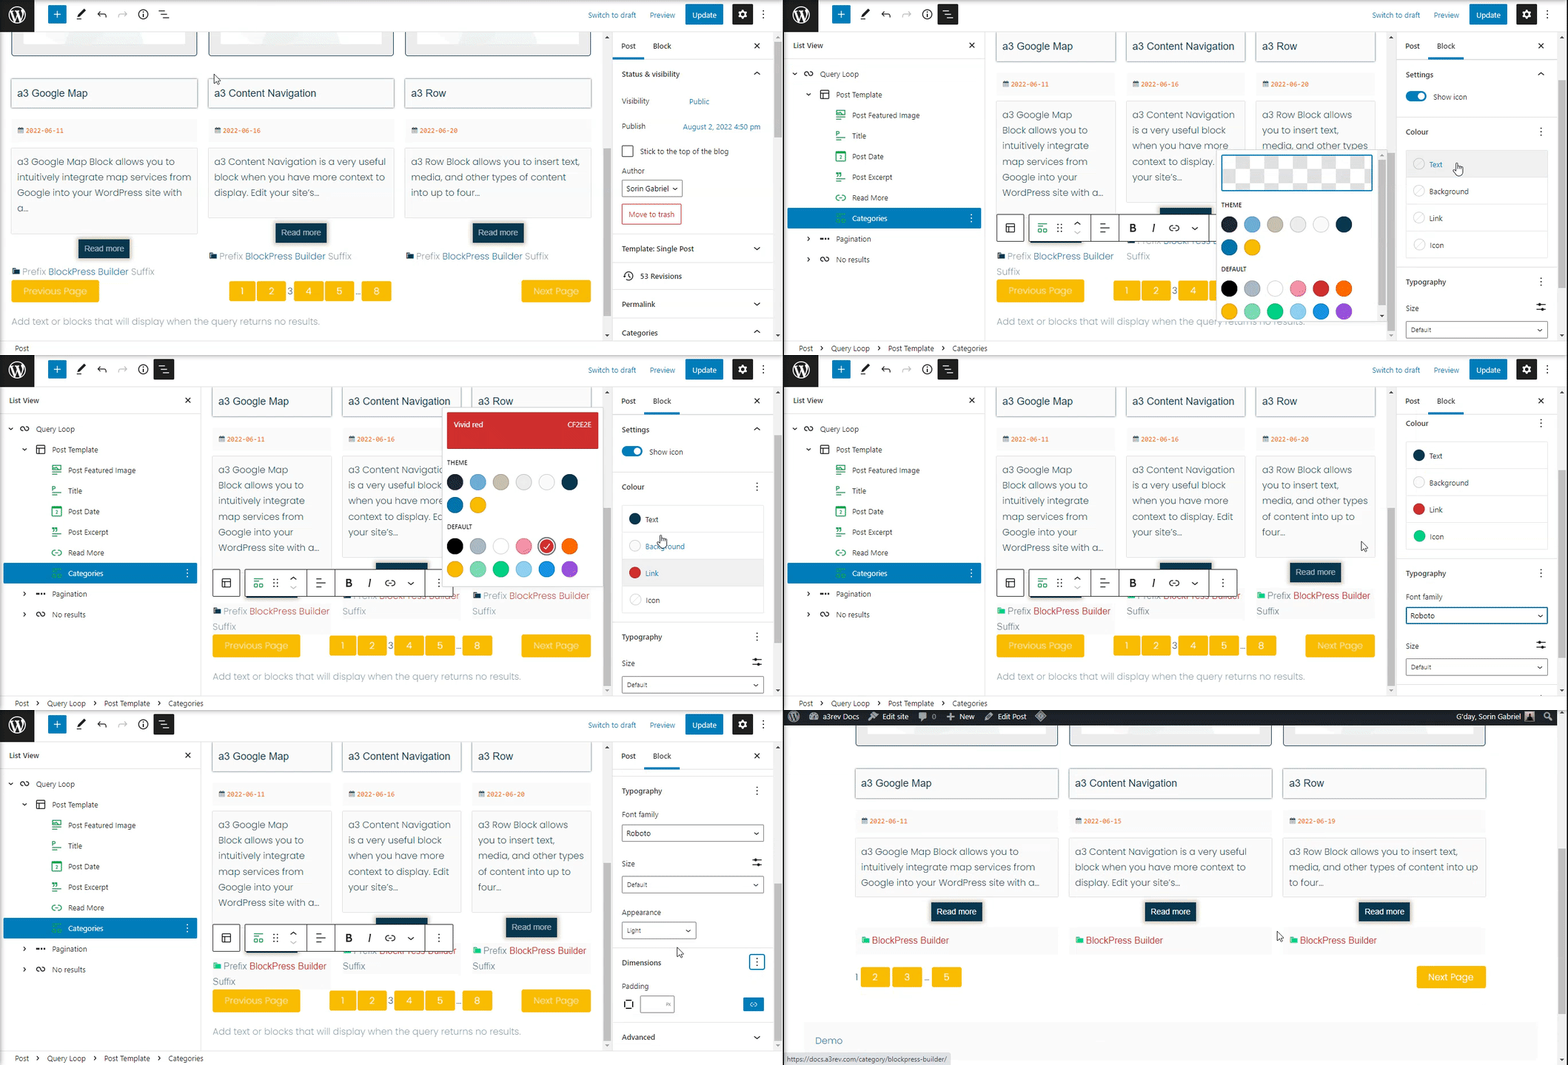
Use the a3 Post Categories block to display the posts’ categories. This block is primarily nested inside a query loop block and helps to customize the appearance of the query loop.
Every block has specific options in the editor sidebar.
- Settings – Turn On or Off the icon.
- Colour – You can customize the text color, background color, and link color for the Post Categories block. The color options available will vary based on the theme.
- Typhography – On this tab, you can adjust the Font size, Appearance, Line height, Letter case, and Letter-spacing. To access all the typography options click on the + button in the right corner of the Typography tab.
- Dimension – The Dimensions settings allow you to customize the padding and margin for the block.
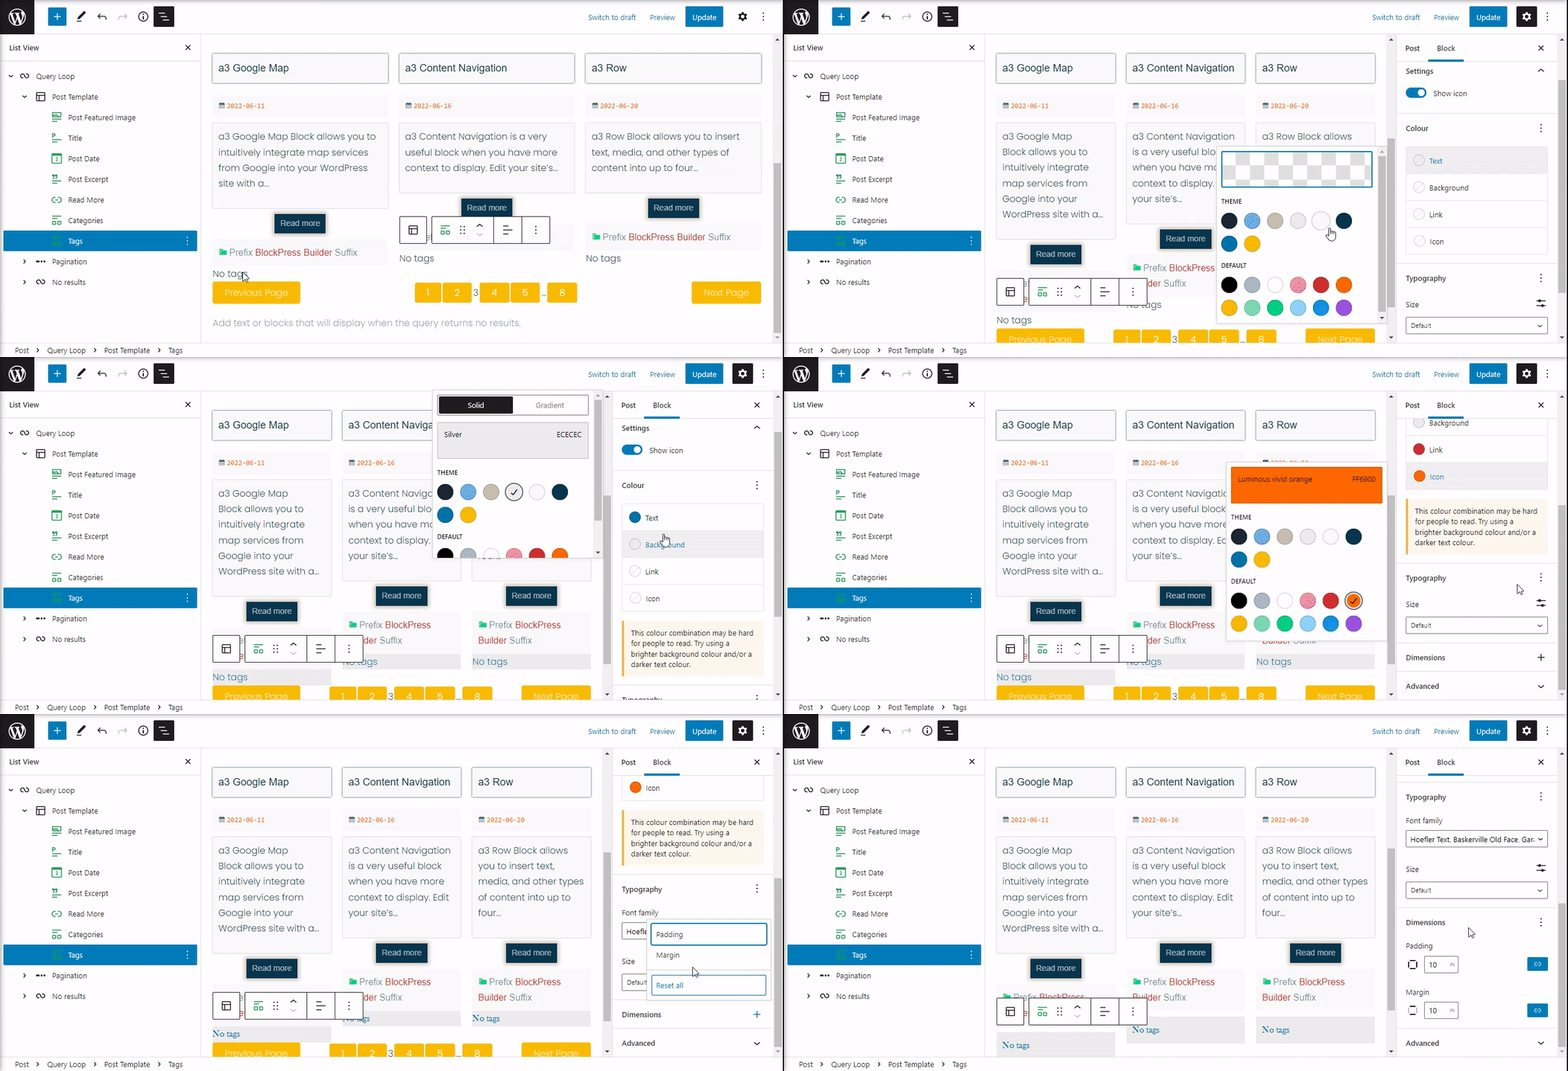
Tags Block
Use the a3 Post Tags block to display the posts’ tags. This block is primarily nested inside a query loop block and helps to customize the appearance of the query loop.
Every block has specific options in the editor sidebar.
- Settings – Turn On or Off the icon.
- Colour – You can customize the text color, background color, and link color for the Post Categories block. The color options available will vary based on the theme.
- Typhography – On this tab, you can adjust the Font size, Appearance, Line height, Letter case, and Letter-spacing. To access all the typography options click on the + button in the right corner of the Typography tab.
- Dimension – The Dimensions settings allow you to customize the padding and margin for the block.
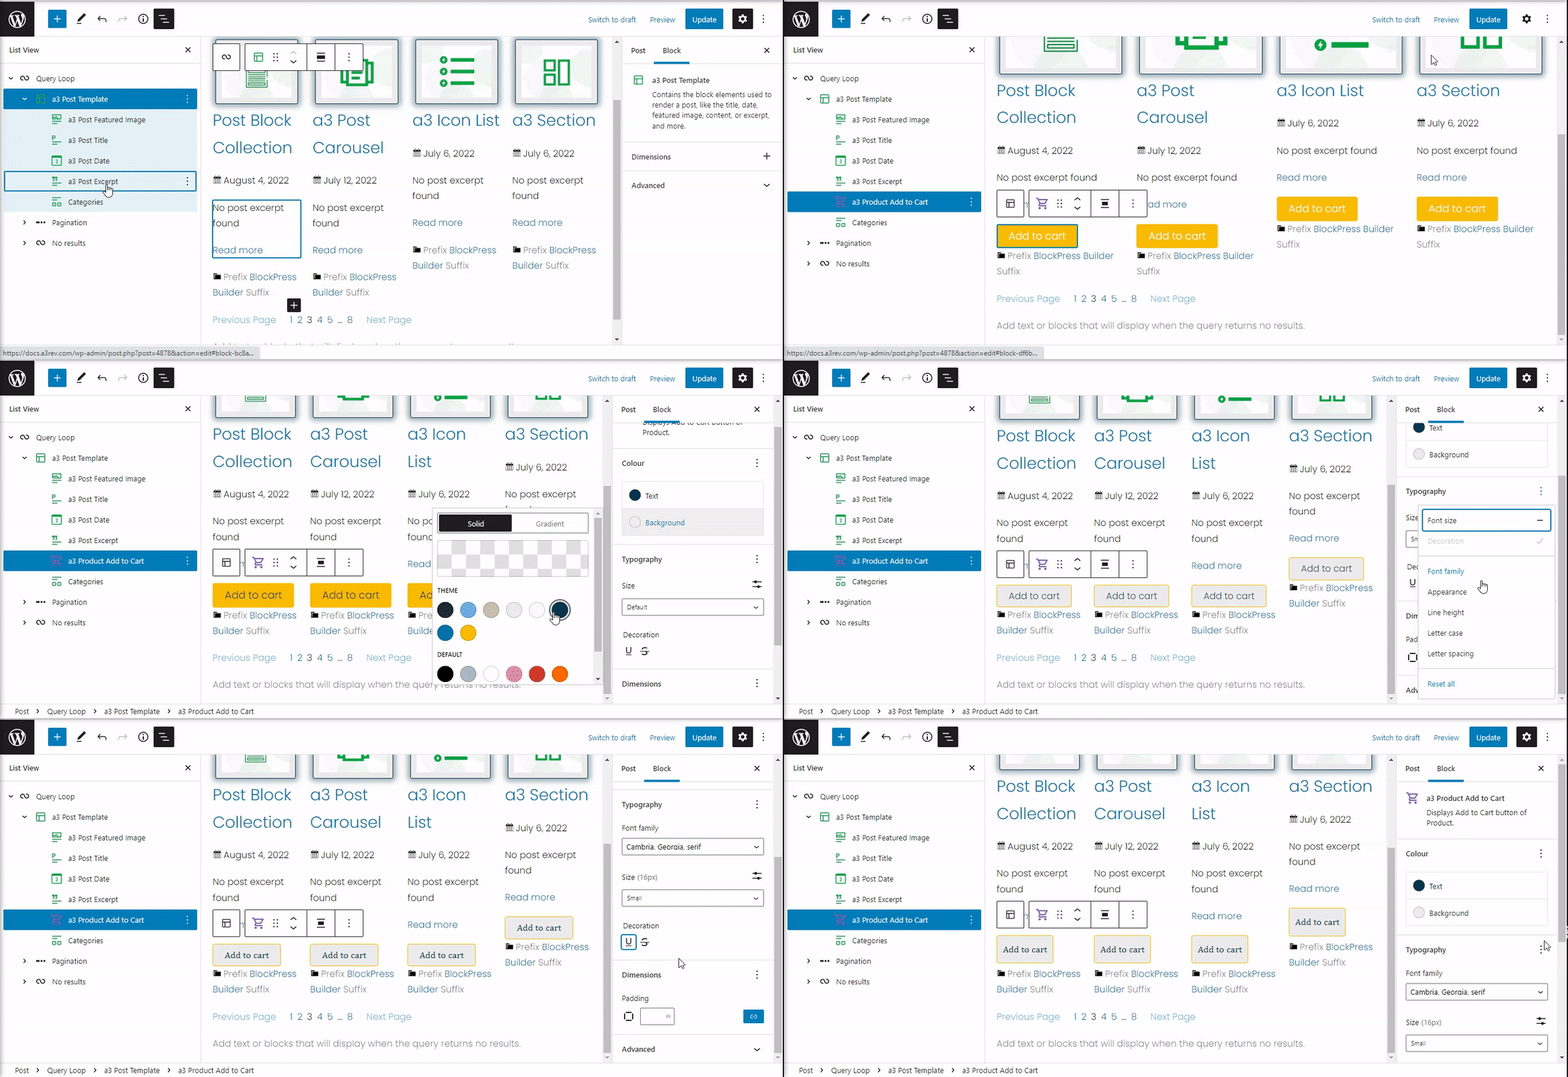
Product Add to Cart
Add an add to cart button for any WooCommerce product anywhere on your page. Customize the WooCommerce Add To Cart button block and allow your users to add products to the cart in just one click!
You can add a cart button on the product cards, product page, deal or offer pages of your website and make the purchase process a lot easier. Allowing your users to add products to the cart directly.
Style the Product Add to Cart block according to your preference and match your existing page design with the advanced styling options. Whether you need to alter the color, change typography, or fonts, icons, you can do it all in just a few clicks.
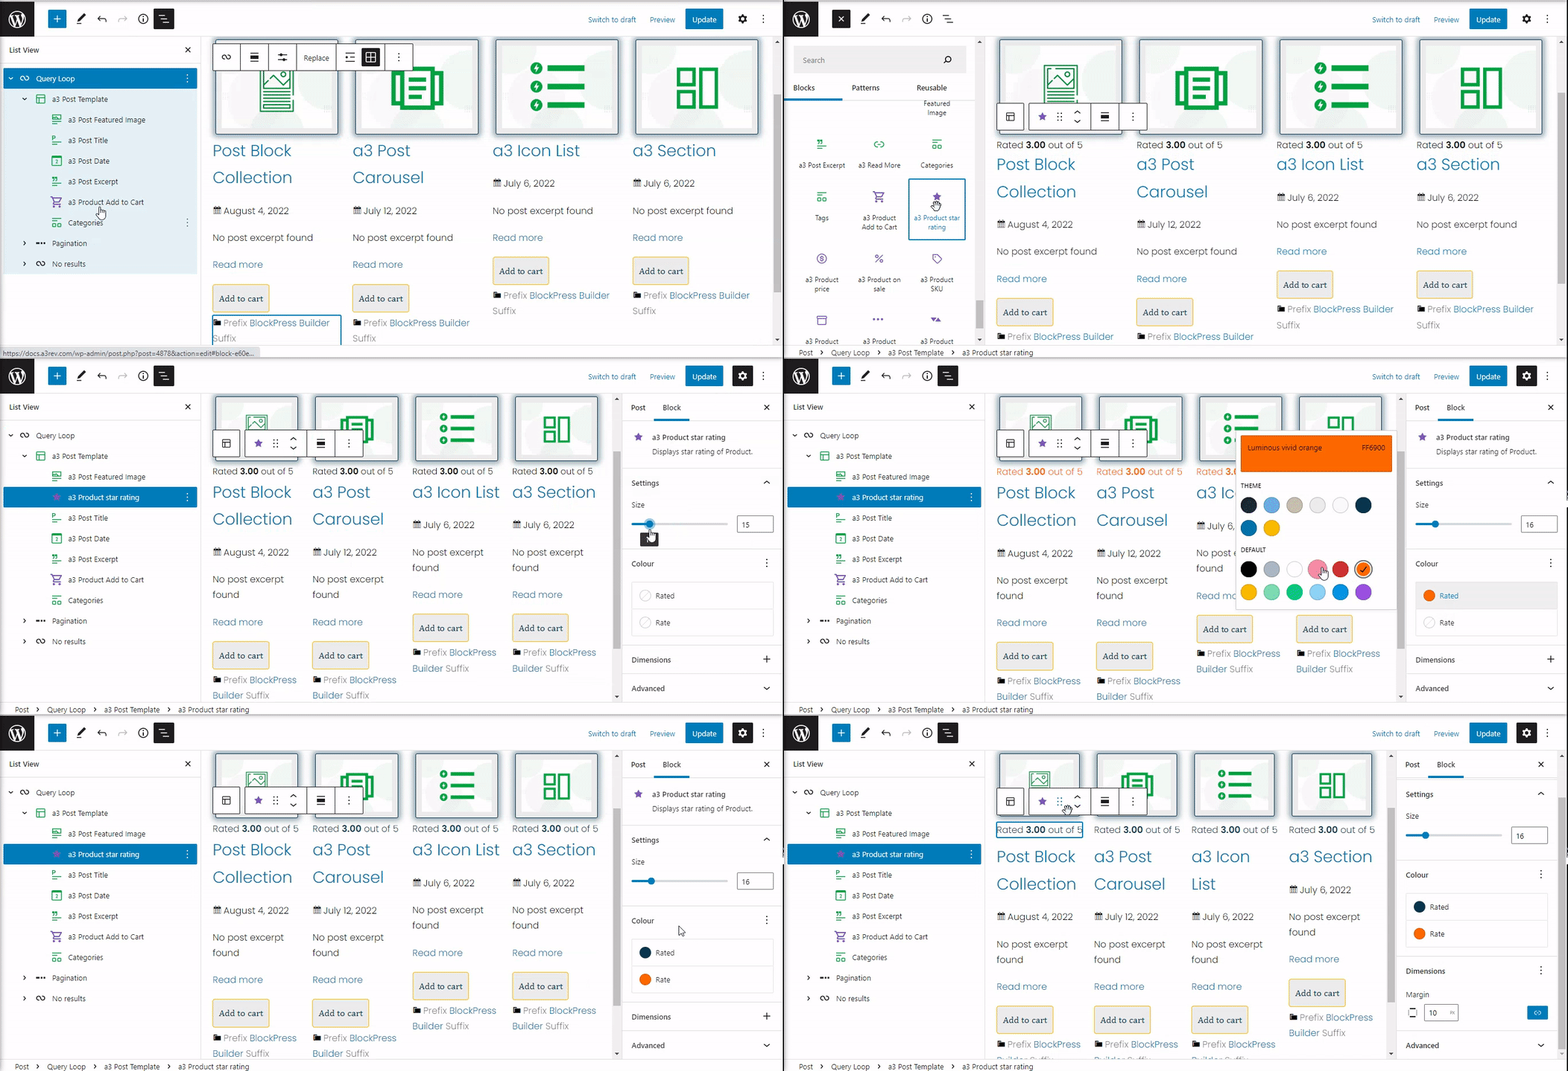
Product Star Rating
Are you looking for a quick and easy way to display star ratings in WooCommerce ? a3 Product Star Rating block allows you to add a star rating anywhere on your website like on product page, product cards, posts, widgets etc..
The Product Star Rating block can be customized with your own color. Every block has specific options in the editor sidebar. Use the Block settings sidebar to select a color for your ratings, change the size or add margin to the container.
Note: If the product don’t have any rating you will not see it on front end.
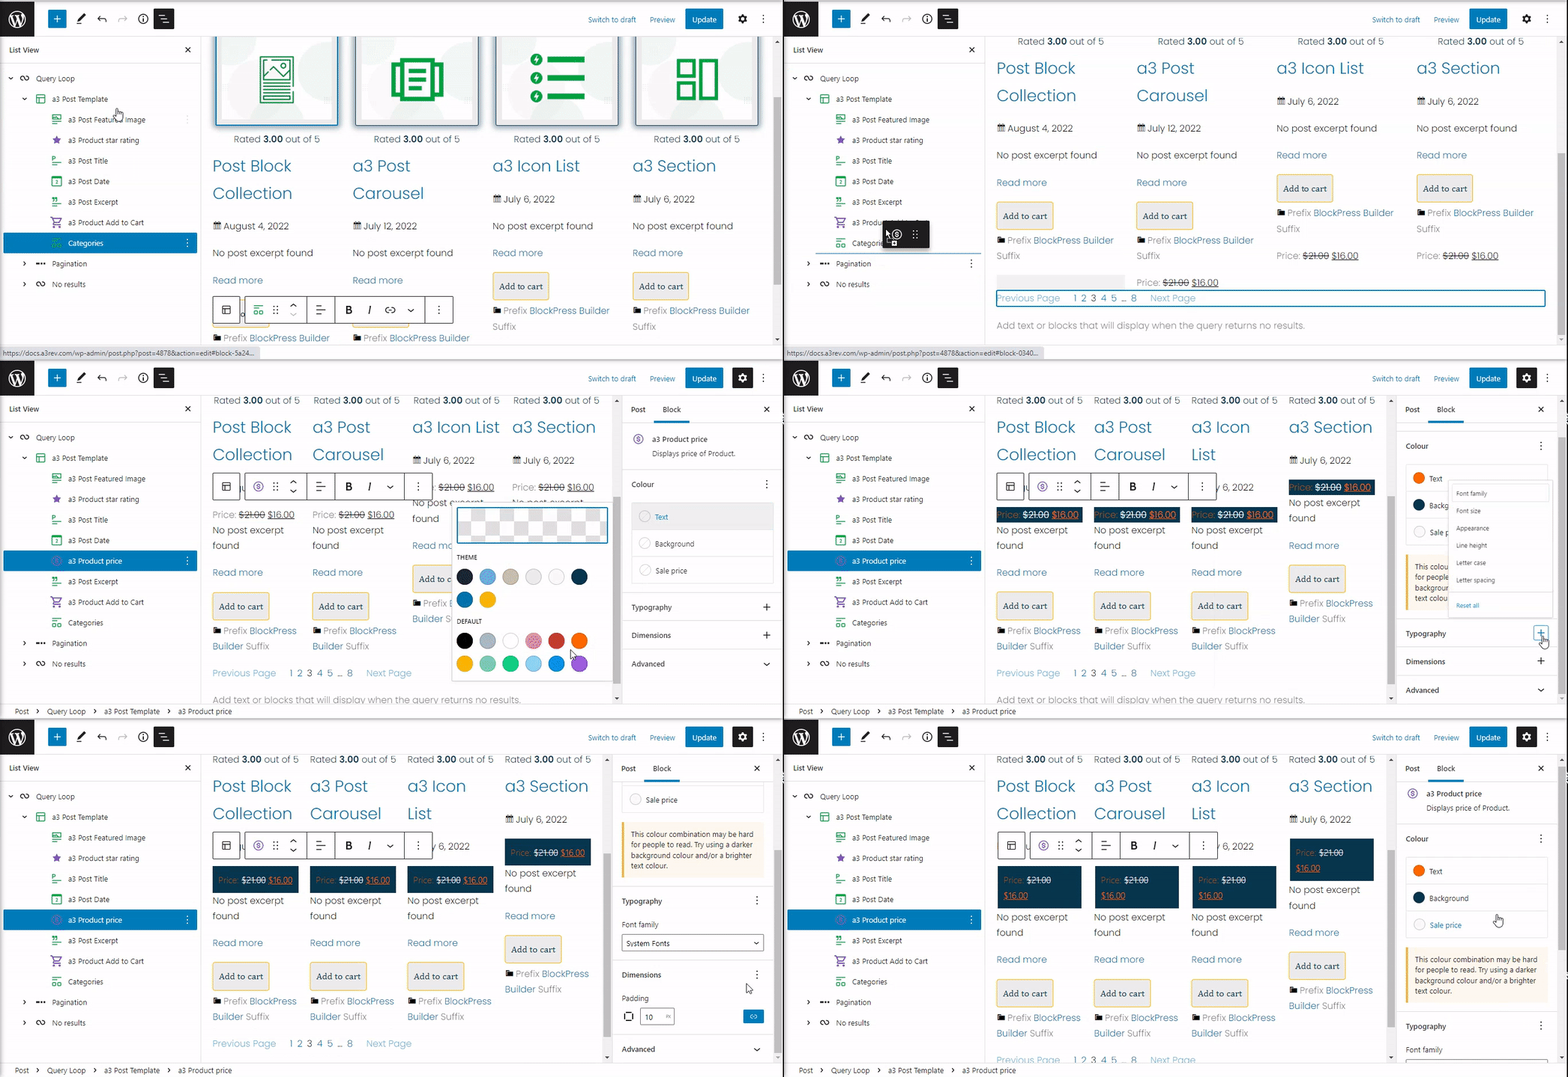
Product Price
Use the a3 Product Price block to display the price of your product and style it using custom colors, typography and dimension.
Product on Sale
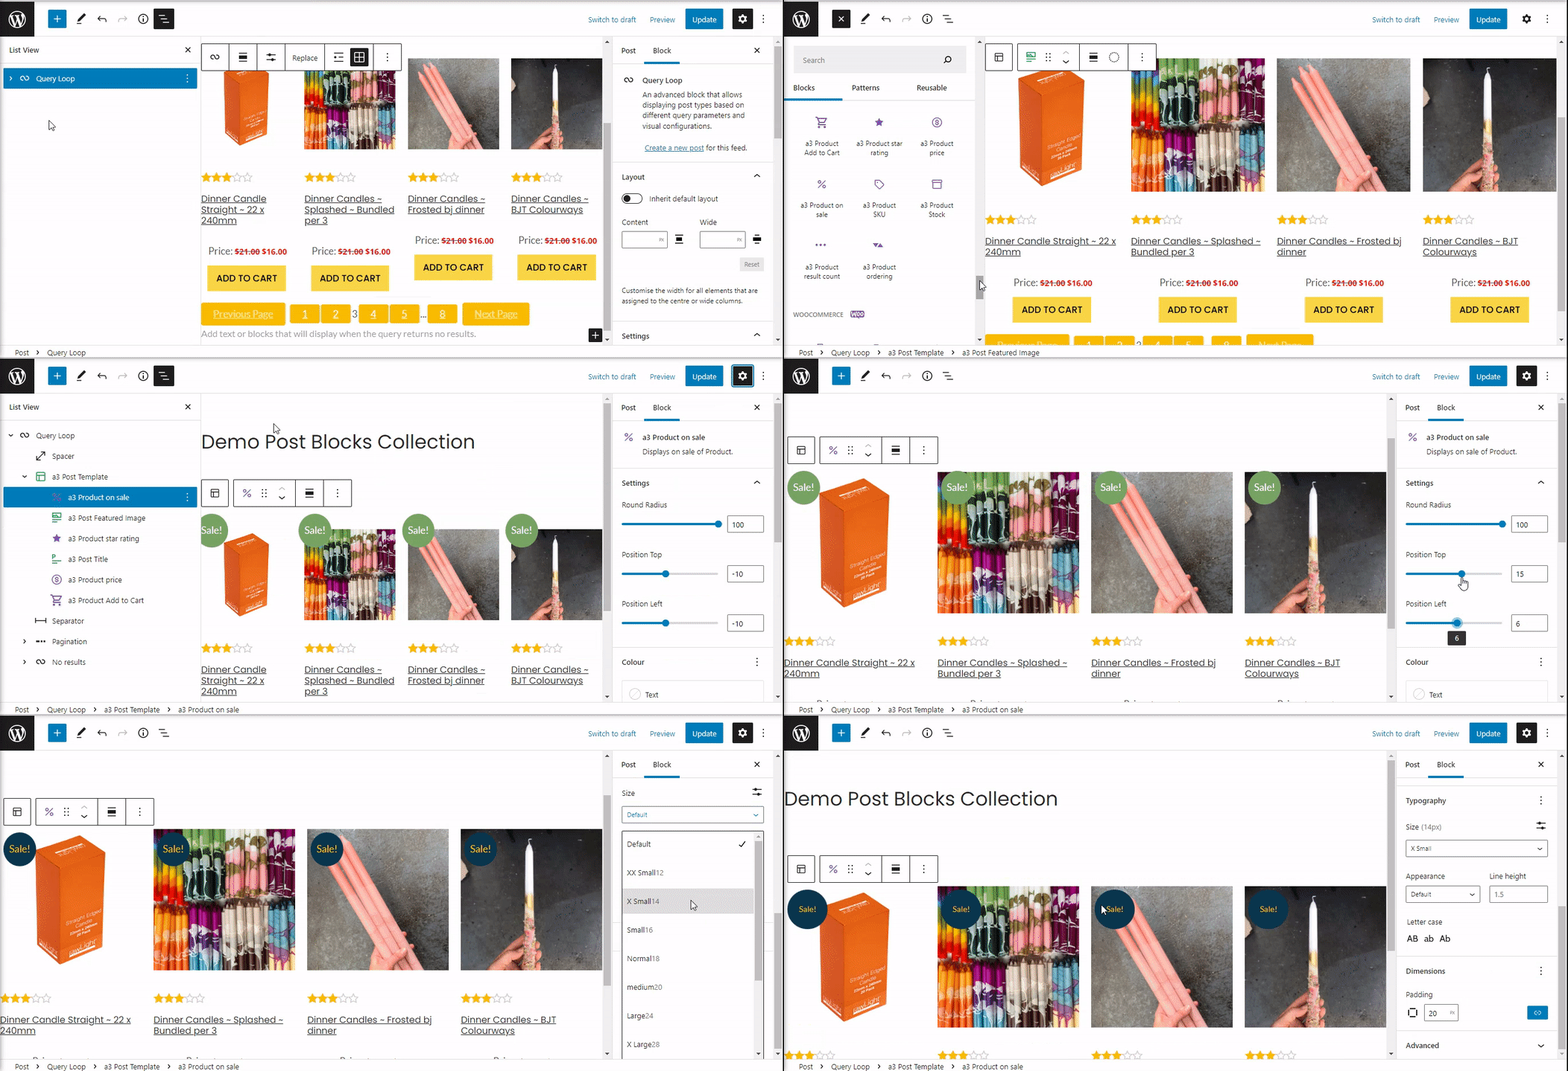
a3 Product on Sale block will display a banner fully customizable on the discount product cards. You can adjust the radius, colors, typography and the dimension of banner. If you want to promote items and advertise them at discounted prices, you could benefit from using the a3 Product on Sale WooCommerce block.
When you use the a3 Product on Sale block, it automatically grabs any products listed as “on sale” from your store and add a banner. Nest this block above the Feature Image block and the banner will show on the product card feature image. Then customize the block to change its appearance.
Product SKU
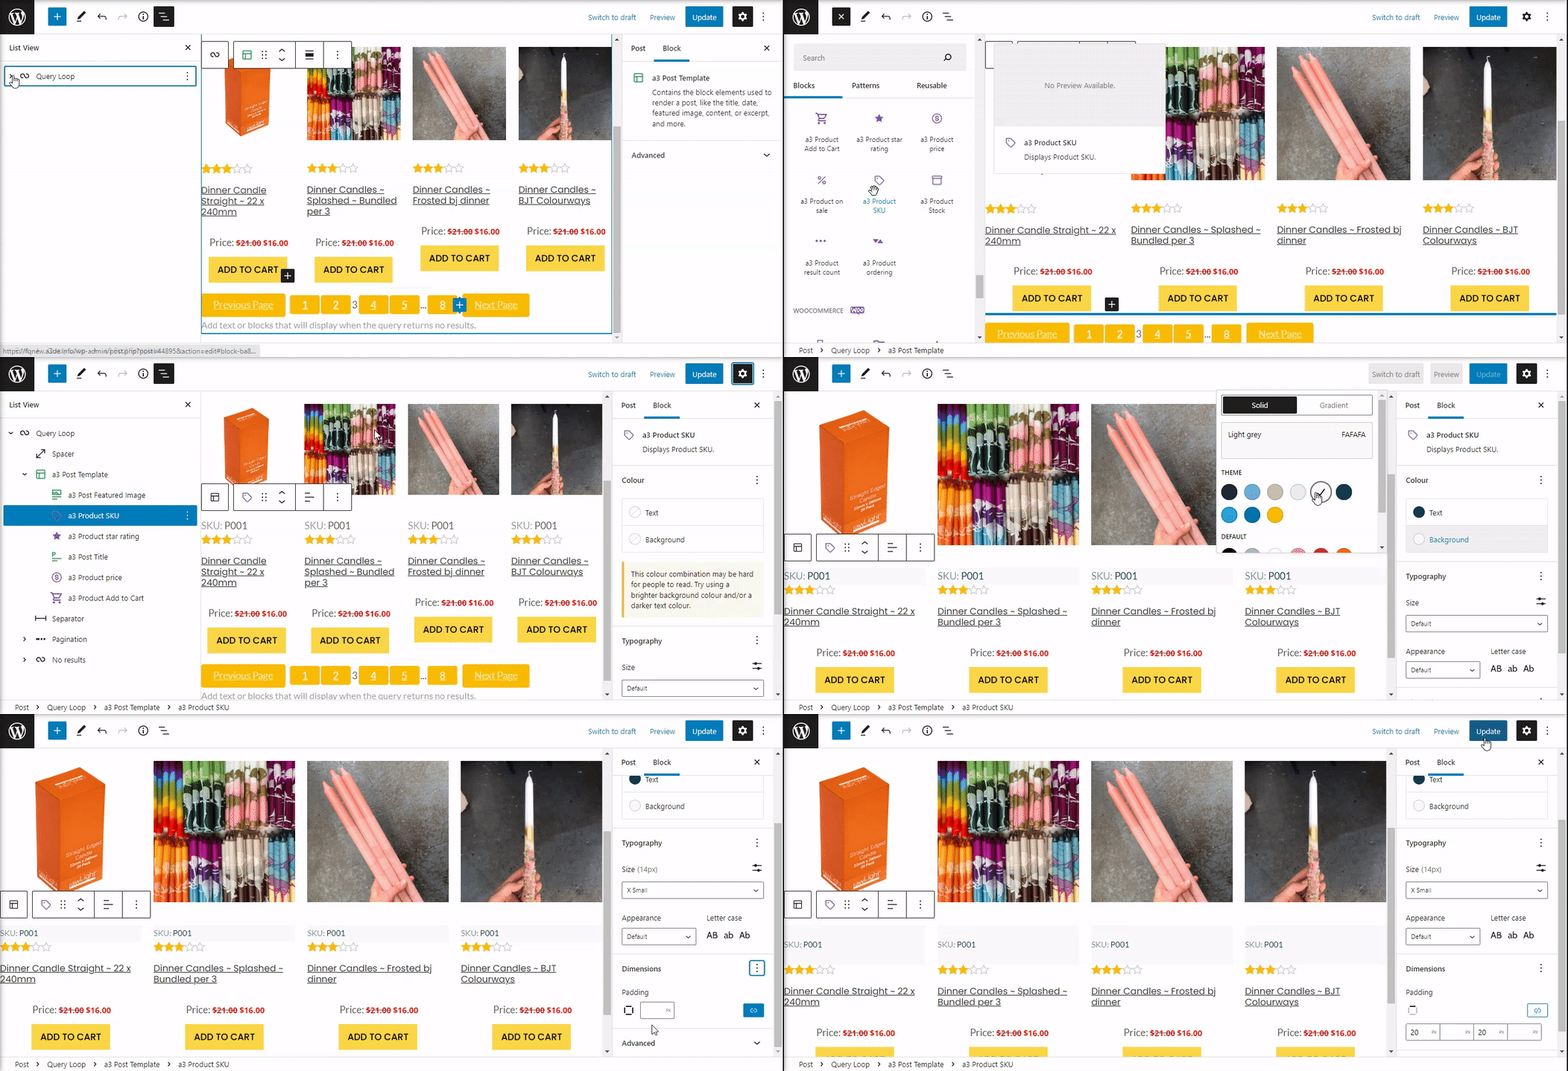
Use the a3 Product SKU block in product cards to keep unit and refers to a unique identification number of a single product that will help you and your customers to track product quickly. Change the appearance of the block with settings like: color, typography and dimension.
Just add the block and nested where you will like to be display in Product Card hierarchy.
Product Stock
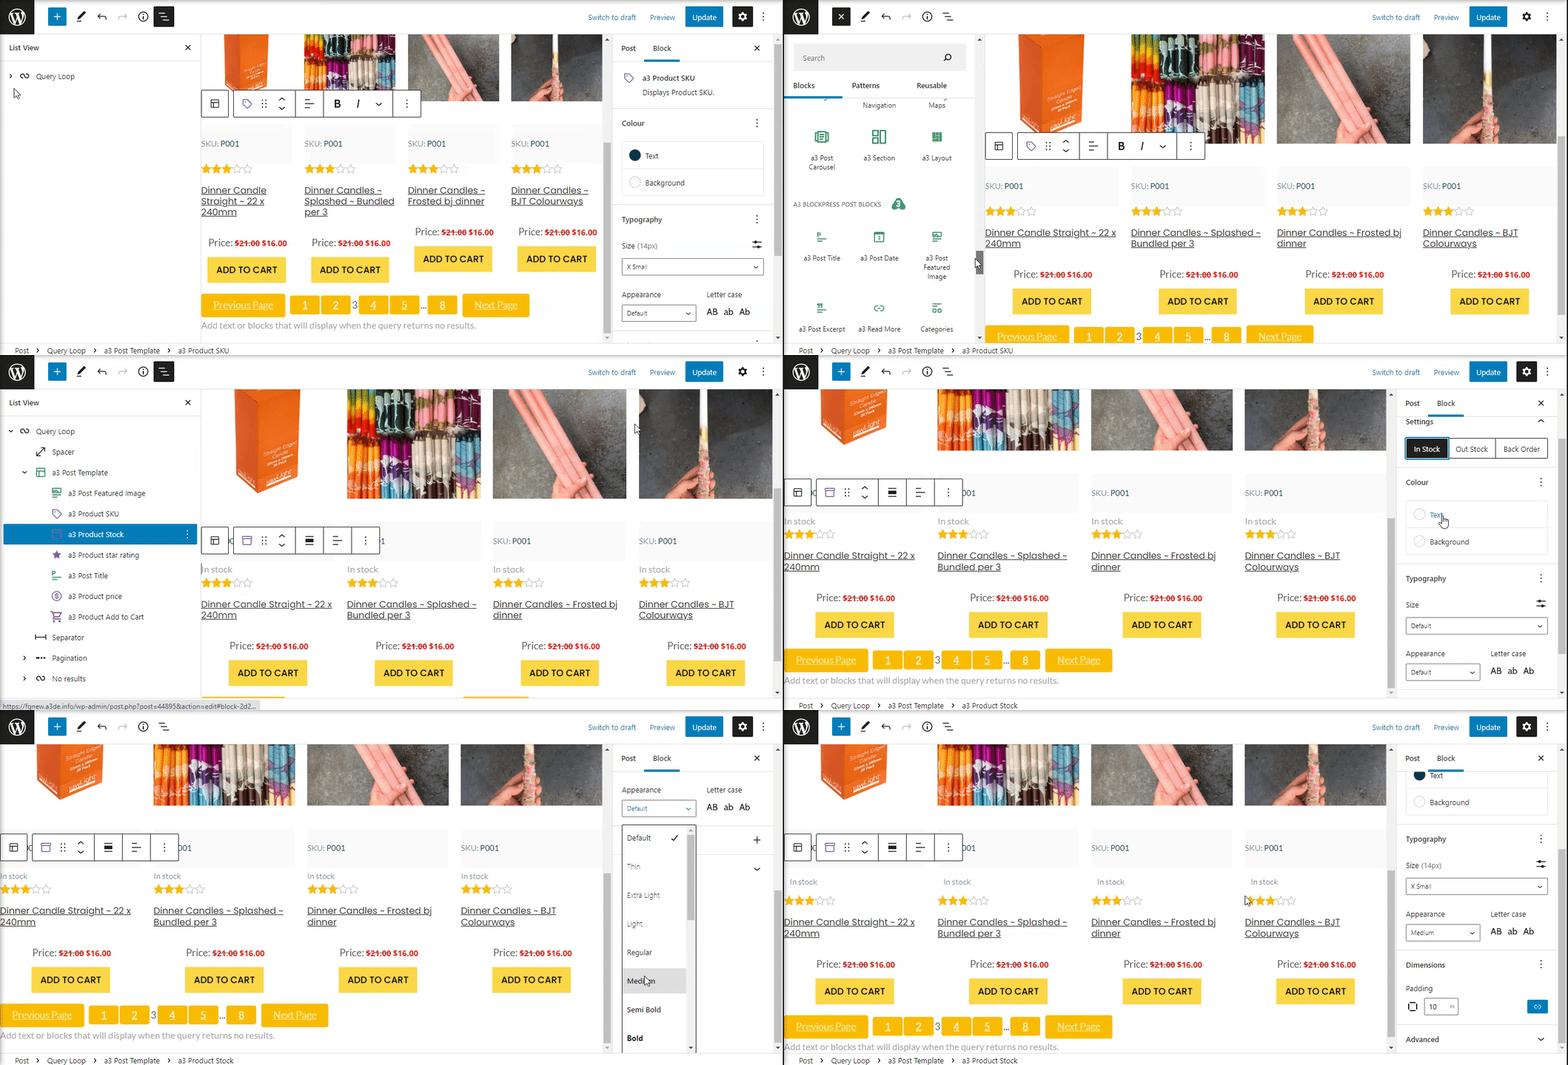
a3 Product Stock block allows you to display the stock status and quantity on Product Cards. You can choose what kind of stocks to be display: In Stock, Out Stock or Back Order. The block have settings for Typography, Color and Dimension.
Product Result Count
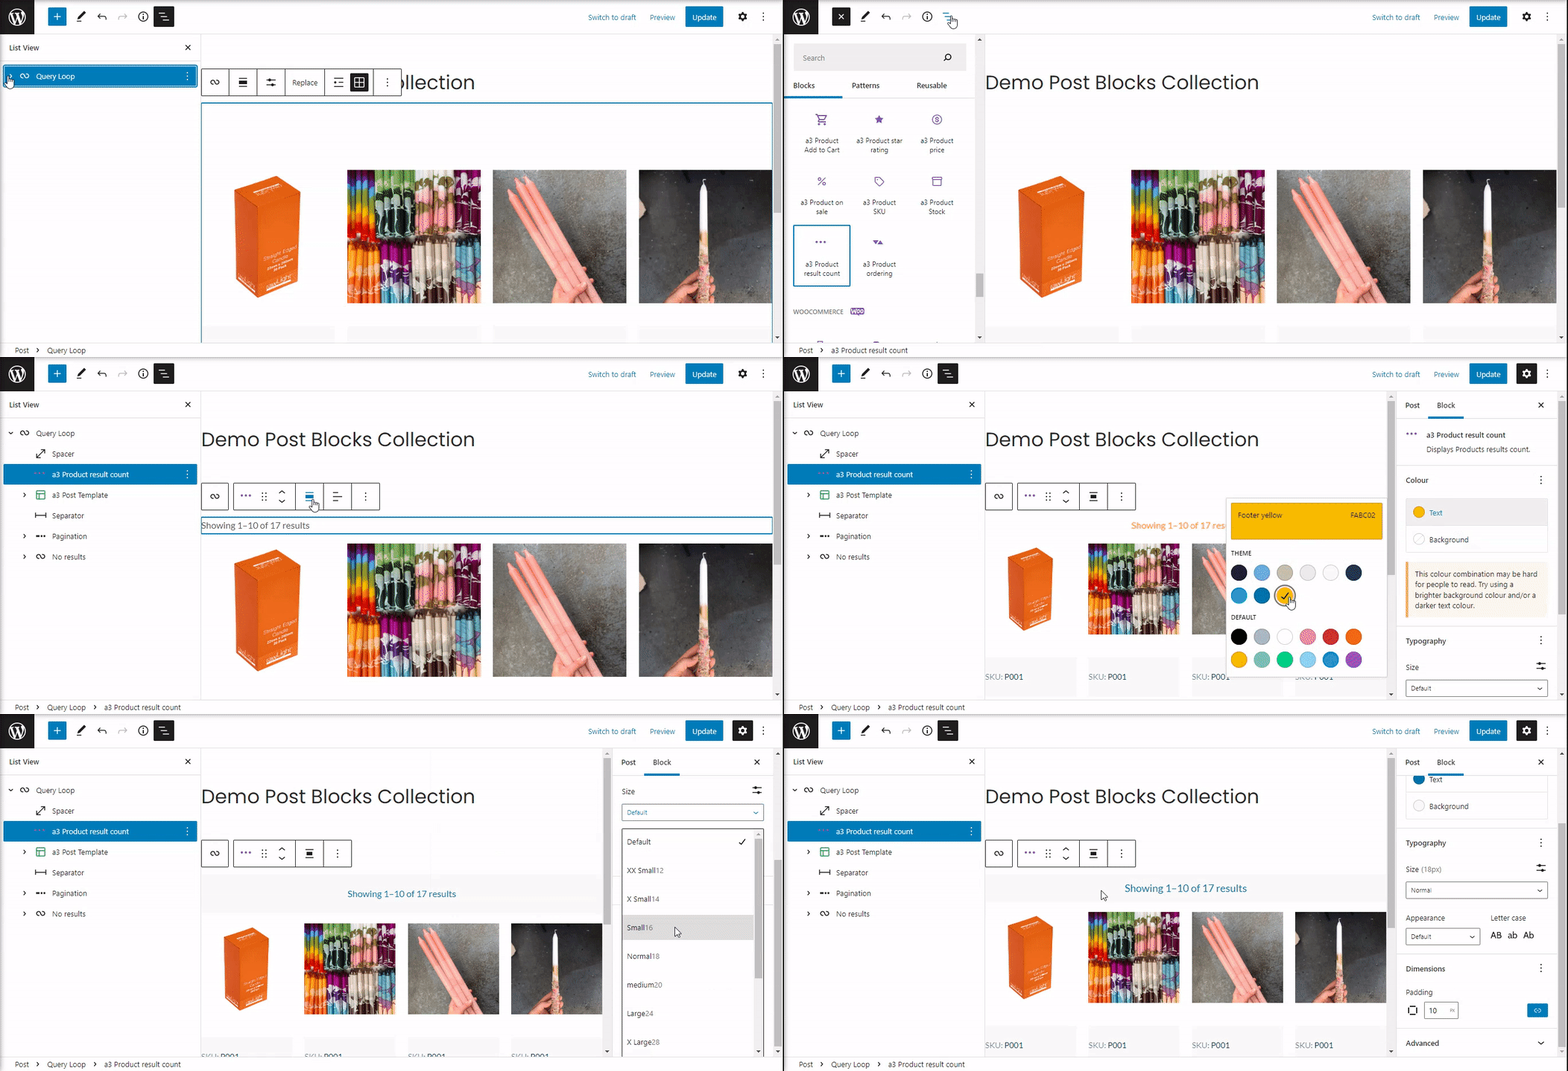
a3 Product Result Count block is a perfect tool for displaying the number of all products that are displayed at the moment from Query Loop block. You have to insert this block nested inside the Query Loop block.
Product Ordering
Displays Products ordering.
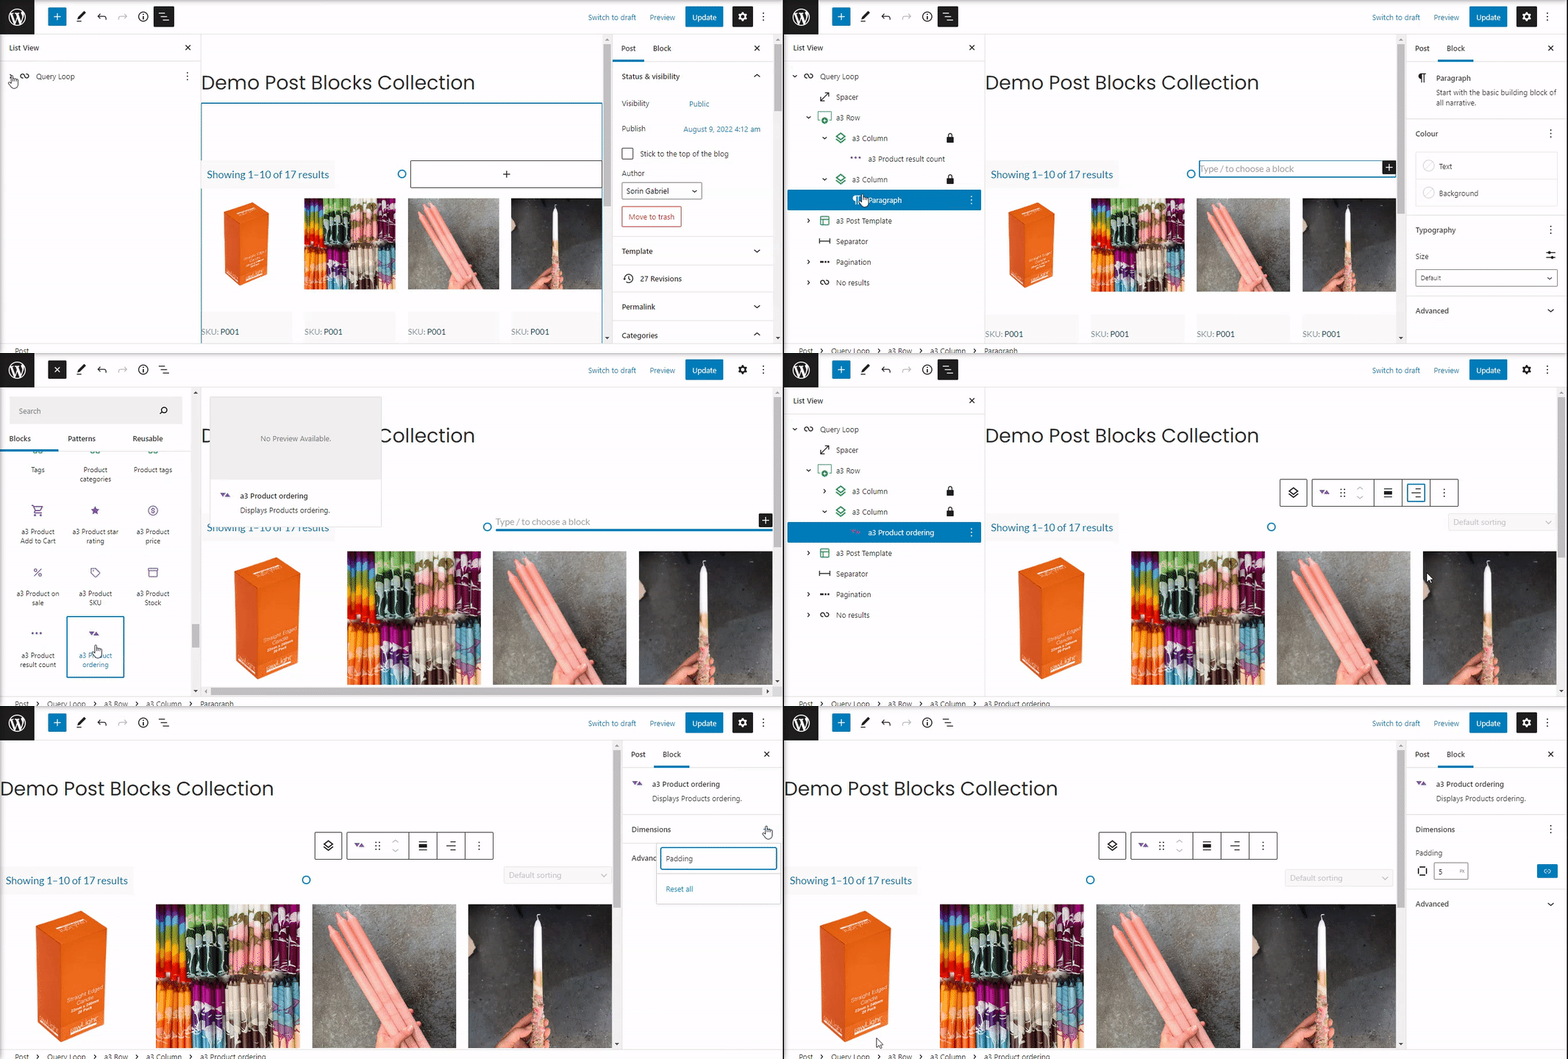
Pagination
Pagination allows you to make large amounts of content easy to find and breaks up several entries or web content into multiple pages, allowing you to toggle through content with ease.
a3 Block Post Collection have enhance the core blocks with many settings useful to create Pagination links for different circumstances.
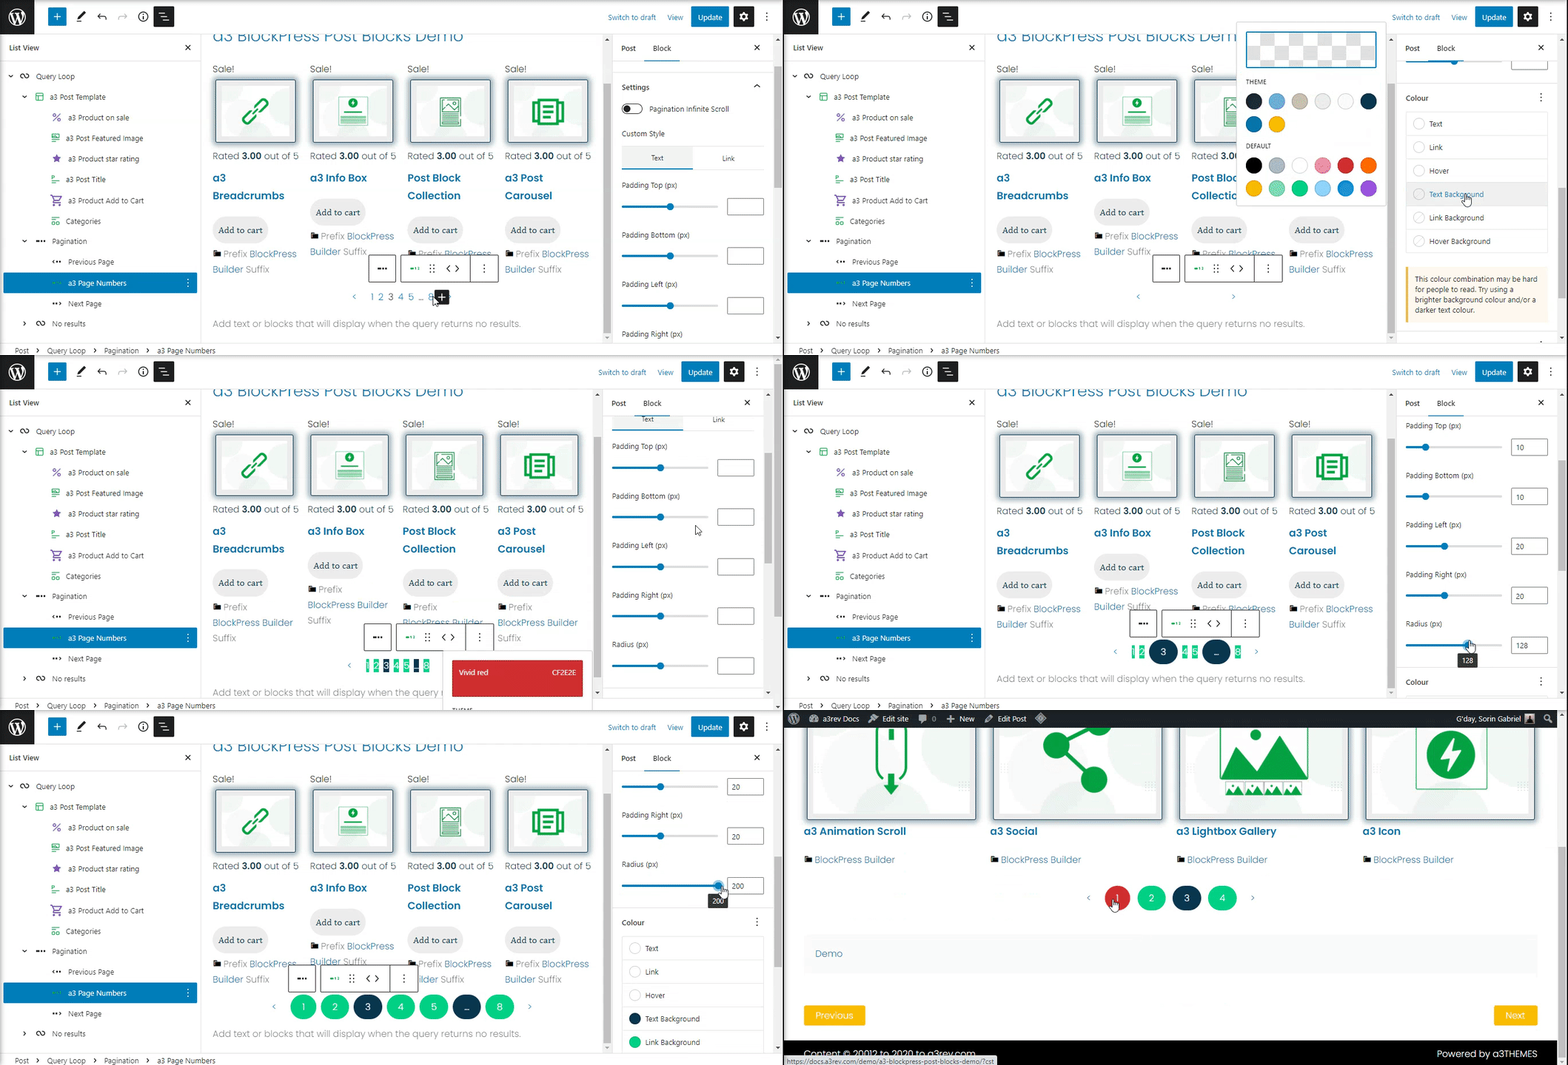
a3 Page Numbers
The pagination numbers allow website visitors to easily move across the blog posts or products.
In order to find and use the a3 Page Number block you must be inside the Core Pagination block tree.
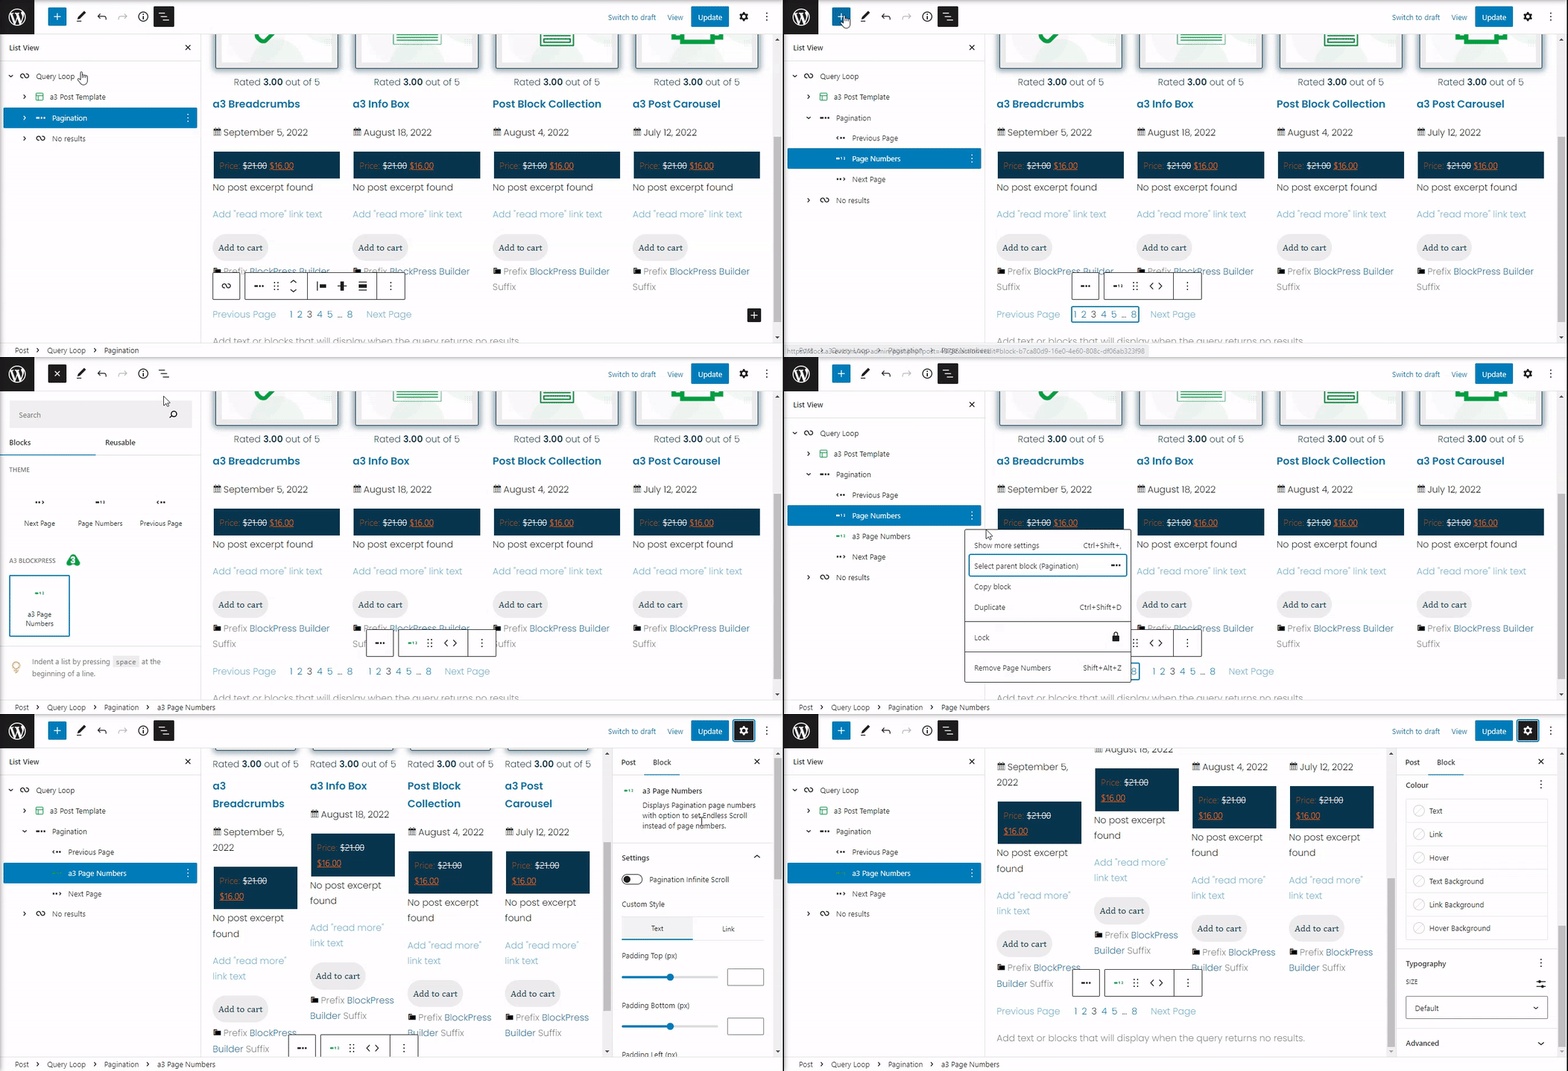
Once ad you will notice that the pagination numbers block has a toolbar on top of it, with several basic editing options. The moment you select the a3 Page Number block, a block editing panel will open up on the right-hand side. It has four options: settings, color, typography and advanced.
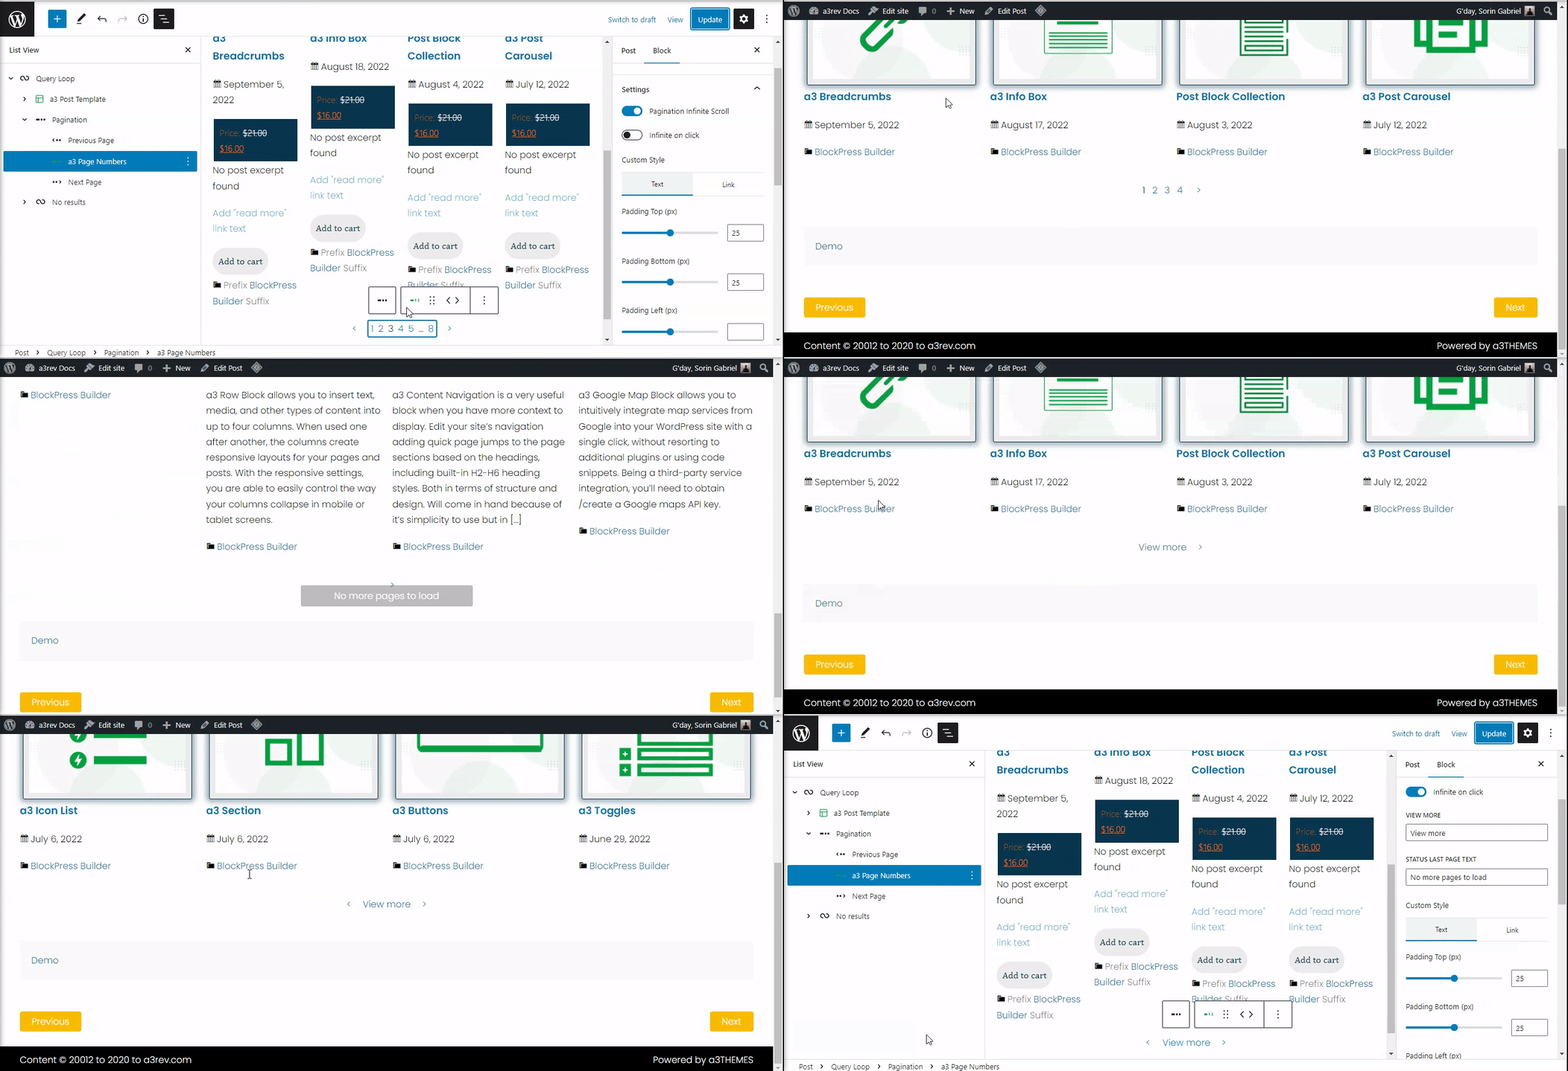
Pagination Infinite Scroll
In settings will find Pagination Infinite Scroll, this technique simply keeps refreshing a page when you scroll down it or make it infinite on click.
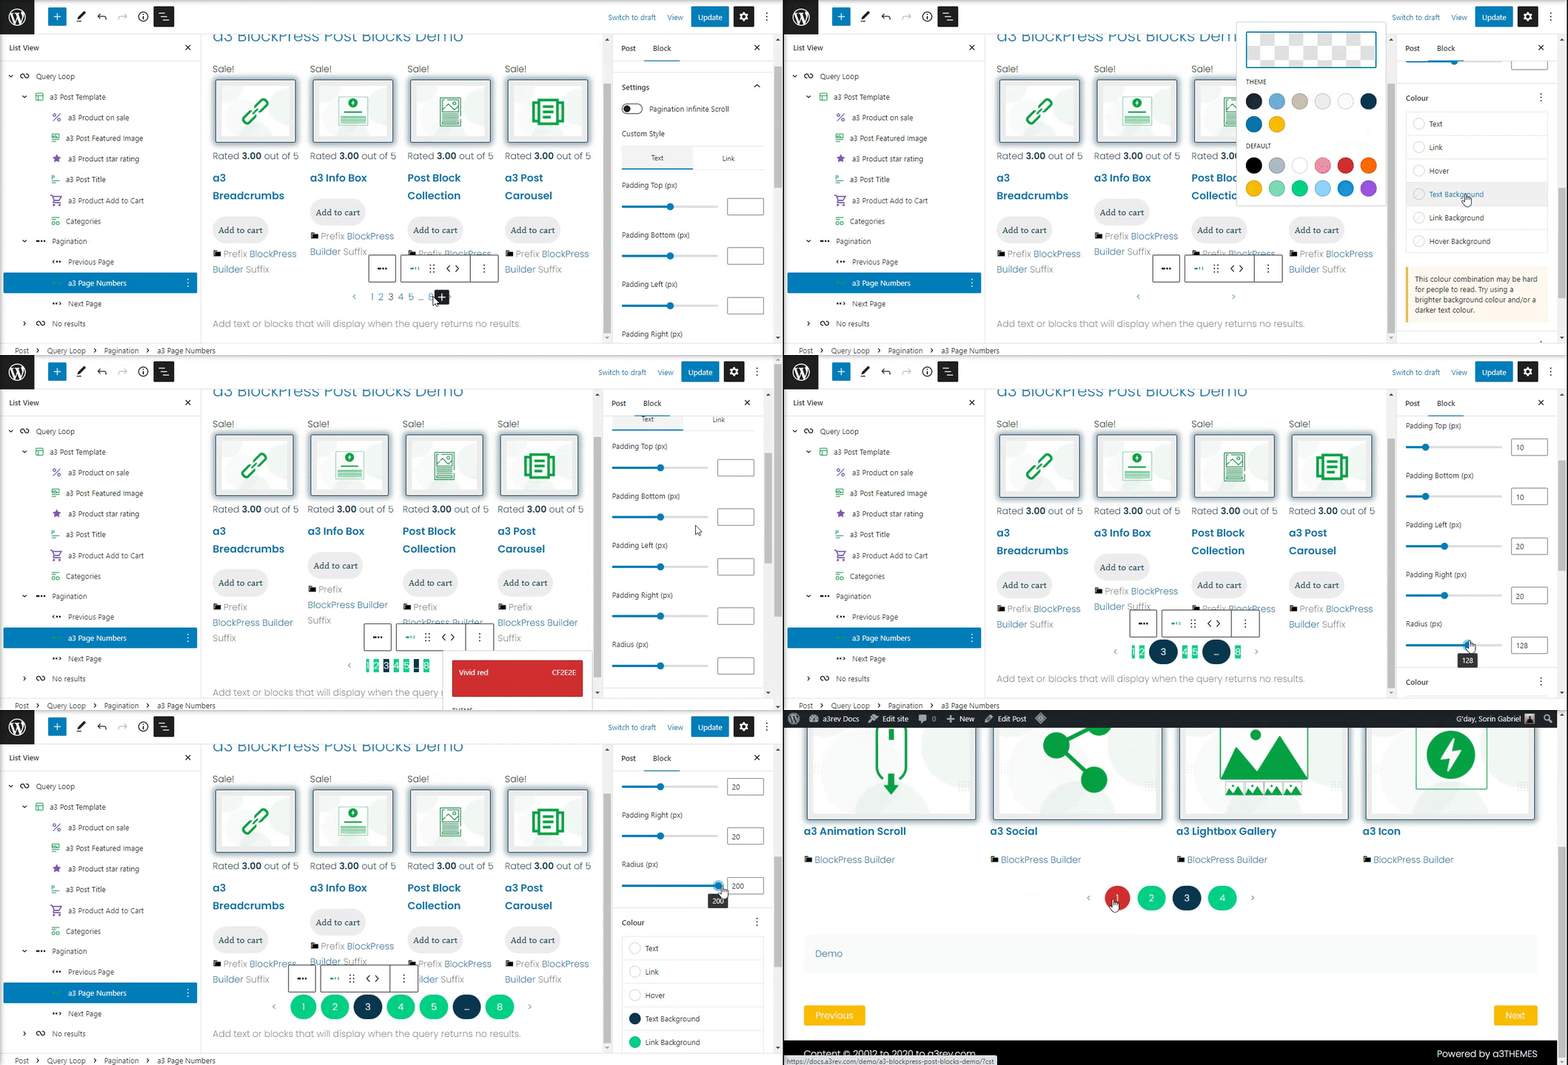
Custom Style
Set the style of the number by adding padding and radius for text and links. But first the colors need to be set.
Typography
Now select the fonts family, size, appearance and line height to make sure the a3 number block style match with your website design.
