Navigation
Introduction
The Campaigns for WooCommerce plugin helps WooCommerce stores streamline backorder management and increase sales through flash campaigns. This guide will walk you through setup, configuration, and maximizing the plugin’s capabilities to enhance your store’s functionality.
Installation & Setup
1. Purchase Confirmation:
After purchasing the Campaigns for WooCommerce plugin, you’ll receive a confirmation email with download instructions.
- Download Access: Click the link in your email to log in to your account.
2. Accessing Your Account:
- Log in to your customer account using the credentials provided during the purchase process.
- Navigate to the ‘Download’ page from your account dashboard. Each card on the download page will include a ‘Download’ button for easy access to your purchase.
Install the Plugin
1. Upload the Plugin:
- In your WordPress admin dashboard, go to Plugins > Add New.
- Click Upload Plugin at the top of the page.
- Choose the downloaded ZIP file, then select Install Now.
2. Activate the Plugin:
- After installation, click Activate Plugin to enable Campaigns for WooCommerce in your store.
Understanding Backorders and Flash Sales
Backorders allow your store to capture sales even when an item is out of stock. When backorders are enabled, customers can still purchase products marked as “out of stock,” helping you maintain sales momentum and meet customer demand, even during supply delays. Backorders can be especially useful for high-demand products and help retain customers who might otherwise shop elsewhere.
Flash Sales are short-term promotions designed to create urgency and encourage quick purchases. By setting a limited time or quantity for discounts, you can effectively boost conversions and clear inventory faster. Flash sales are ideal for seasonal promotions, new product launches, or encouraging quick buys during key shopping times, providing a powerful tool to generate excitement and increase store revenue.
Plugin Navigation Overview
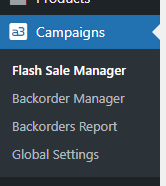
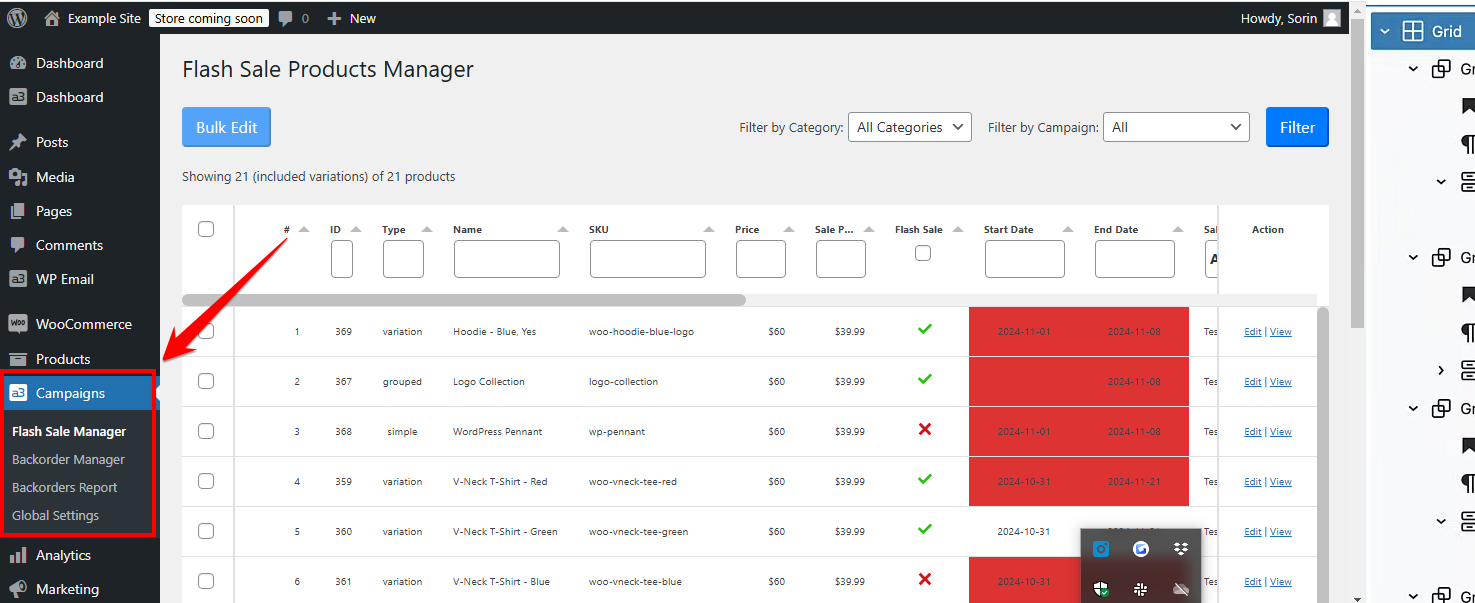
To streamline your store’s backorders and flash sales, Campaigns for WooCommerce provides an intuitive, centralized control panel. Here’s a quick look at each menu and how it can enhance your store’s sales and inventory management:
- Flash Sale Manager
This menu simplifies creating and managing flash sales across multiple products at once. Designed for bulk actions, it allows you to set up time-sensitive sales with ease. You can specify sales dates, discount amounts and stock limits to encourage quick purchases—all from a single, user-friendly panel. - Backorder Manager
Easily activate and manage backorders on single or multiple products simultaneously. The Backorder Manager lets you control stock availability and automate notifications for products out of stock, making it a powerful tool for recovering missed sales. This centralized view allows you to adjust backorder settings efficiently across various products, minimizing individual configuration time. - Backorder Report
The Backorder Report provides real-time updates on pending and due backorders, helping you maintain an organized workflow. This report simplifies tracking by displaying product statuses in one place, so you can prioritize restocking and customer follow-ups without navigating each product page. Automated email updates also ensure you stay informed on backorder status. - Global Settings
Customize default styles, notification messages, and other settings across backorders and flash sales here. With Global Settings, you can maintain a cohesive look and feel for all backorder and sale notifications, giving customers a consistent shopping experience while saving you from adjusting settings individually.
Backorders
By enabling backorders, you allow customers to purchase items even when stock is low or temporarily unavailable, ensuring you never miss a sale opportunity.
- Backorder Campaigns: Create reusable campaign templates that can be applied to multiple products, making it easy to set uniform backorder options across your store.
- Product Page Backorder Settings: Configure individual product backorder settings directly within each product’s backend for specific, per-product control.
- Backorder Manager: Use the Backorder Manager for efficient, bulk-editing capabilities. Here, you can activate backorders, apply campaign settings, and adjust fields like maximum backorder quantity and notification details for multiple products at once.
This flexibility allows you to handle backorders seamlessly—whether you’re targeting individual items or managing backorders across entire categories. Let’s dive into each method to get you started!
Backorder Campaigns
The Backorder Campaigns feature in the Campaigns for WooCommerce plugin allows you to set up a backorder template that can be applied to multiple products across your store. This saves time and ensures consistency, as you only need to configure settings once and then easily apply them to as many products as needed.
By setting up a campaign, you can standardize backorder messages, notifications, and appearance across all selected products, making it easier to manage customer expectations and streamline your store’s inventory control.
Step-by-Step Guide to Creating a Backorder Campaign
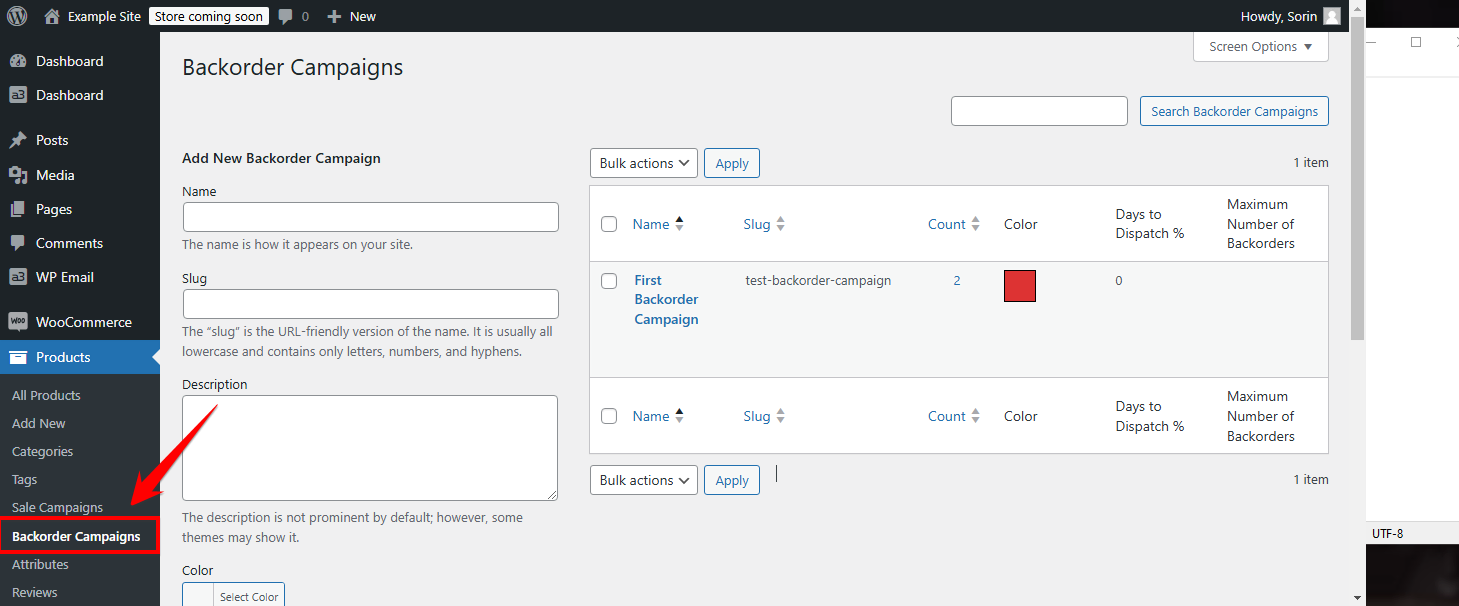
- Navigate to Backorder Campaigns
- In your WordPress admin dashboard, go to Products > Backorder Campaigns.
- Create a New Campaign
- Click on Add New Campaign to start setting up a unique backorder template.
- Define Campaign Details
- Campaign Name: Choose a descriptive name (e.g., “Seasonal Backorders”).
- Custom Backorder Notification: Set up specific messages, styling, and notification lines that will appear on the product page when a product is on backorder.
- Configure Notification Fields
- Line 1 and Line 2: Customize notification text that will appear on product pages to inform customers about expected delays or other relevant information.
- Cart Message: Set a message that will appear when customers add backordered items to their cart.
- Days to Dispatch: Input an estimated dispatch timeframe to keep customers informed about when the item might be available.
- Offer Message: Add any special offer details or perks for backordered products (e.g., “Order now to secure a spot in the next shipment!”).
- Save and Apply
- Once all settings are configured, click Save. Your campaign is now ready to be applied to products.
With your campaign saved, you can apply it to individual products or multiple products at once. This allows you to manage backorder notifications seamlessly and ensure a uniform experience across all products using this campaign.
Applying a Backorder Campaign to Products
After creating your backorder campaign, you can apply it to specific products or use the Backorder Manager for a quick bulk application.
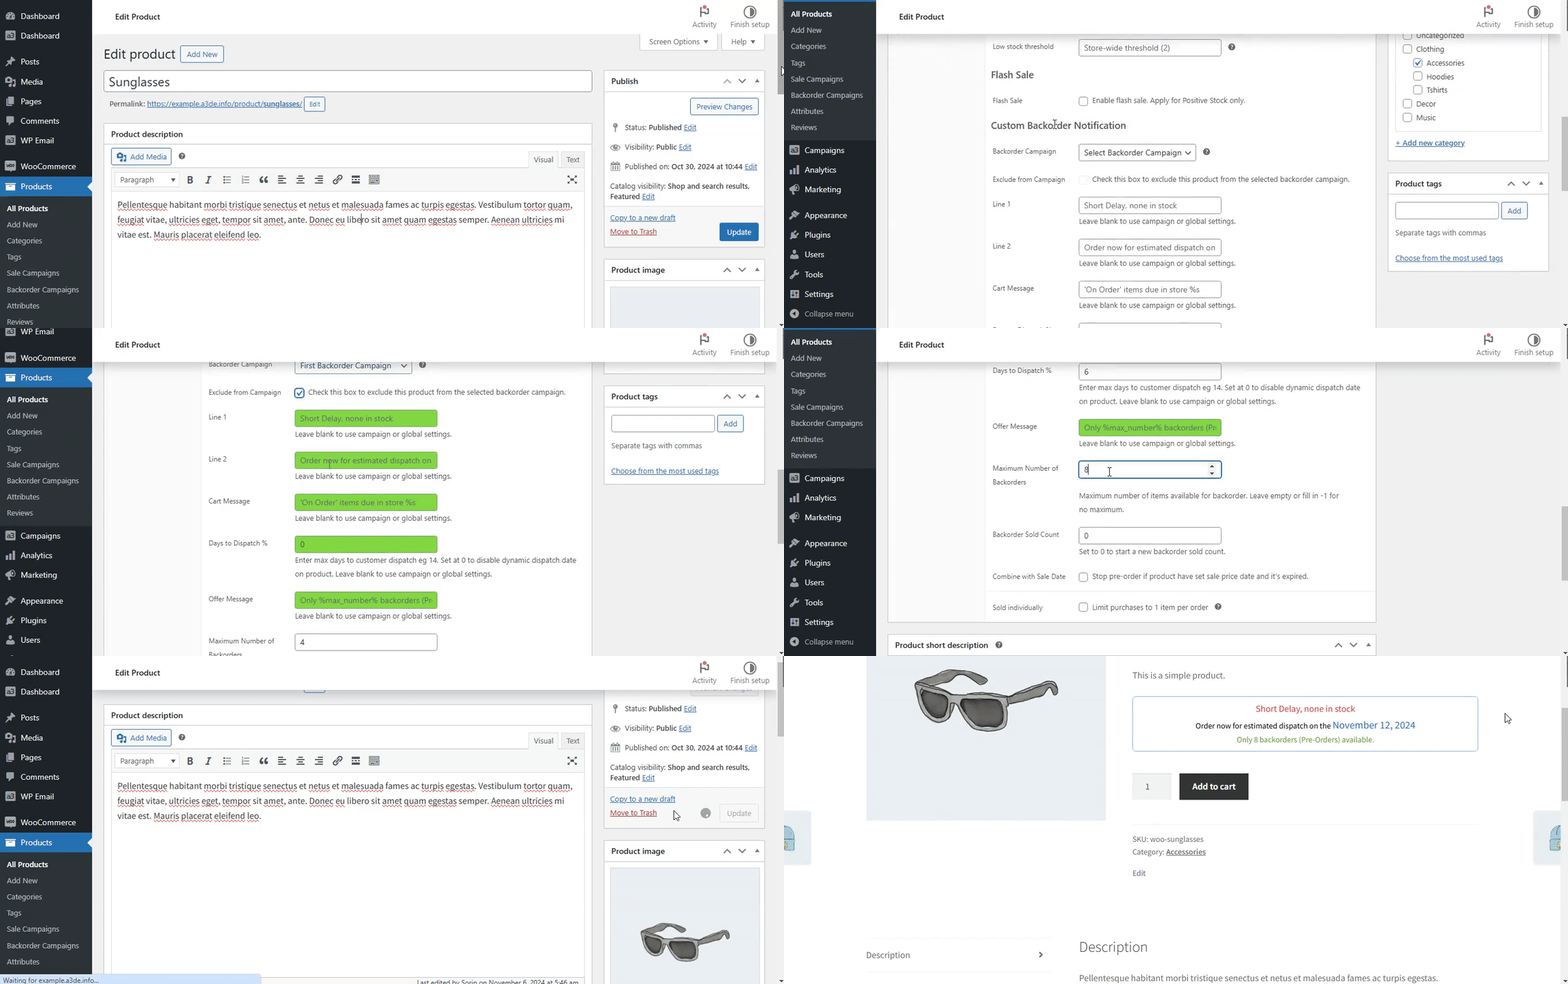
- Navigate to the Product Page
- Go to Products in your WordPress admin and select the product you want to configure.
- Enable Backorder Settings
- Scroll down to the Inventory section of the product page.
- Under Stock Status, set the product to On Backorder or Allow Backorders.
- Assign the Backorder Campaign
- In the Backorder Campaign dropdown, select the campaign you created (e.g., “Seasonal Backorders”).
- Exclude from Campaign: If you want to customize this product’s backorder messaging independently from the selected campaign, check the Exclude from Campaign box. This will unlock the fields below for individual editing.
- Adjust any additional fields as needed, like Line 1, Line 2, and Cart Message, if you want them to differ from the campaign defaults.
- Maximum Number of Backorders: Set a limit for how many items can be backordered for this product. Leave empty or set to -1 if there’s no maximum.
- Backorder Sold Count: Enter a starting count if you want to track backordered sales from a particular number; otherwise, leave at 0 to start fresh.
- Save Changes
- Click Update to save the product settings. The campaign’s settings will now be applied to this product on the storefront.
Backorder Manager
The Backorder Manager is a powerful tool for streamlining backorder settings and adjustments across your product catalog. With it, you can:
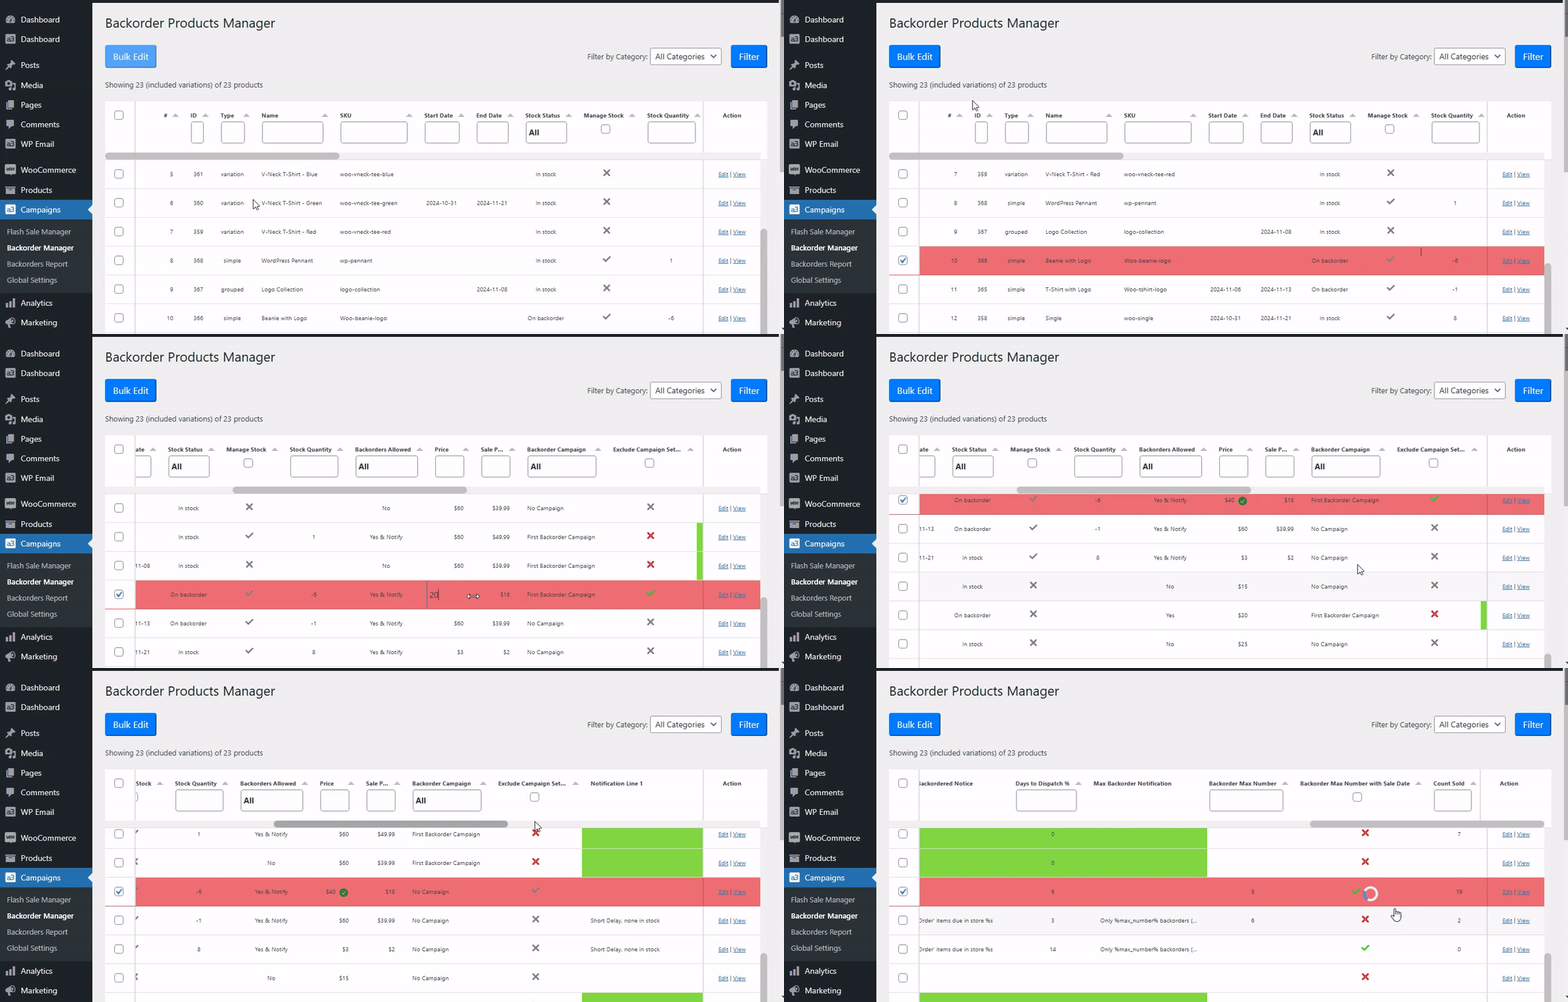
- Filter by Categories: Focus on specific product categories to quickly find the items needing backorder setup or adjustments.
- Bulk Editing: Select multiple products at once to apply consistent backorder settings, saving time and ensuring accuracy across similar items.
- Direct Modifications: Edit essential fields directly from the Backorder Manager tab, such as: Backorder Max Number, Price, Count sold etc.
This feature is ideal for efficiently managing backorder details across numerous products, ensuring that all relevant information is accurate and up-to-date.
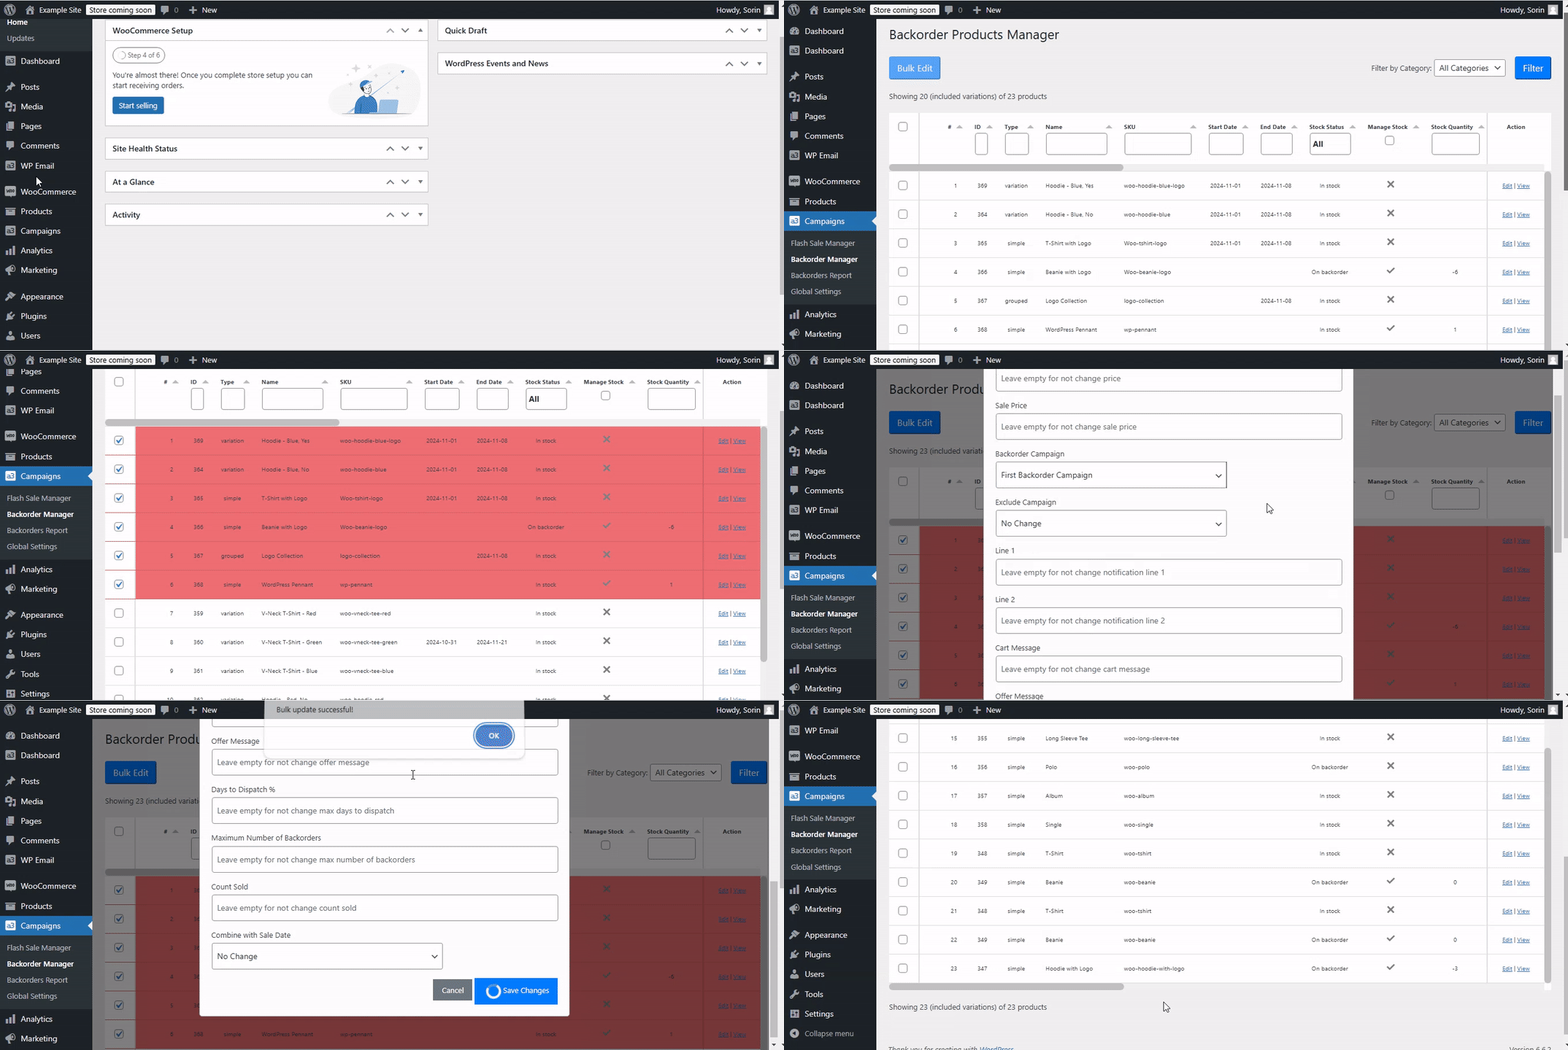
- Navigate to the Backorder Manager
- In your WordPress admin dashboard, go to Backorder Manager under the plugin’s main menu.
- Select Products for Bulk Application
- Use the filters or checkboxes to select the products you’d like to apply the campaign to. You can filter by category, stock status, or other criteria for convenience.
- Apply the Campaign
- Once your selection is complete, look for the Bulk Edit button.
- Choose Apply Backorder Campaign and select the specific campaign from the list.
- Confirm the action to apply the campaign to all selected products.
- Save and Confirm
- Click Save or Apply to confirm the changes. The campaign settings are now active on all selected products, ensuring consistent backorder messaging across your store.
By using these methods, you can easily control how your backorder campaigns are displayed across single or multiple products, ensuring customers receive a clear, consistent backorder experience. Let me know when you’re ready to move on to the next step!
Set Backorders on Product Page
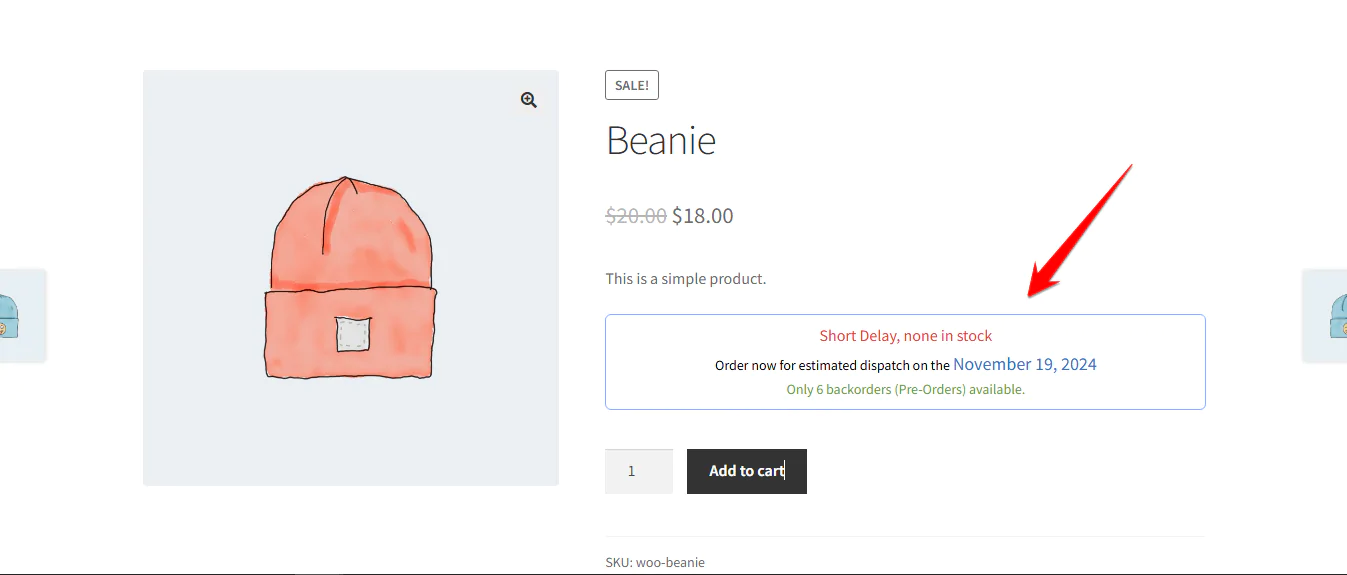
While Backorder Campaigns allow you to create reusable templates for managing backorders across multiple products, the Set Backorders on Product Page feature provides product-specific control. This approach is ideal for setting unique backorder parameters on an individual basis, giving you flexibility outside of a campaign template.
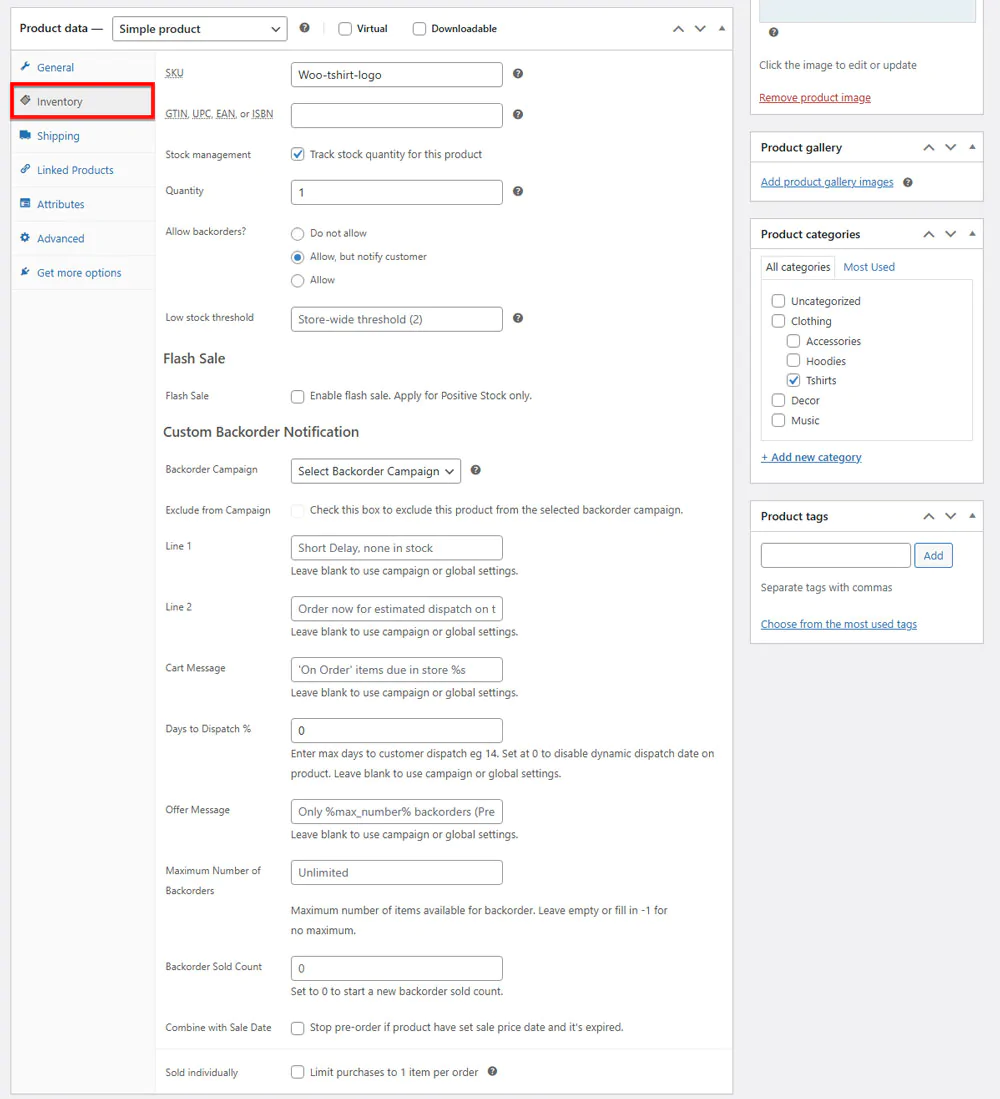
These backorder notifications automatically appear on the product page when:
- Stock Management is On and “Backorders > Notify” is enabled for the product or variation
- Stock Management is Off and Stock status is set to backorder
- The stock level reaches 0 or less.
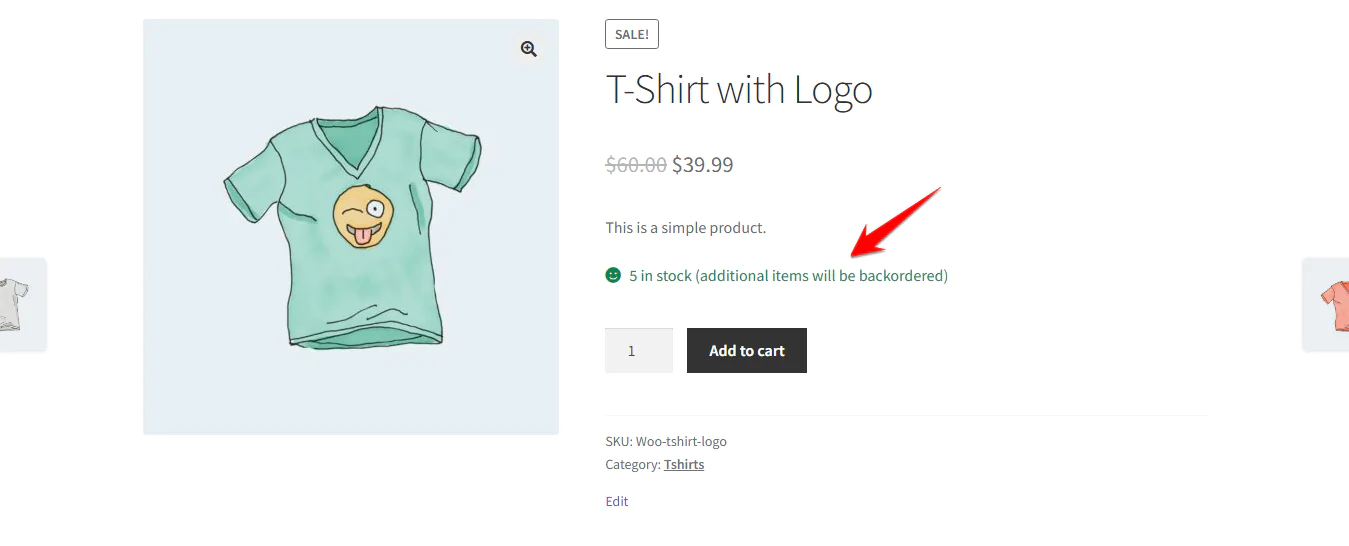
If the stock is positive, the backorder message will display as “5 in stock (additional items will be backordered)” (or the corresponding quantity available). As soon as the stock drops to 0, the backorder notification will automatically activate and display on the product page, allowing customers to place orders even when stock is unavailable.
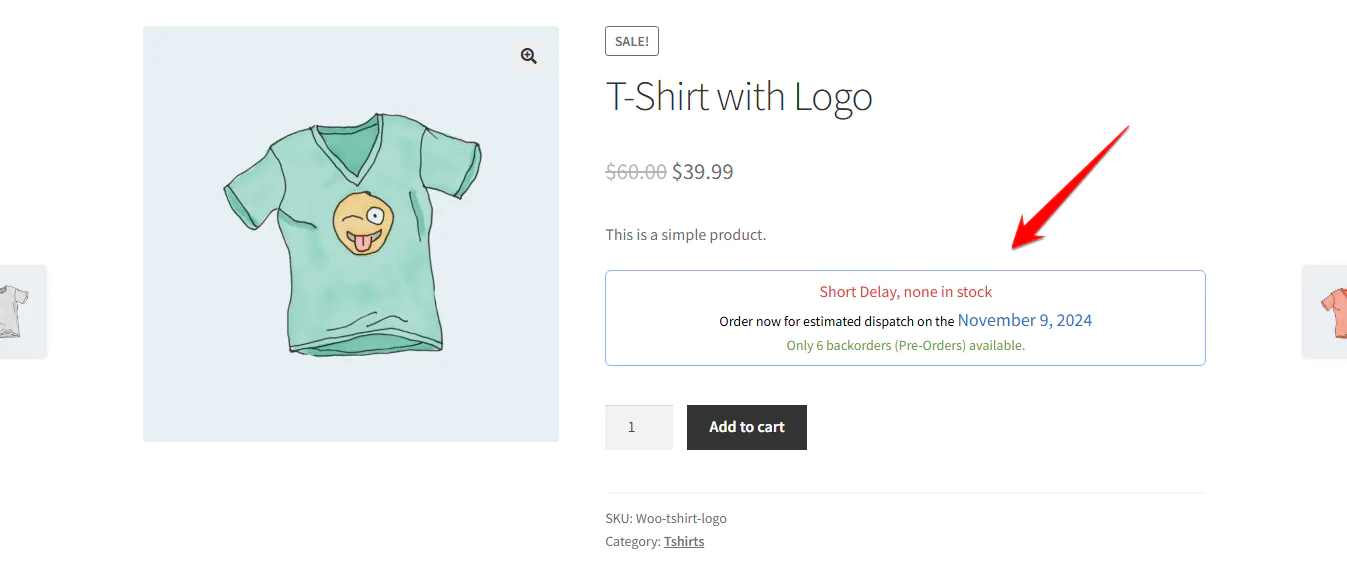
These settings allow you to tailor backorder details on a per-product basis, either linked to a backorder campaign or customized individually. You can configure product backorders in a way that suits your stock and sales strategy, with the option to modify notifications and dispatch dates.
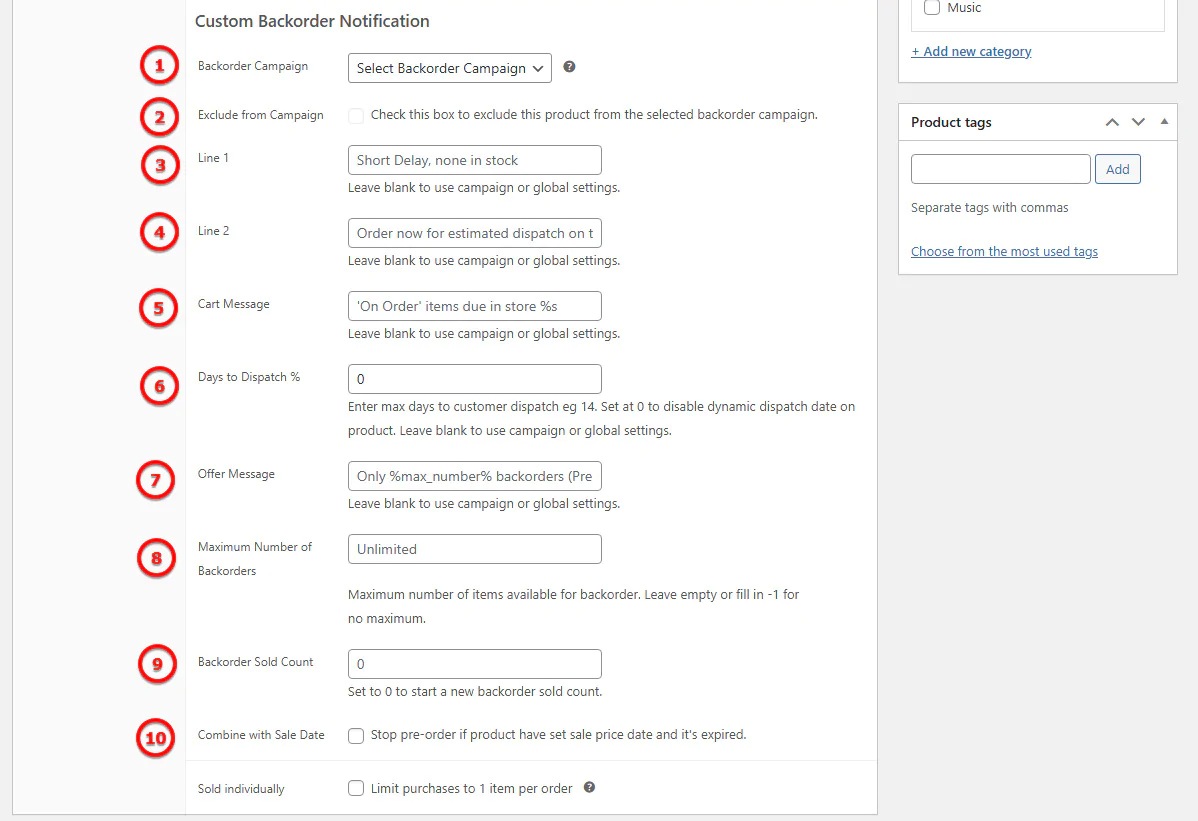
- Backorder Campaign
Select a backorder campaign to automatically apply its settings to this product.
You can assign a pre-configured backorder campaign to the product, which will apply the campaign’s rules (like messages and stock limits) to it. This is especially useful if you want to maintain consistency across multiple products. - Exclude from Campaign
Check this box to exclude this product from the selected backorder campaign.
If checked, the product will no longer follow the campaign’s predefined rules. Instead, you can configure this product’s backorder settings independently, allowing more flexibility. - Line 1
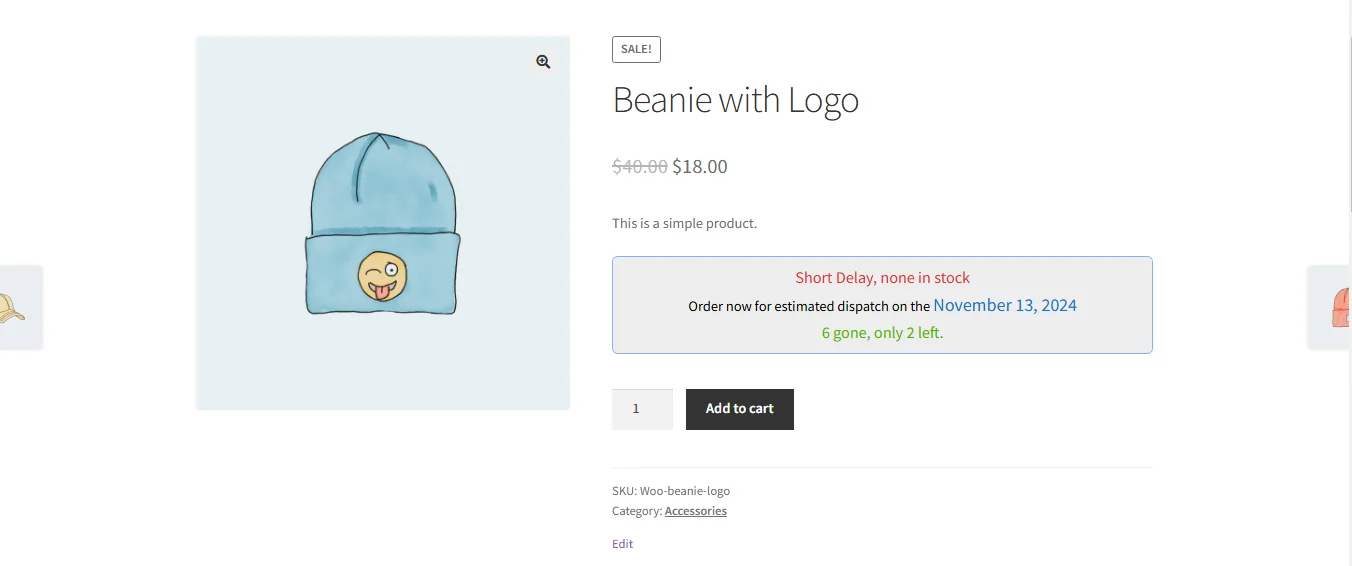
Example: “Short Delay, none in stock”
This message will appear on the product page to inform customers when a backordered product is unavailable in stock but can still be ordered. If left blank, the default message from the campaign or global settings will be used. - Line 2
Example: “Order now for estimated dispatch on the %s”
This line typically displays an estimated dispatch date for backordered items. It lets customers know when they can expect their order to ship. If left blank, the campaign or global setting will apply here. - Cart Message
Example: “‘On Order’ items due in store %s”
This message shows in the cart when backordered products are added. It helps clarify that the items are not immediately available but will be delivered once they’re back in stock or dispatched. Leave blank to use the campaign or global settings. - Days to Dispatch %
Example: 14
This field allows you to set the maximum number of days it will take to dispatch a backordered item. If set to 0, it disables the dynamic dispatch date (i.e., the dispatch date won’t be shown). This setting is useful for providing clear delivery expectations to customers. If left blank, the campaign or global settings will apply. - Offer Message
Example: “Only %max_number% backorders (Pre-Orders) available.”
This message displays an offer related to the availability of backorders. It can inform customers that there is a limited quantity available for pre-order. This is useful for creating urgency around backorders. Leave blank to use the campaign or global settings. - Maximum Number of Backorders
Example: Unlimited
This setting defines the maximum number of items available for backorder. If you leave it empty or set it to-1, there will be no limit to how many backorders can be placed for that product. Use this option to control the quantity available for backorder. - Backorder Sold Count
Example: 0
Set this count to0to reset the number of backorders sold. This is useful when you want to track backorders independently from previous sales or campaigns. It also helps manage stock visibility for new backorder periods. - Combine with Sale Date
Automatically stops pre-order functionality if the product has an active sale price date that expires.
This feature prevents customers from placing backorders or pre-orders for a product if it has a set sale price date that has already passed. This ensures that products are only available for backorder during valid promotional periods, protecting your sales strategy.
Backorder Global Settings
By default, the global settings apply to all products in your WooCommerce store. However, each product can have its own custom settings that override the global ones. This allows for more specific configurations for individual products, ensuring flexibility when setting up backorders across your store.
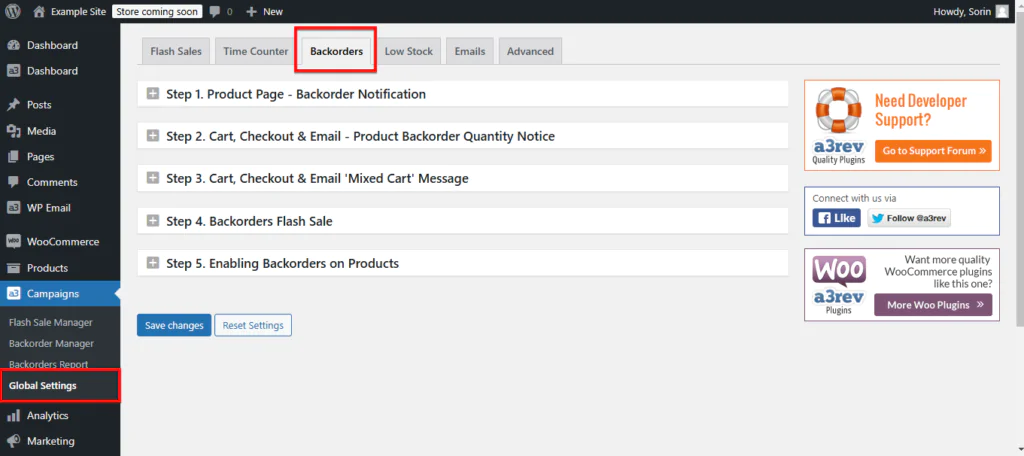
Step 1. Product Page – Backorder Notification
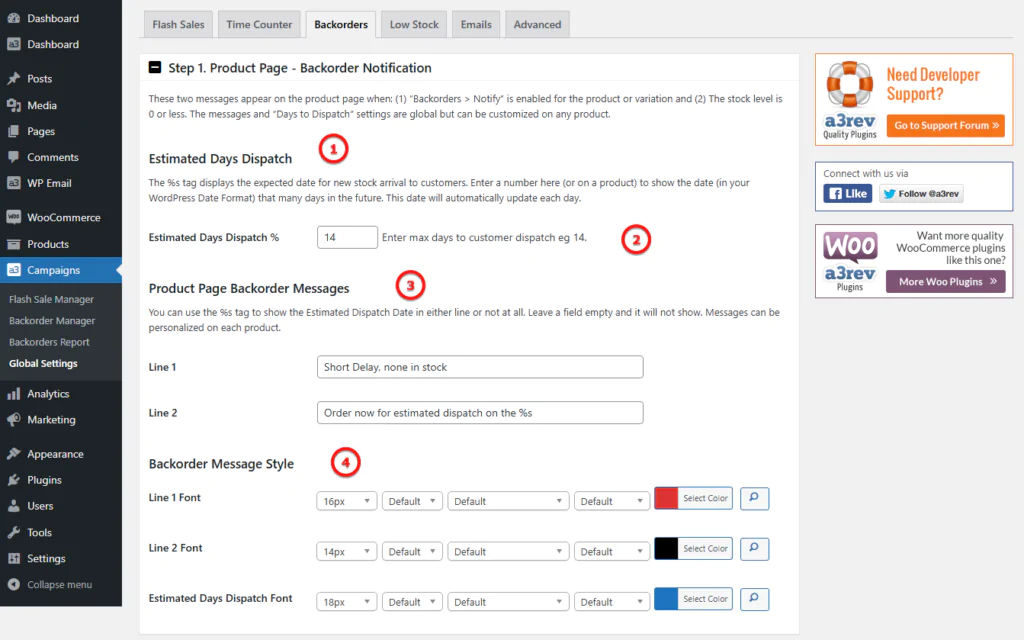
These two messages appear on the product page when: (1) “Backorders > Notify” is enabled for the product or variation and (2) The stock level is 0 or less. The messages and “Days to Dispatch” settings are global but can be customized on any product.
- Estimated Days Dispatch – The Estimated Days to Dispatch setting allows you to specify the maximum number of days it will take to dispatch a backordered product to the customer once the order is placed. This setting is helpful when managing backorders and ensuring customers are informed about delivery times.
- You can set a value in days (e.g., 14 for 14 days), and the dispatch date will be dynamically calculated based on that.
- Product Page Backorder Messages
The Estimated Dispatch Date feature allows you to provide an estimated shipping date for backordered products. You can use the %s tag to dynamically insert the estimated dispatch date into either of the two lines (Line 1 or Line 2) on the product page. If you leave a field empty, the message will not display. Line 1: You can provide a message like “Short Delay, none in stock,” or leave it empty to use the campaign or global settings. Line 2: You can display a message such as “Order now for estimated dispatch on the %s,” where %s will be replaced with the calculated dispatch date. Personalization: Each product can have its own custom message, allowing you to tailor the backorder notifications to suit specific product needs. - Backorder Message Style – You can customize the appearance of backorder messages on the product page using the following options: Line 1 Font: Customize the font style for the first line of the backorder message (e.g., “Short Delay, none in stock”). Line 2 Font: Customize the font style for the second line of the backorder message (e.g., “Order now for estimated dispatch on the %s”). Estimated Days Dispatch Font: Customize the font style and color for the message related to the estimated dispatch date (e.g., “Order now for estimated dispatch on the %s”).
Step 2. Cart, Checkout & Email – Product Backorder Quantity Notice
Info: These notices will only show on Cart and Checkout pages if you are using the Classic Template. They will not appear if you are using the blocks template.

These notices appear on the product line item in the cart, at checkout, and in order emails when: (1) An order includes both in-stock and backordered quantities of a product (both quantities are displayed) or (2) A product is fully backordered (only the backordered quantity is displayed).
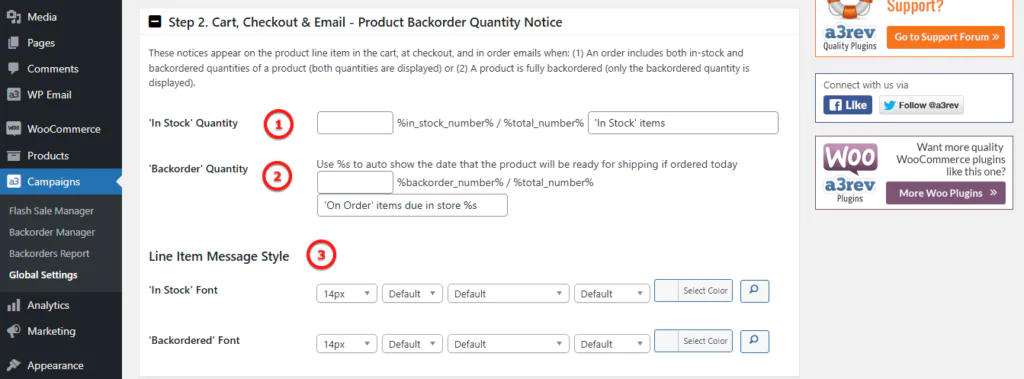
1. ‘In Stock’ Quantity
- %in_stock_number% / %total_number%: This will display the number of items in stock versus the total quantity available (including backorders). For example, “5 In Stock / 10 Available.”
2. ‘Backorder’ Quantity
- %backorder_number% / %total_number%: This shows the quantity of items on backorder. For example, “3 Backordered / 10 Available.”
- Auto Show Shipping Date: Use the
%stag to automatically insert the estimated dispatch or shipping date based on the backorder’s delivery schedule.
Example: “Backorder: 3 / 10 Available, Shipping by %s”
‘On Order’ Items
- On Order items due in store %s: Displays the message on the Cart and Checkout pages to notify customers of items that are on backorder, with an estimated date for when the stock will be replenished.
3. Line Item Message Style
- ‘In Stock’ Font: Customize the font style for the “In Stock” message on Cart and Checkout pages.
- ‘Backordered’ Font: Customize the font style for the “Backordered” message on Cart and Checkout pages.

Step 3. Cart, Checkout & Email ‘Mixed Cart’ Message
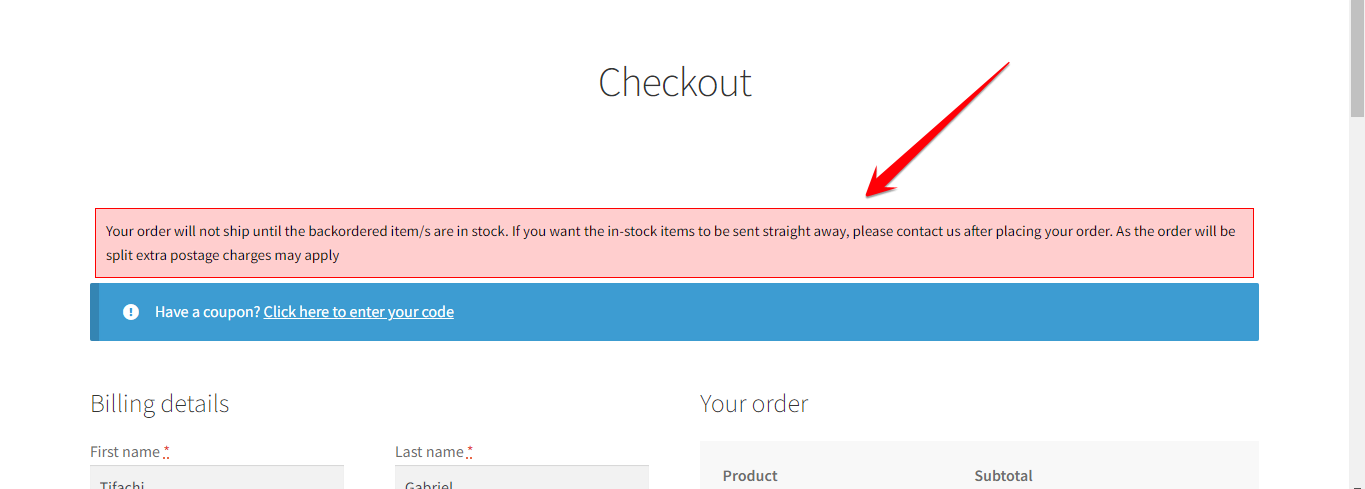
This setting controls the display of a special notice when a customer’s cart contains both in-stock and backordered items (Mixed Cart). This message can be crucial for informing customers about any specific terms or conditions that may apply to their order, such as shipping policies or additional charges.
Info: For the Blocks template, the Mixed Cart Notice will only show on Cart and Checkout pages if you add the block named Backorder Shipping Notification. This block must be manually added to the Cart and Checkout pages for the notice to appear. For the Classic Template, the Mixed Cart Notice is added automatically to the Cart and Checkout pages
How It Works:

1. Enable Mixed Cart Notice
Turn this setting ON to display a notice on the Cart page, Checkout page, and in Order emails whenever a customer’s cart contains both in-stock and backordered products.
- Cart Page: Display the notice on the cart page.
- Checkout Page: Display the notice on the checkout page.
2. Mixed Cart Notice
Example Notice:
- Message: “Your order will not ship until the backordered item/s are in stock. If you want the in-stock items to be sent straight away, please contact us after placing your order. As the order will be split extra postage charges may apply.” Customize the notice message as needed to communicate important information to your customers.
3. ‘Mixed Cart’ Notice Style
This setting allows you to customize how the Mixed Cart Notice is displayed when customers have a combination of in-stock and backordered items in their cart. You can adjust the font and style to ensure that customers are clearly notified about items on backorder when reviewing their cart.
Step 4. Backorders Flash Sale
This feature allows you to create a limited-time Pre-Order Flash Sale for any product, with a countdown timer, utilizing WooCommerce’s Special Price and Schedule Date functionality. It’s ideal for running time-sensitive offers with limited quantities of backorders.
Placeholders
- %max_number%: Replaces with the maximum backorder quantity available.
- %gone_number%: Replaces with the number of backorders already placed.
- %left_number%: Replaces with the remaining quantity available for backorder.
Offer | Countdown | Limit Reached
- Offer: Create a pre-order offer with a maximum backorder limit. This message will appear on the product page when the backorder limit is set.
- Example: “Only %max_number% backorders (Pre-Orders) available.”
- Countdown: Show the quantity that has already been ordered, and how many are left in stock.
- Example: “%gone_number% gone, only %left_number% left.”
- Limit Reached Notice: A notice that will display when the pre-order limit has been reached.
- Example: “Sorry, No more Pre-Orders Available.”
Font Style
Customize the font style for the flash sale offer and countdown to ensure it aligns with your store’s design and stands out to customers.
Step 5: Enabling Backorders on Products
Finding Backorder Automation Settings in Product Editor
To enable and configure backorders on individual products, follow these steps:
- Navigate to Product Editor: Open the product editor for the item you wish to enable backorders on. You will find the backorder settings under the ‘Product Data’ section in WooCommerce.
- Activate Stock Management: First, ensure that Stock Management is activated for the product. This is essential for backorders to work properly.
- Allow Backorders: In the Inventory tab, enable the ‘Allow Backorders’ option. This setting controls whether backorders are allowed, and it must be turned on to activate the backorder functionality.
- Backorder Automation Features: Once the “Allow Backorders” option is enabled, you will see the additional backorder settings introduced by the Backorders Automation feature. These settings allow you to customize the backorder process further, such as setting up campaigns, messages, maximum backorder quantities, and more.
Import / Export Backorders
The Backorder Automation feature integrates seamlessly with the WooCommerce Products Import/Export system, making it easy to manage backorders across multiple products using CSV files.
- Importing Backorders: When importing products via CSV, you can include the backorder-related metadata and settings. This ensures that backorder settings are applied to products automatically when added in bulk.
- Exporting Backorders: You can also export backorder settings from your WooCommerce store. This allows you to create backups of your settings or migrate them to another store.
Example CSV: Below is an example CSV showing how the Backorder Meta and data will be structured for import/export:
| Product Name | SKU | Stock Quantity | Allow Backorders | Backorder Campaign | Max Backorder Quantity | Backorder Sold Count |
|---|---|---|---|---|---|---|
| Example Product 1 | EX123 | 10 | Yes | Backorder Campaign 1 | 50 | 20 |
| Example Product 2 | EX124 | 0 | Yes | Backorder Campaign 2 | 100 | 5 |
This allows for efficient bulk management of backorder settings, ensuring consistency across your product catalog.
Flash Sales
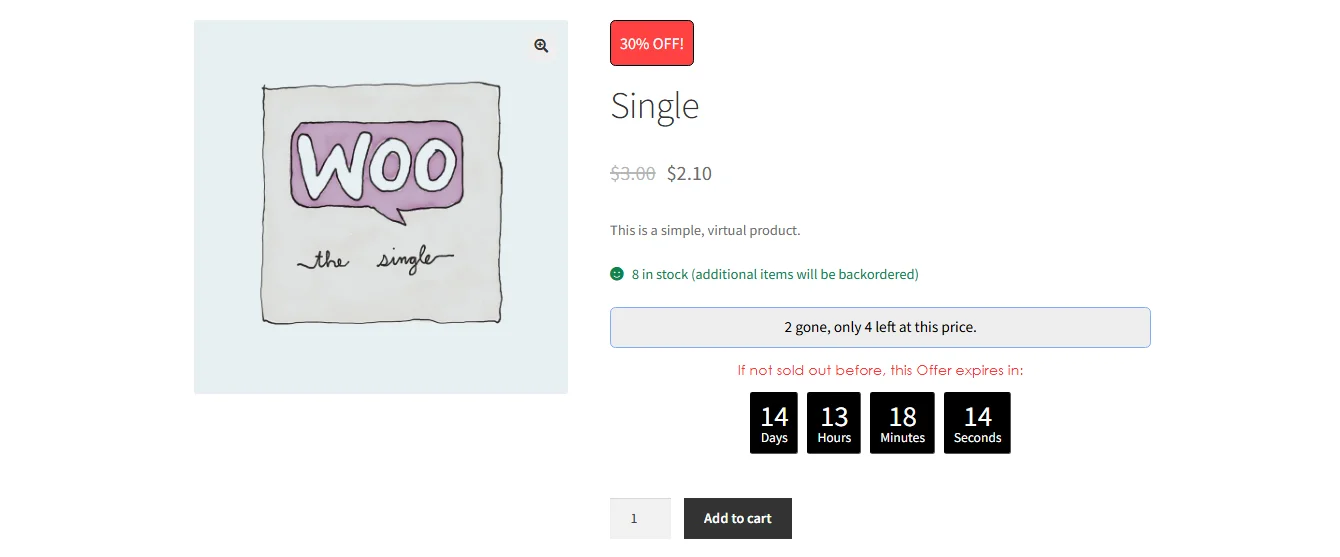
The Flash Sales feature allows you to create enticing, time-limited offers for your in-stock products. Flash sales work by creating urgency and scarcity, encouraging customers to make quick purchases. These time-limited offers are shown on the product page and are fully integrated with WooCommerce’s Special Price and Schedule features for seamless functionality.
Introduction to Flash Sales Setup
The Flash Sales feature in the plugin offers a versatile approach to running limited-time discounts. You can assign a flash sale to products individually or in bulk, using any of these three methods:
- Flash Sale Campaigns: Set up a flash sale campaign template that can be easily applied to multiple products, streamlining your setup process.
- Product Page Flash Sale Settings: Access individual product settings to configure flash sale options directly within each product’s backend.
- Flash Sale Manager: Use the Flash Sale Manager for a quick overview and efficient bulk-editing capabilities. This tool allows you to apply campaigns, activate sales, and adjust product details for multiple products at once.
Each method serves unique needs, from targeting a single item to rolling out promotions across product categories. Let’s explore each option in detail to get you set up quickly and effectively!
Flash Sale Campaigns
By setting up a Flash Sale Campaign, you can apply the same sale template across multiple products, saving time and effort. Once a campaign is created, it can be reused on various products, ensuring consistency in your promotions.
Step-by-Step Guide to Creating a Sales Campaign

A Sale Campaign allows you to define the styling, countdowns, and messaging for flash sales in one place. When applied to products, this campaign ensures that your sales are consistent and recognizable. Here’s how to get started:
- Navigate to Sale Campaigns
- In your WordPress admin dashboard, go to Products > Sale Campaigns.
- Create a New Campaign
- Click on Add New Campaign to start setting up a unique sale template.
- Define Campaign Details
- Campaign Name: Choose a descriptive name (e.g., “Seasonal Sales”).
- Custom Sales Notification: Set up specific messages, styling, and notification lines that will appear on the product page when a product is on sale.
- Configure Notification Fields
- Campaign Color
- Select the color for the Flash Sale notice that will be displayed on the product page.
- Discount Type
- Choose between:
- Percent: Apply a percentage discount to the product price.
- Fixed: Apply a fixed amount discount to the product price.
- Discount Amount
- Enter the discount value (either percentage or fixed amount, depending on your choice above).
- Start/End Sale Day
- Set the start and end dates for your Flash Sale. The sale will only be active during the designated time frame.
- Badge Text
- Define the text that will appear as a badge on the product image, such as “Flash Sale” or “Limited Time Offer”.
- Flash Sale Message
- Enter a custom message that will appear on the product page during the Flash Sale (e.g., “Hurry! Flash Sale ends in 2 hours!”).
- Save and Apply
- Once all settings are configured, click Save. Your campaign is now ready to be applied to products.
With your campaign saved, you can apply it to individual products or multiple products at once. This allows you to manage flash sale promotions seamlessly and ensure a uniform experience across all products using this campaign.
Applying a Sales Campaign to Products
- Navigate to the Product Page
- Go to Products in your WordPress admin and select the product you want to configure.
- Enable Flash Sales Settings
- Scroll down to the Inventory section of the product page.
- Under Stock Status.
- Assign the Sales Campaign
- In the Sale Campaign dropdown, select the campaign you created (e.g., “Seasonal Sales”).
- Exclude from Campaign: If you want to customize this product’s sales messaging independently from the selected campaign, check the Exclude from Campaign box. This will unlock the fields below for individual editing.
- Adjust any additional fields as needed, like Discount Amount and Flash Sale Message if you want them to differ from the campaign defaults.
- Save Changes
- Click Update to save the product settings. The campaign’s settings will now be applied to this product on the storefront.
Flash Sale Products Manager
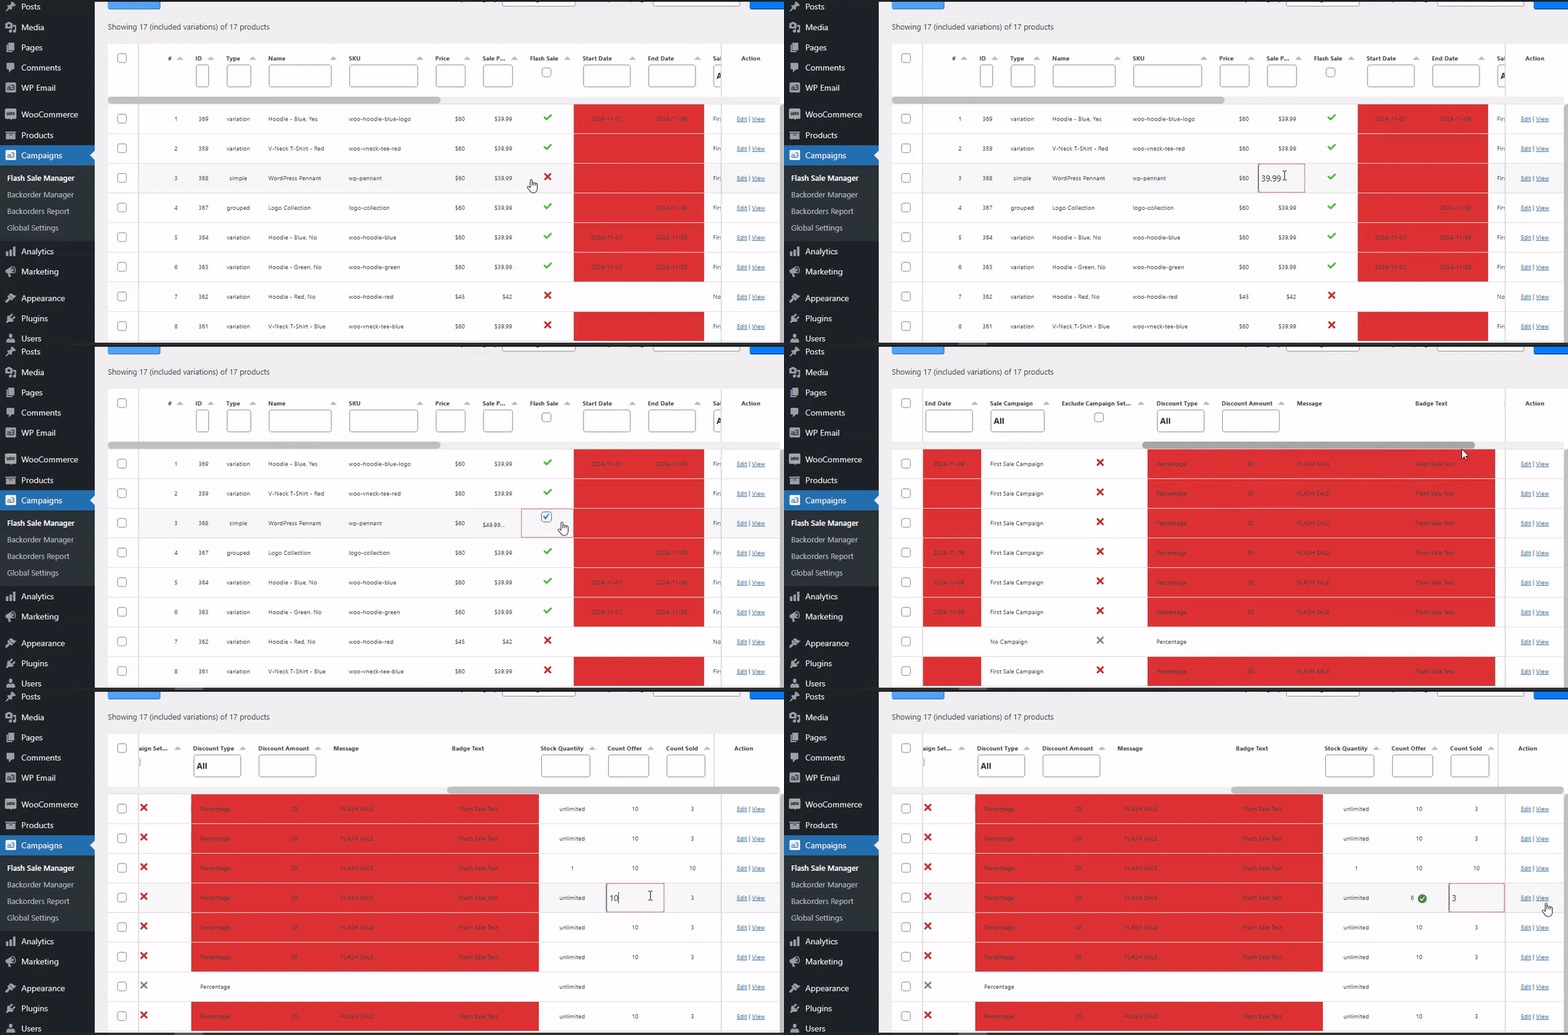
The Flash Sale Products Manager is a streamlined tool for efficiently managing flash sale settings across multiple products. With an intuitive table layout, this manager allows you to quickly configure or update flash sale details, making it easy to create urgency-driven campaigns that boost sales. One of its most valuable features is the bulk edit capability, which enables you to quickly apply flash sale settings to many products at once—especially helpful for stores with large inventories.
Inline Editing of Key Fields:
Adjust important fields directly within the manager, including Price, Sale Price, Discount Type, and Flash Sale Start/End Date. These edits are immediately reflected on product pages.
Quickly activate or deactivate products for flash sales, directly from this panel.
With the Flash Sales Campaign created, you can streamline the process of applying it across multiple products using the Sales Manager.
Access Sales Manager
Go to Campaigns > Flash Sales Manager in your WordPress dashboard.
Filter Products by Category
Use the Category Filter at the top of the Flash Sale Products Manager to narrow down the list of products you want to edit.
This makes it easy to:
- Focus on a specific product category
- Select only relevant items for your campaign
- Avoid accidentally editing unrelated products

Bulk Editor
Once you’ve filtered products by category or viewed all products, you can use the Flash Sale Products Manager’s bulk editor to apply changes quickly.
How to Bulk Edit Flash Sale Products
1. Filter Products (Optional)
Use the Category filter dropdown to narrow down products to a specific group. This is especially useful when running targeted sales.
2. Select Products to Edit
Use the checkboxes to select individual products, or click the checkbox at the top of the column to select all products in the current view.
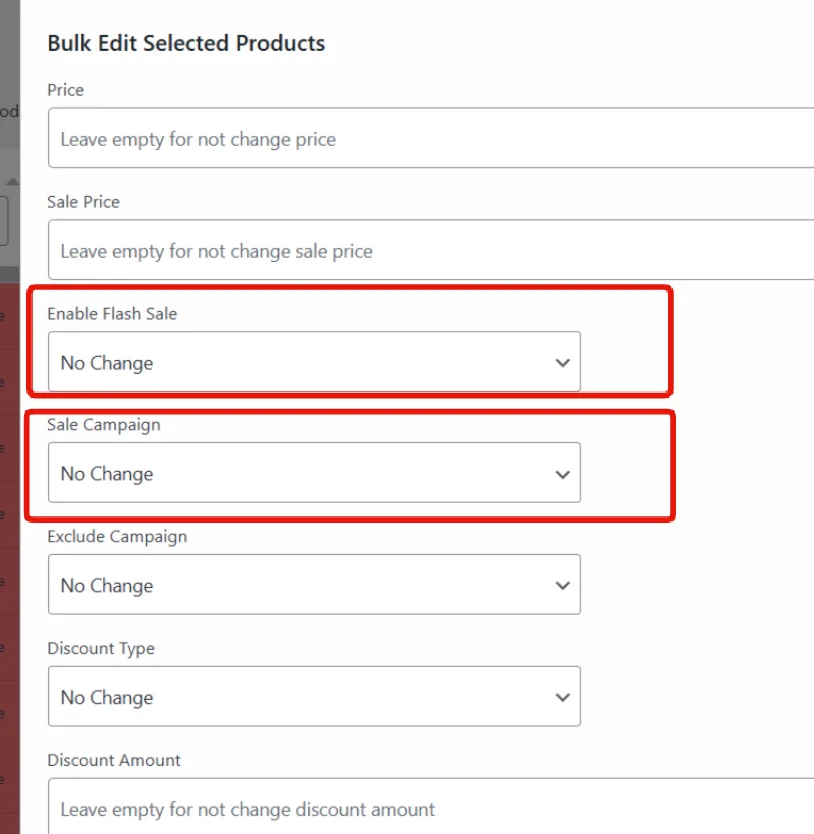
3. Set Required Fields for Flash Sale
Before applying any changes, make sure:
✅ Enable Flash Sale is checked.
✅ A Sale Campaign is selected from the dropdown.
These are required for the bulk editor to apply changes.
4. Configure Flash Sale Settings
Enter the sale price, start date, end date, or other fields you wish to apply.
5. Apply Changes
Click Apply to Selected to update all selected products with the configured flash sale settings.
Change key flash sale settings like Discount Amount, Badge Text, and Maximum Number of Flash Sale Items in bulk, saving you from repetitive manual edits.
Set Flash Sale on Product Page
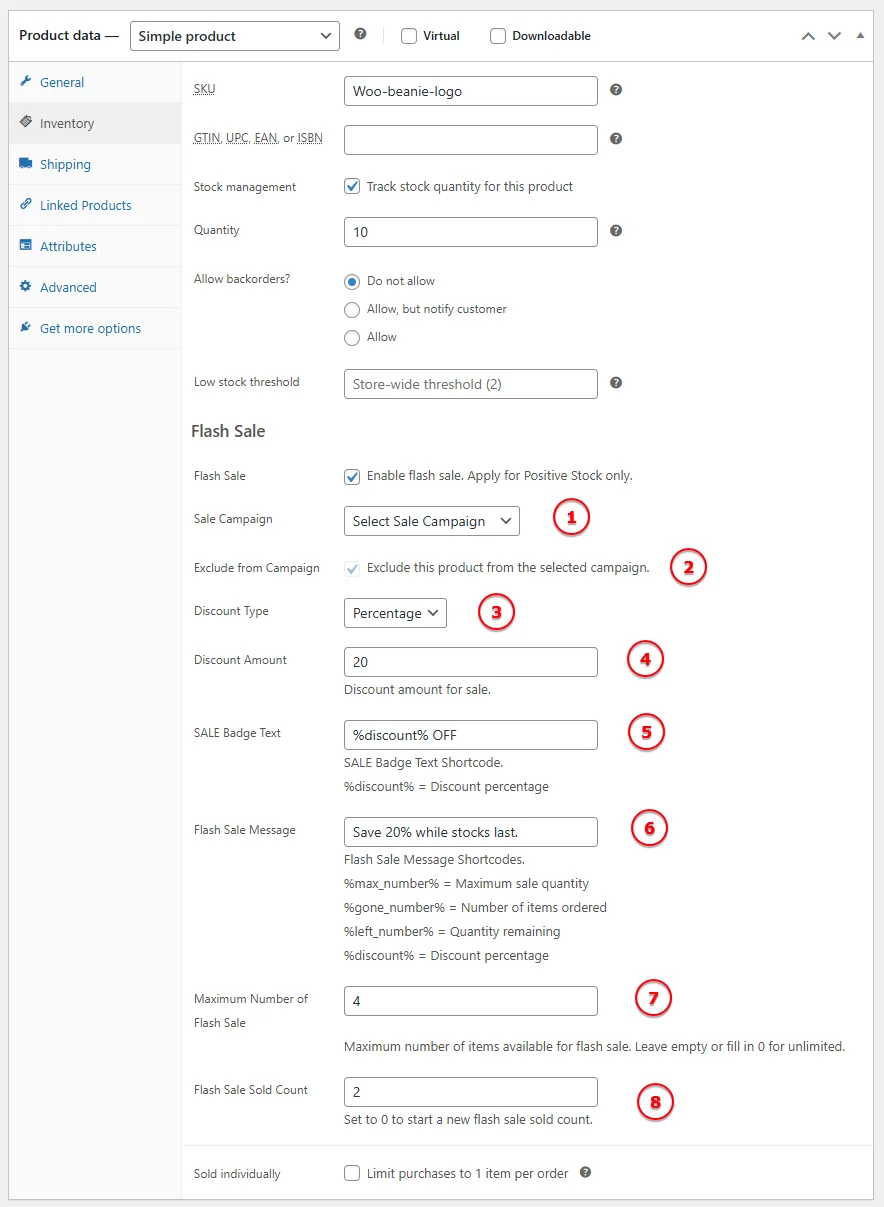
To enable a Flash Sale for an individual product, it’s essential to ensure the product has a positive stock level. Flash sales work by offering time-sensitive discounts on items currently in stock, creating a sense of urgency and encouraging quick purchases. Here’s how to set it up:
Navigate to the Product’s Flash Sale Settings
In the WooCommerce product editor, go to the Inventory section. Ensure Stock Management is enabled, and the Stock Status is set to reflect the available inventory.
- Sale Campaign
Select a pre-configured sale campaign to apply its settings to this product.
2. Exclude from Campaign
Check this box to exclude the product from the selected campaign. This allows you to set custom sale parameters for the product without using the campaign template.
3. Discount Type
Choose the discount type—either Percentage or Fixed amount.
4. Discount Amount
Enter the discount amount (e.g., 30) to apply based on the selected discount type.
5. SALE Badge Text
Enter the badge text for the flash sale, like “%discount% Off!” This will appear on the product page to highlight the flash sale. Leave blank to use the global badge setting.
6. Flash Sale Message
Customize the flash sale message displayed on the product page, such as “Only %max_number% available for this Flash Sale.” Leave blank to use the global settings.
Flash Sale Message Shortcodes:
%max_number% = Maximum sale quantity
%gone_number% = Number of items ordered
%left_number% = Quantity remaining
%discount% = Discount percentage
7. Maximum Number of Flash Sale
Set the maximum quantity of items available for this flash sale. Leave blank or set to 0 for unlimited availability.
8. Flash Sale Sold Count
Specify the current number of sold items within the flash sale. Set to 0 to start a fresh count.
Flash Sale Global Settings
The Flash Sale Global Settings provide a powerful tool for setting up uniform, visually engaging flash sale notices across your entire WooCommerce store. These global settings allow you to apply flash sale configurations effortlessly, but they can also be customized per product or through the Sales Manager to fine-tune each item’s promotion.

- Placeholders for Dynamic Flash Sale Content
Use placeholders to dynamically update flash sale messages across all products, allowing customers to see relevant, up-to-the-minute information on available discounts and remaining quantities:
- %discount% : Automatically displays the discount amount (e.g., “20% off”) based on the sale configuration.
- %max_number% : Shows the maximum number of items available in the flash sale, emphasizing limited availability.
- %gone_number% : Updates in real-time to reflect the number of items already sold, intensifying urgency as quantities reduce.
- %left_number%: Replace by left quantity.
2. Badge, Offer, and Countdown Notices for Flash Sales
In the Flash Sale Global Settings, you can configure global notices for flash sales using the Badge, Offer, and Countdown settings. These notices, which display only on the product page, create urgency and scarcity, encouraging faster purchases. With just a few clicks, you can set up visually compelling flash sale messages and seamlessly integrate them with WooCommerce’s Special Price and Schedule features. To activate a flash sale on any product or variation, simply set a Flash Sale Limit number.
Global Settings for Flash Sale Notifications
- Badge Text
Display a concise and enticing badge that instantly communicates the discount. Use%discount%to dynamically replace this with the set discount amount.- Example:
“%discount% Off!”– Automatically updates to show the actual percentage or amount saved.
- Example:
- Quantity Offer
This notice informs customers about the total quantity available under the flash sale, highlighting limited stock.- Example:
"Only %max_number% available for this Flash Sale."– This line shows customers the limited stock, emphasizing urgency.
- Example:
- Quantity Countdown
Display a real-time countdown of items sold and remaining, motivating customers to buy before the offer runs out.- Example:
"%gone_number% gone, only %left_number% left at this price."– These placeholders dynamically update as stock reduces, creating a sense of urgency.
- Example:
3. Customization Options for Global Flash Sale Styling
The Global Settings include a comprehensive set of design controls to ensure your flash sale notifications align with your store’s branding while standing out to customers. Here’s what you can customize:
- Container Background: Select a background color for the entire flash sale notification container, making the notice easily visible.
- Container Pading
- Container Border: Add a border to frame the flash sale section, further distinguishing it on the product page.
- Font Style: Define the base font for flash sale messages, ensuring consistency across all product notices.
4. Specific Font Customizations for Flash Sale Details
These individual font settings enable you to style key elements within the flash sale message, highlighting critical information:
- Badge Font: Customize the discount badge’s font for better visibility, drawing immediate attention to the deal.
- Offer Font: Style the main offer text to make the discount compelling (e.g., “Hurry, while stocks last!”).
- Countdown Font: Choose a distinct font for the countdown timer to convey urgency, encouraging customers to act before time runs out.
Time Counter

The Countdown Timer feature allows you to set up and style a countdown for your flash sales, displaying a Day | Hour | Minute counter above the “Add to Cart” button on the product page. This creates a sense of urgency and encourages customers to make a purchase before the offer expires.
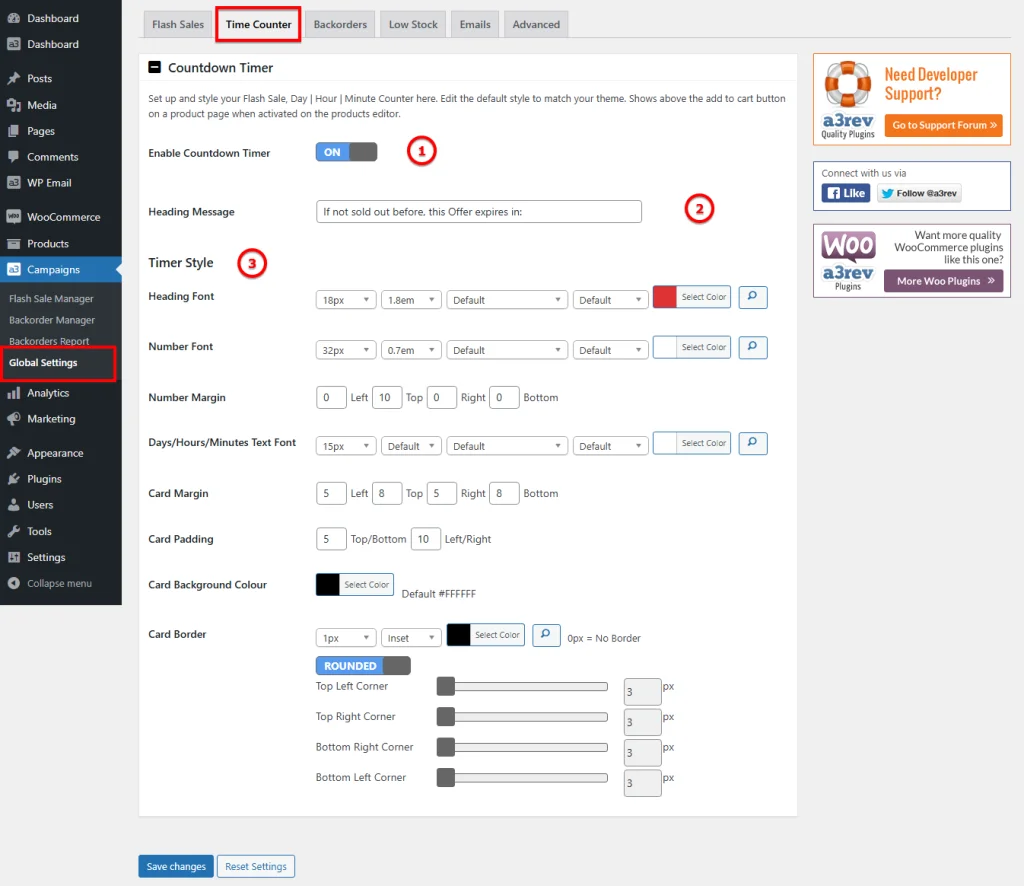
- Enable Countdown Timer
Toggle this setting On or Off to activate or deactivate the countdown timer on your product page. - Heading Message
Set a custom message that will appear above the countdown timer, such as “[If not sold out before, this Offer expires in:]” or any message that suits your sale theme. - Timer Style Customization
Fine-tune the countdown timer’s look and feel to make it engaging and consistent with your store’s branding:- Heading Font: Choose the font style for the heading message.
- Number Font: Select the font style for the countdown numbers.
- Number Margin: Adjust the margin around the countdown numbers for optimal spacing.
- Days/Hours/Minutes Text Font: Pick a font style for the labels (Days, Hours, Minutes).
- Card Margin: Set the outer margin of the countdown timer card to control its position on the page.
- Card Padding: Define the padding inside the countdown timer card for balanced spacing around the content.
- Card Background Color: Choose a background color that contrasts well with the text and numbers, enhancing readability.
- Card Border: Customize the border style, color, and thickness around the countdown timer card for a more polished look.
Applying the Countdown Timer to a Product

- Activate Countdown Timer on Product
- Go to the product editor and ensure the countdown timer is enabled for this item.
- Automatic Display on Product Page
- Once enabled, the countdown timer will automatically appear above the “Add to Cart” button on the product page whenever a Flash Sale or a Pre-Order campaign is active.

Sale Badge

The Sale Badge feature allows you to display dynamic sale badges for both simple and variable products. This functionality ensures that your customers see the most relevant badge information, making your sales campaigns more effective and visually appealing.
Simple Products
For simple products, the Sale Badge can be applied directly. The settings allow you to configure:
- Custom badge text (e.g., “15% OFF!” or “Save $10!”).
- Dynamic updates based on sales campaigns.
- The badge appears on product cards as well as product detail pages.
Learn more about setting and styling option.
Variable Products
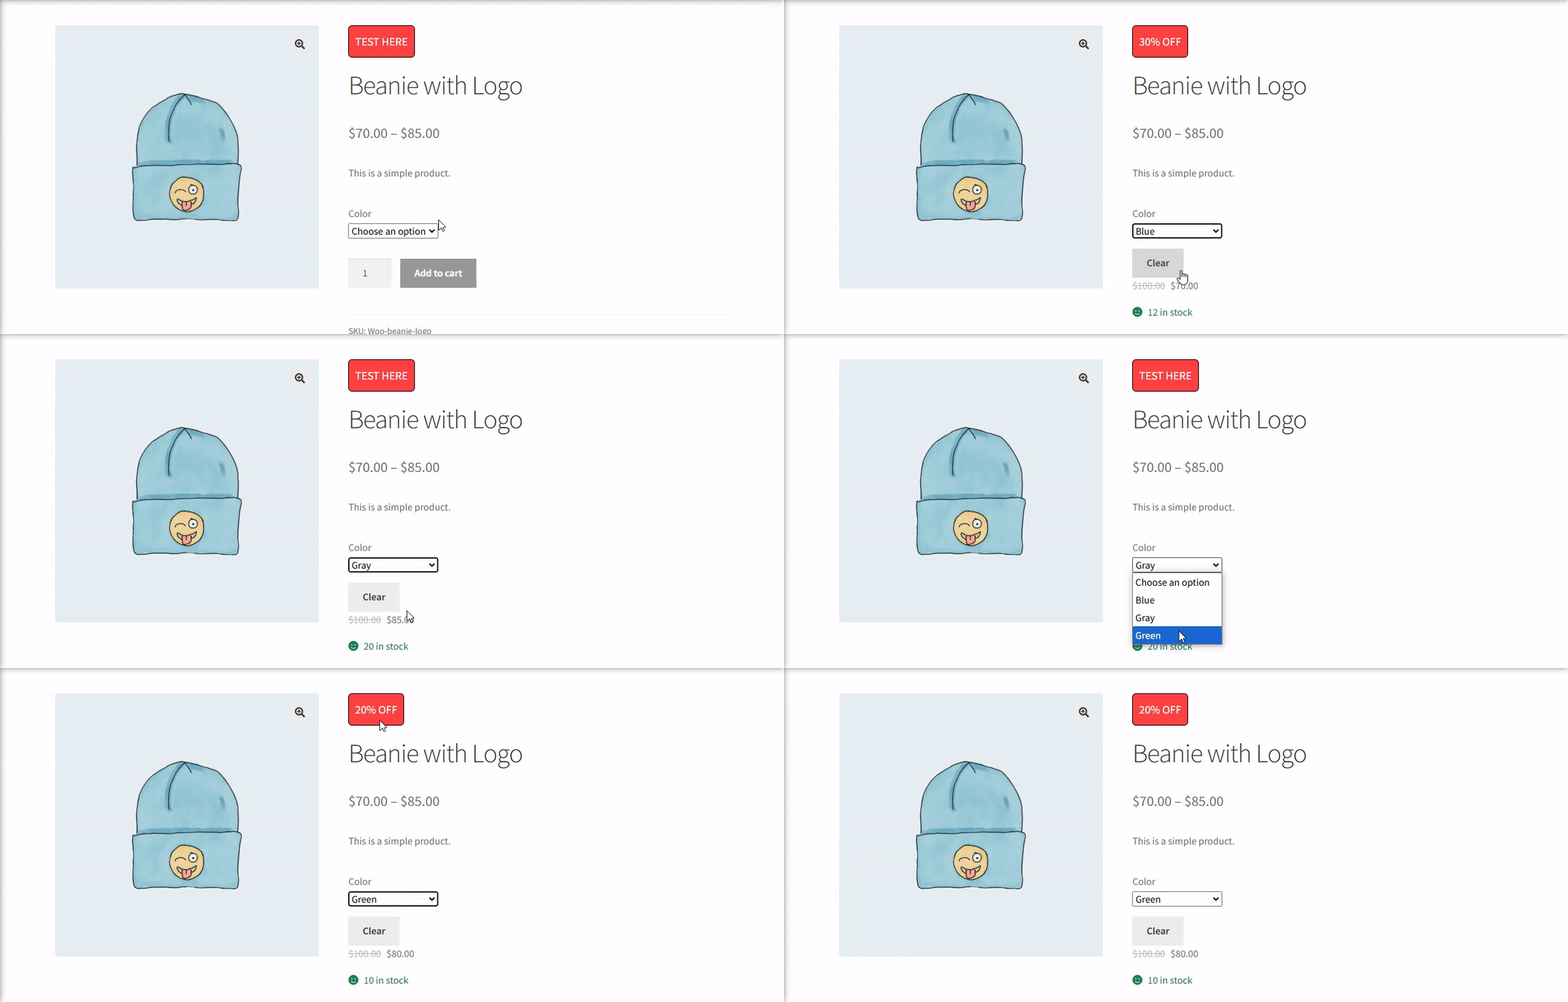
For variable products, the Sale Badge works similarly, with additional features tailored to variations:
- Each variation can have its own badge and discount settings.
- The badge dynamically updates on the product detail page as customers select different variations.
Default SALE Badge

The Default SALE Badge setting allows you to choose which variation’s badge will display by default for a variable product. This is useful when you want to highlight a specific badge from a particular variation.
Where to find the setting:
- Go to the Edit Product screen in WooCommerce.
- In the Product data section, ensure the product type is set to Variable product.
- Open the Variations tab.
- Locate the Default SALE Badge dropdown at the top of the Variations section.
How it works:
- Use the dropdown to select a specific variation for the default badge. This badge will display on the product card and product detail page.
- If no default badge is selected, WooCommerce will show the first variation’s badge it can find.
This setting ensures that your preferred badge is consistently displayed across your store unless overridden by customer variation selections.
Dynamic SALE Badge with Shortcodes
The SALE Badge feature for variable products dynamically updates as customers switch between variations on the product detail page. You can enhance the badge text further by using the %discount% shortcode to display the discount percentage automatically.
Dynamic Badge
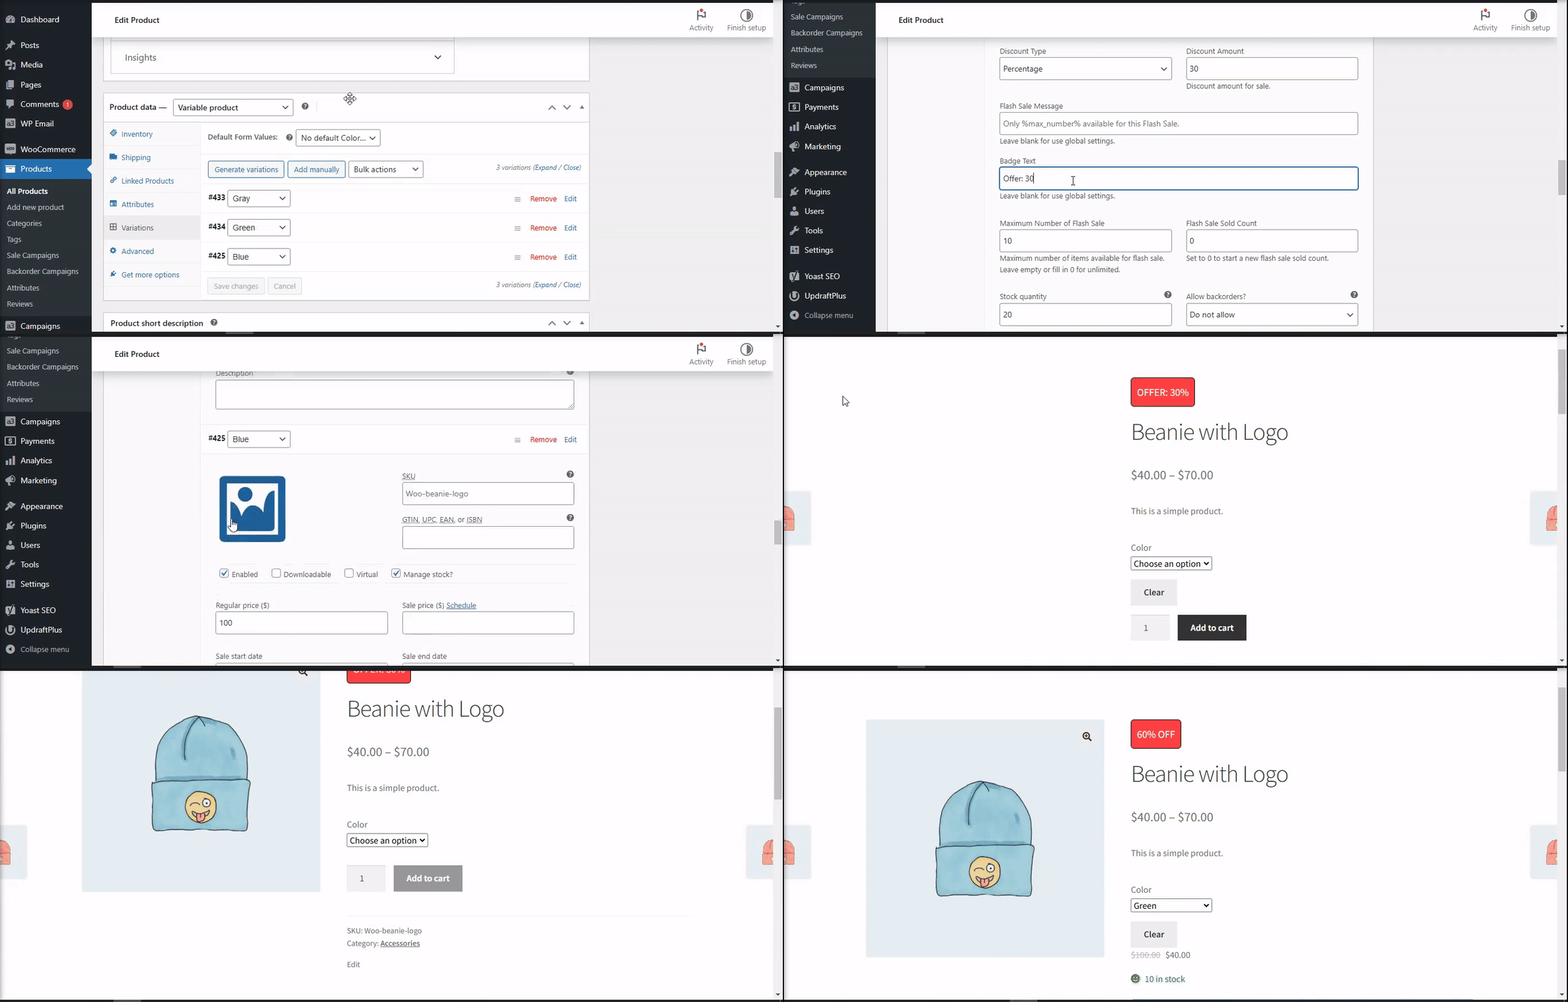
When customers select a variation, the badge reflects the specific settings for that variation. For example:
- Blue: “30% OFF”
- Gray: “Offer: %discount%” (displays as “Offer: 30%” for a 30% discount)
- Green: “60% OFF”
If a customer selects the Green variation, the badge will dynamically update to display “60% OFF.”
How to Configure Dynamic Badges with Shortcodes
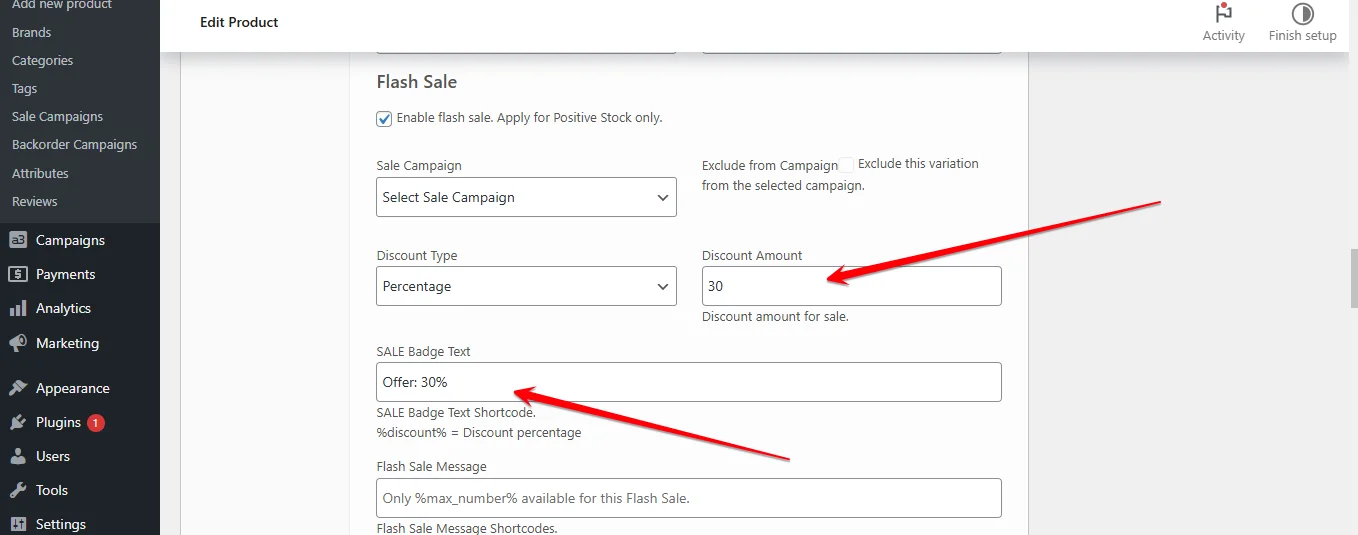
- Navigate to Product Data and select Variable Product.
- Open the Variations tab.
- For each variation:
- Click Edit next to the variation.
- Add a custom Badge Text. You can use plain text (e.g., “30% OFF”) or include the
%discount%shortcode to display the discount dynamically.- Example: Enter
Offer: %discount%to display asOffer: 30%for a product with a 30% discount.
- Example: Enter
- Save the changes for each variation.
- After setting the Badge Text for all variations, save the product.
Result
- On the product detail page, the badge dynamically updates as customers switch between variations, showing the relevant badge text or discount percentage.
- If you use the
%discount%shortcode, the badge text automatically adjusts based on the variation’s discount settings.
Low Stock Threshold Notice
Overview
These settings control how notifications appear on the product page when a product’s stock hits the designated Low Stock Threshold (LST). The Low Stock Threshold Notice messages are crucial for informing customers about the availability of items nearing depletion. If you have not set a Low Stock Threshold, you can skip these settings.

These messages ONLY SHOW if ‘Low Stock Threshold‘ (LST) is set and the product has hit the threshold.
1. Can be Backordered
Indicate if additional items can be backordered when the product hits the low stock threshold. Add additional text to the WooCommerce Low Stock Threshold notice.
Customize the message that appears when the product’s stock is low. Use this option to provide additional information to customers.

2. Availability Message
Display a message about product availability and expected shipping date.
Use %s to automatically show the date when the product will be ready for shipping if ordered today. Warn customers that ordering more than the in-stock quantity may delay dispatch.
3. Availability Message Style
- Availability Font: Customize the font style for the availability message.
Email – Backorders Due Report
Overview
Automate your upcoming backorders due email notifications with the options below. These settings ensure that you stay informed about pending backorders and can manage them efficiently. You can also manually generate report emails at any time from the Backorders Report page.
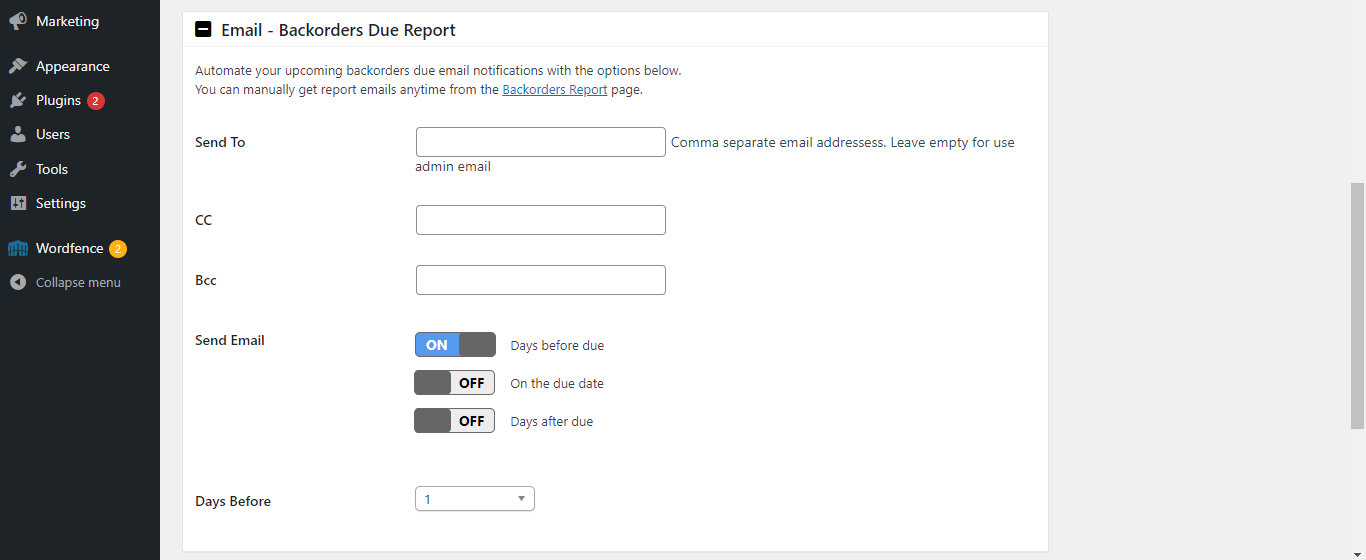
Email Notification Settings
- Send To:
- Enter the email addresses to which the report should be sent. Use a comma to separate multiple email addresses.
- If left empty, the report will be sent to the admin email address.
manager@example.com, warehouse@example.com - CC:
- Enter email addresses to receive a carbon copy (CC) of the report. Use a comma to separate multiple addresses.
sales@example.com, logistics@example.com - Bcc:
- Enter email addresses to receive a blind carbon copy (Bcc) of the report. Use a comma to separate multiple addresses.
admin@example.com - Send Email:
- Check the appropriate toggle to choose when to send the email notifications:
- Days before due: Sends an email notification a specified number of days before the backorder is due.
- On the due date: Sends an email notification on the exact due date of the backorder.
- Days after due: Sends an email notification a specified number of days after the backorder is due.
- Check the appropriate toggle to choose when to send the email notifications:
- Days Before:
- If “Days before due” is selected, specify the number of days before the due date when the email should be sent.
3(This will send the notification three days before the backorder is due.)
By configuring these settings, you can ensure that relevant stakeholders are notified in a timely manner about upcoming backorders, helping you manage stock and fulfill orders efficiently.
Example Configuration
- Send To:
manager@example.com, warehouse@example.com - CC:
sales@example.com - Bcc:
admin@example.com - Send Email:
- Days before due:
3 - On the due date
- Days after due
- Days before due:
This configuration will send an email notification to the specified recipients three days before the backorder is due, with CC and Bcc copies sent to the specified addresses.
Email – Daily Backorder Sales Report
Overview
The Daily Backorder Sales Report provides an itemized list of all backordered items sold in the last 24 hours. This report is automatically sent at 00:01 each night based on your site’s timezone settings. If no backordered items are sold in a 24-hour period, no email is sent.

Email Notification Settings
- Send Email:
- Enable this option to activate daily email notifications.
- Send To:
- Enter the email addresses to which the report should be sent. Use a comma to separate multiple email addresses.
- If left empty, the report will be sent to the admin email address.
manager@example.com, warehouse@example.com - CC:
- Enter email addresses to receive a carbon copy (CC) of the report. Use a comma to separate multiple addresses.
sales@example.com, logistics@example.com - Bcc:
- Enter email addresses to receive a blind carbon copy (Bcc) of the report. Use a comma to separate multiple addresses.
admin@example.com
By configuring these settings, you can ensure that relevant stakeholders receive daily updates on backordered items sold, helping you stay informed and manage stock effectively.
Example Configuration
- Send Email: [On]
- Send To:
manager@example.com, warehouse@example.com - CC:
sales@example.com - Bcc:
admin@example.com
This configuration will send a daily email notification to the specified recipients with CC and Bcc copies sent to the specified addresses, ensuring everyone stays informed about backordered sales.
Advanced
In the Advanced Settings section, you can fine-tune the display and styling for messages that appear throughout your store. This section includes options for configuring:
Product Page Message Container
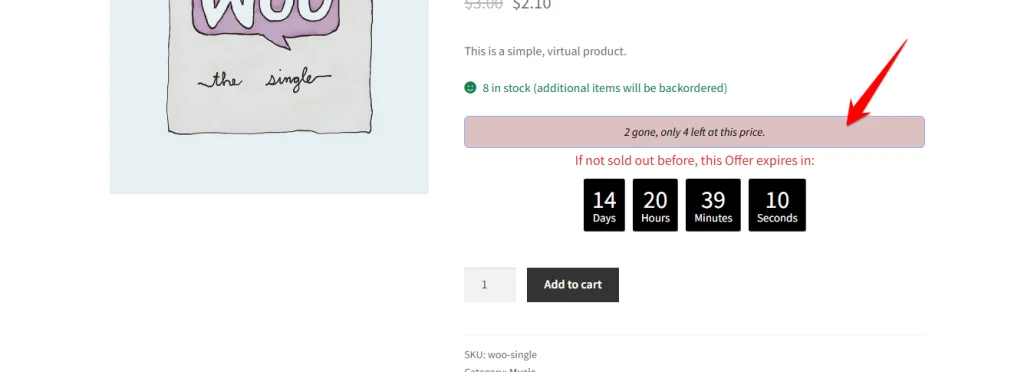
Customize how messages are displayed on the product page. These settings allow you to adjust the appearance of backorder and flash sale notifications, making sure they align with your brand’s style.

In the Product Page Message Container settings, you can control the layout and appearance of message containers that display on individual product pages. Here are the customization options available:
- Container Alignment
- Adjust the alignment of the container within the product page (left, center, or right), allowing you to place messages where they fit best visually.
- Container Margin
- Set the outer margin around the container to control the space between the message and other elements on the product page.
- Container Padding
- Define the padding within the container, which controls the space between the container’s border and the message content itself, making the text easier to read.
- Container Background Colour
- Choose a background color for the message container. A contrasting background color can help the message stand out against the rest of the page.
- Container Border
- Customize the container’s border style, including color, thickness, and style (solid, dashed, etc.), adding a clear visual frame around the message.
Cart, Checkout & Email Message Container
The Cart, Checkout & Email Message Container settings allow you to style the message containers that appear on the Cart, Checkout, and in customer emails. These settings help ensure that backorder or flash sale notifications are prominent and consistent throughout the purchasing process.
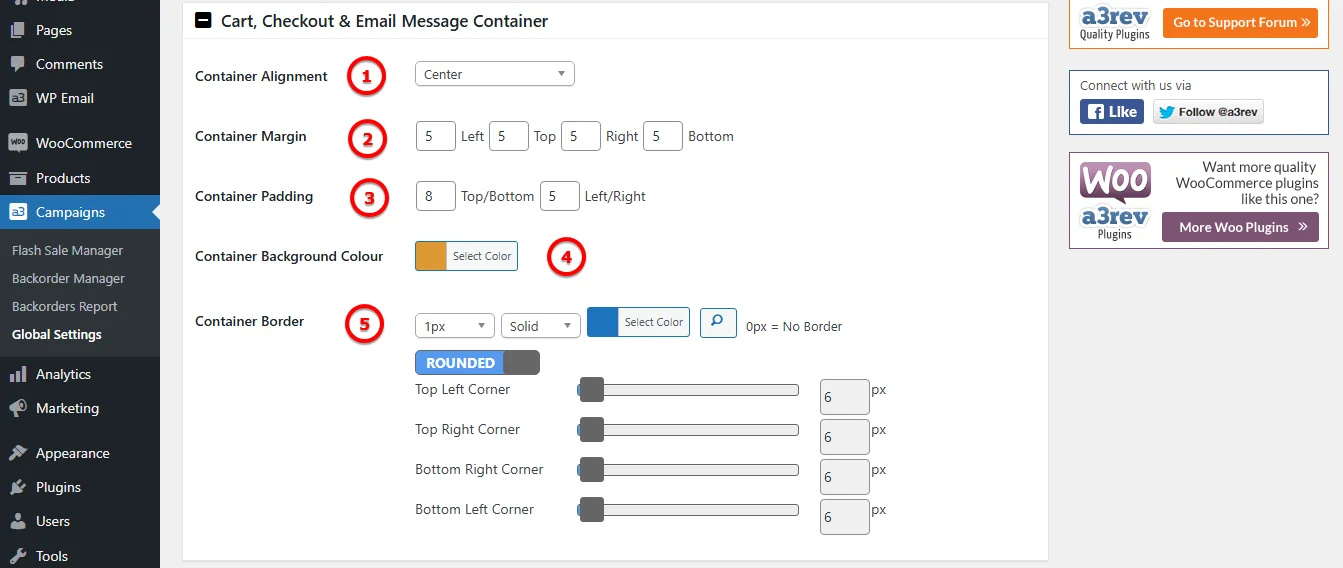
- Container Alignment
- Adjusts the alignment of the message container (left, center, or right) within the Cart, Checkout, and Email layouts, letting you control where messages appear for maximum visibility.
2. Container Margin
- Sets the outer margin around the message container, controlling the space between the message and surrounding elements for a cleaner layout.
3. Container Padding
- Defines the padding within the container, creating space between the container border and message content for a balanced look.
4. Container Background Colour
- Sets the background color for the message container, helping it stand out against other elements in the Cart, Checkout, or Email sections.
5. Container Border
- Customize the border style around the message container, including color, thickness, and style (solid, dashed, etc.), which adds a defined frame for the message.
Plugin Framework Global Settings
Overview
The Plugin Framework Global Settings allow you to customize how the admin settings are displayed and manage housekeeping tasks when the plugin is deleted.

Customize Admin Setting Box Display
- Open Box Display:
- ON: Each admin panel setting box will open in the OPEN position by default.
- OFF: Each admin panel setting box will open in the CLOSED position by default.
- The OPEN | CLOSED state of each admin panel setting box is saved every time changes are saved, providing a customized and consistent experience for the administrator.
Housekeeping
- Clean up on Deletion:
- ON: When the plugin is deleted (not deactivated), it will completely remove all tables and data it created, ensuring no residual data remains.
- OFF: Deleting the plugin will leave all data intact, which can be useful if you plan to reinstall or want to keep a backup of the data.
By configuring these global settings, you can ensure the plugin behaves according to your preferences, maintaining a clean and efficient admin interface and handling data responsibly when the plugin is no longer needed.
Custom Campaign Slugs
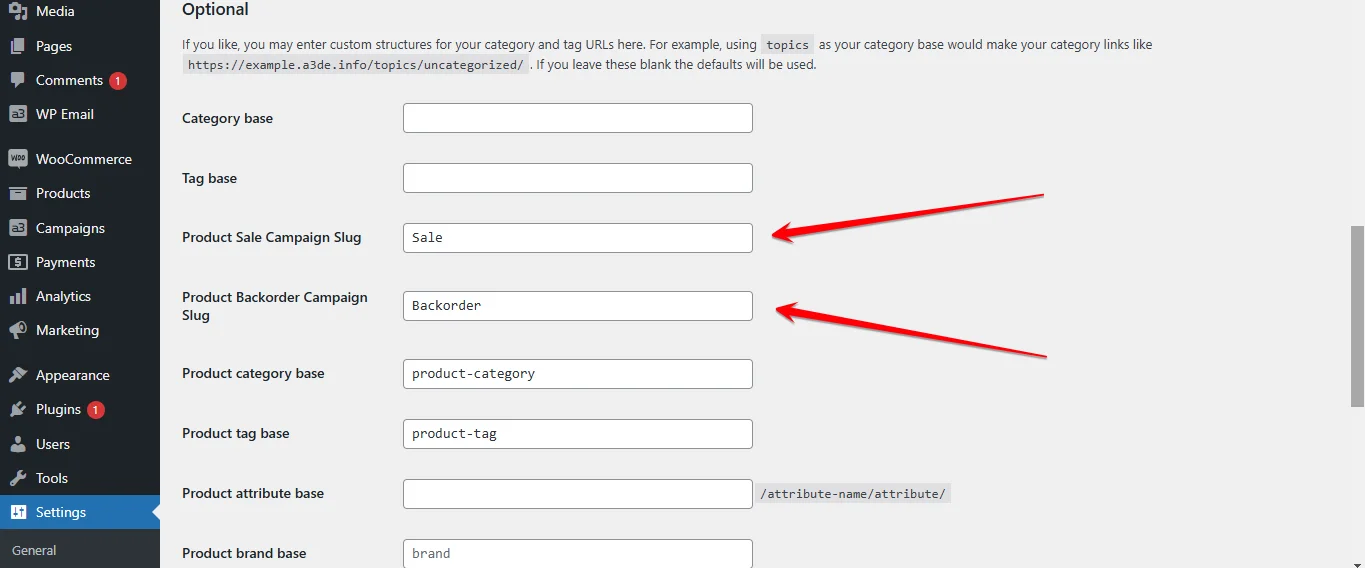
With the latest update, the Campaigns for WooCommerce plugin allows you to define custom slugs for your Sale Campaigns and Backorder Campaigns directly from WordPress’s Permalink Settings. This integration provides seamless control over the structure of your campaign URLs.
Why Customize Campaign Slugs?
- Improved SEO: Optimize URLs for better search engine rankings by including relevant keywords.
- Consistent Branding: Ensure your campaign URLs align with your store’s overall branding strategy.
- User-Friendly Links: Create clean, descriptive URLs that are easier for your customers to understand and share.
How to Configure Custom Campaign Slugs:
- Navigate to Permalink Settings:
- In your WordPress admin dashboard, go to Settings > Permalinks.
- Locate the Campaign Slug Section:
- Scroll down to find the section labeled Campaigns.
- You will see two fields:
- Product Sale Campaign Slug: Customize the slug used for Sale Campaigns.
- Product Backorder Campaign Slug: Customize the slug used for Backorder Campaigns.
- Enter Your Custom Slugs:
- Replace the default slugs with your desired text (e.g.,
flash-dealsfor Sale Campaigns orback-in-stockfor Backorder Campaigns).
- Replace the default slugs with your desired text (e.g.,
- Save Changes:
- Scroll down and click Save Changes to apply your customizations.
Example URLs:
- Sale Campaign:
- Default:
yoursite.com/campaigns/sale/ - Custom:
yoursite.com/flash-deals/
- Default:
- Backorder Campaign:
- Default:
yoursite.com/campaigns/backorder/ - Custom:
yoursite.com/pre-orders/
- Default:
Tips:
- Use concise, descriptive keywords in your slugs.
- Avoid spaces or special characters; use hyphens (
-) to separate words. - After updating slugs, verify all links work correctly on your site.
Backorders Report
Overview
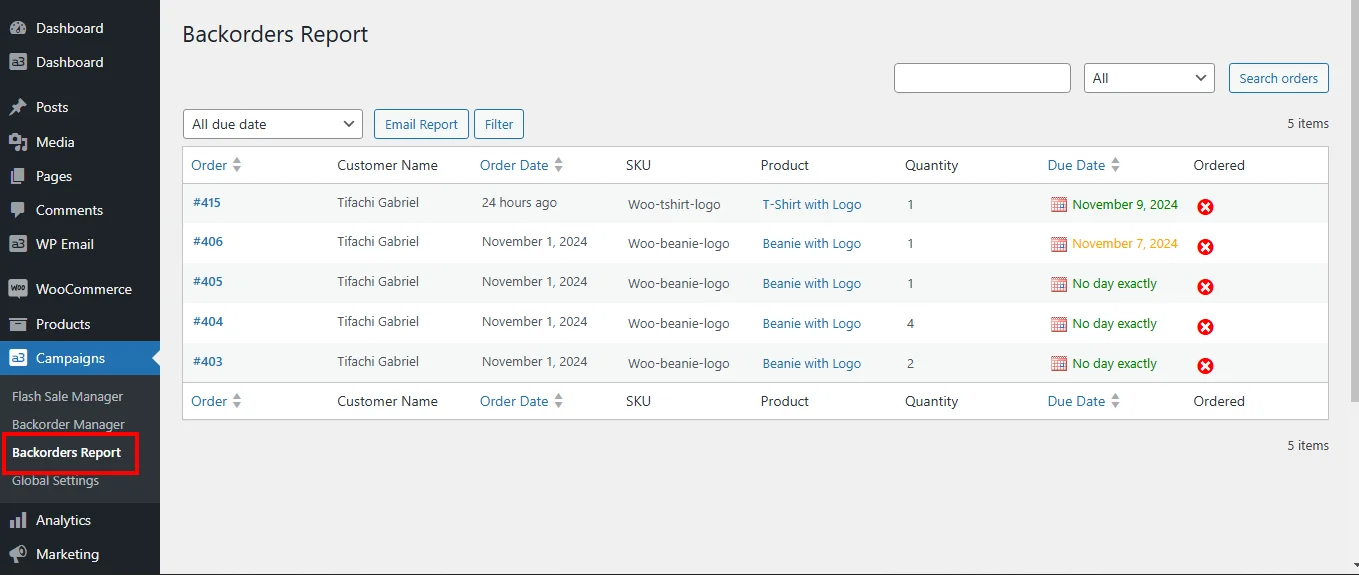
The Backorders Report provides a comprehensive overview of all backordered items, allowing you to manage and track your backorders efficiently. This report is accessible from a separate menu in the plugin.
Features
- Filtering: You can filter the report by due date to view only the relevant orders.
- Email Report: Generate and send a detailed email report of backordered items.
- Order Details: The report includes detailed information for each order, such as:
- Order Number: Clickable links to view individual order details.
- Customer Name: The name of the customer who placed the order.
- Order Date: The date the order was placed.
- SKU: The stock-keeping unit for the product.
- Product Name: The name of the product.
- Quantity: The quantity of items ordered.
- Due Date: The expected date for the items to be back in stock.
- Ordered: Indicator to show if the item has been reordered from the supplier.
How It Works
- Access the Report: Navigate to the Backorders Report menu from the plugin’s settings.
- Filter Orders: Use the filter options to narrow down the list by due date or other criteria.
- Review Details: Examine each order’s details, including the status of backordered items and due dates.
- Email Reports: Click the “Email Report” button to send a detailed report to specified email addresses.
- Manage Backorders: Use the information provided to manage your inventory and ensure timely restocking of backordered items.
This report ensures that you stay on top of your backorders, providing the necessary details to manage customer expectations and maintain efficient stock levels.
Analytics Sale Campaigns
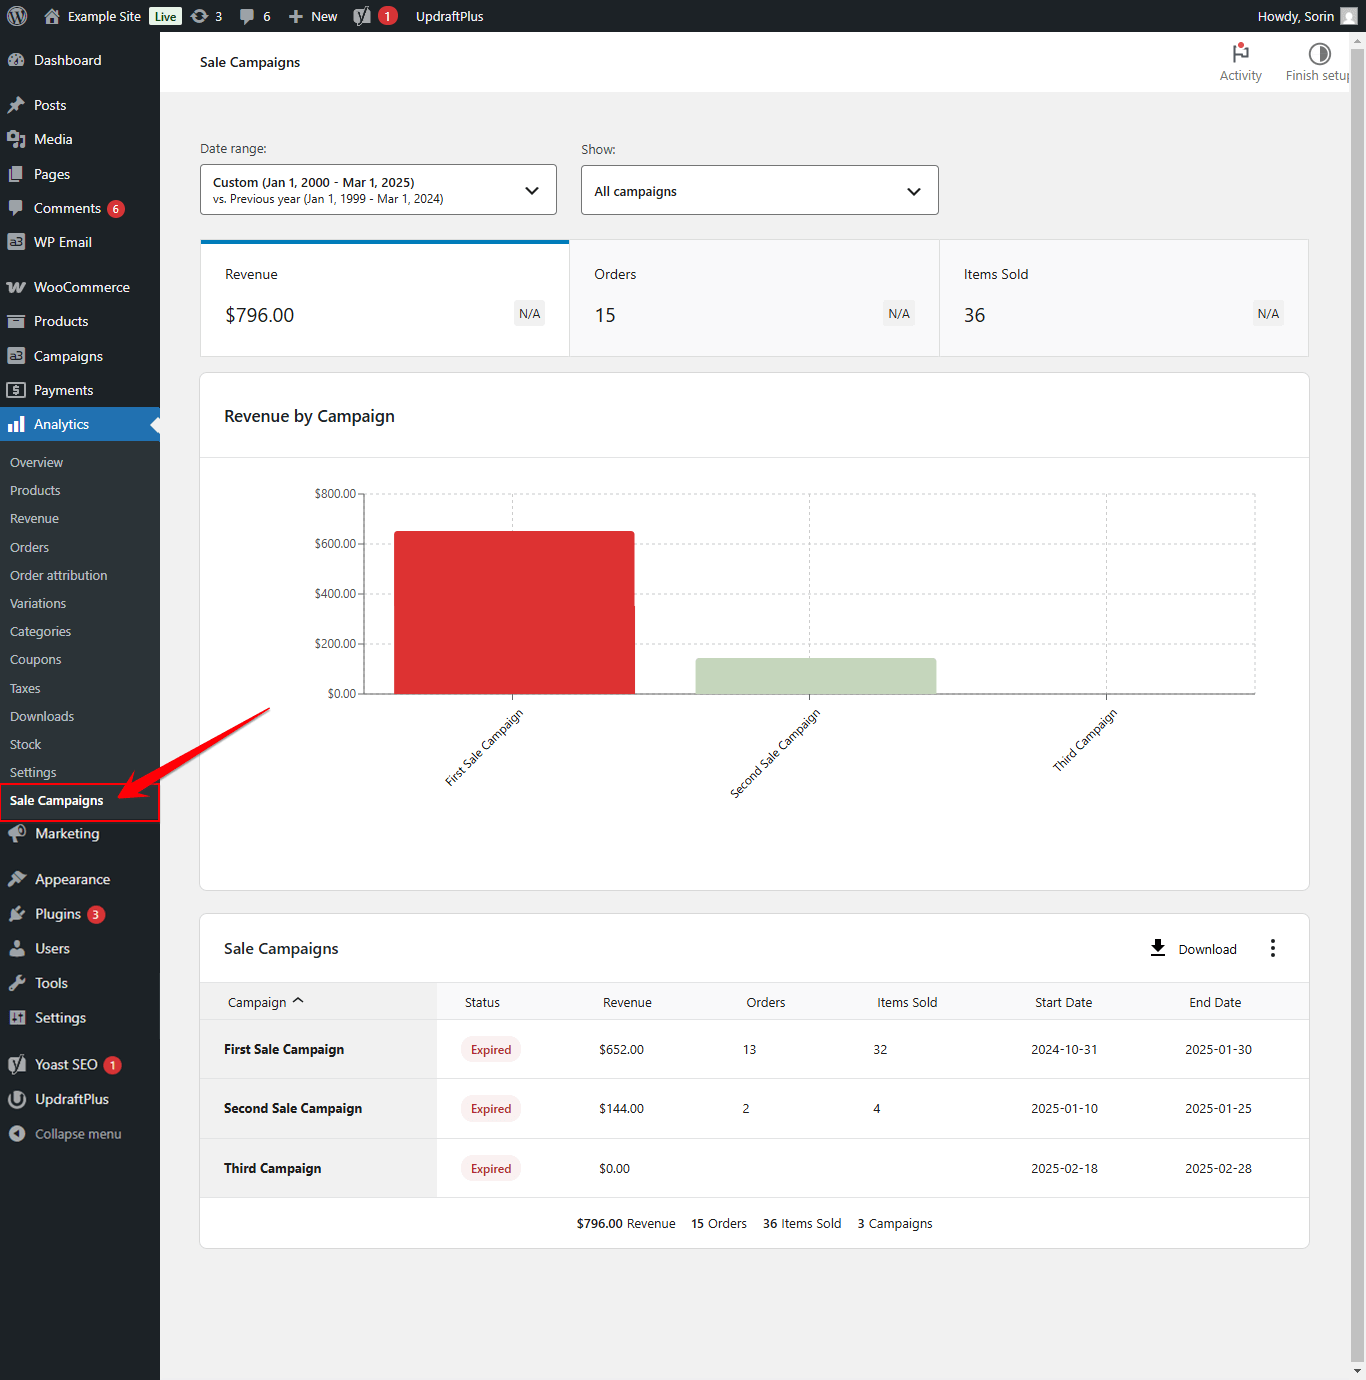
The Analytics Sale Campaigns feature provides in-depth insights into the performance of your sales campaigns. This report integrates seamlessly with the WooCommerce Analytics UI, ensuring a familiar and intuitive experience for store admins.
Accessing the Sale Campaigns Report
To view the Sales Campaigns Analytics Report, follow these steps:
- Navigate to your WordPress dashboard.
- Go to Analytics > Sale Campaigns.
- Use the filters and date range selector to customize your report view.
Features
- Integrated with WooCommerce Analytics: The report is built on WooCommerce’s existing analytics framework for a seamless experience.
- Campaign Performance Tracking: View revenue, number of orders, and items sold for each campaign.
- Interactive Chart: Visual representation of sales data per campaign.
- Sortable Summary Table: Displays all campaign details with sortable columns.
- Filter by Campaign: View data for all campaigns or select specific ones.
- CSV Export: Download campaign reports for further analysis.
How to Use
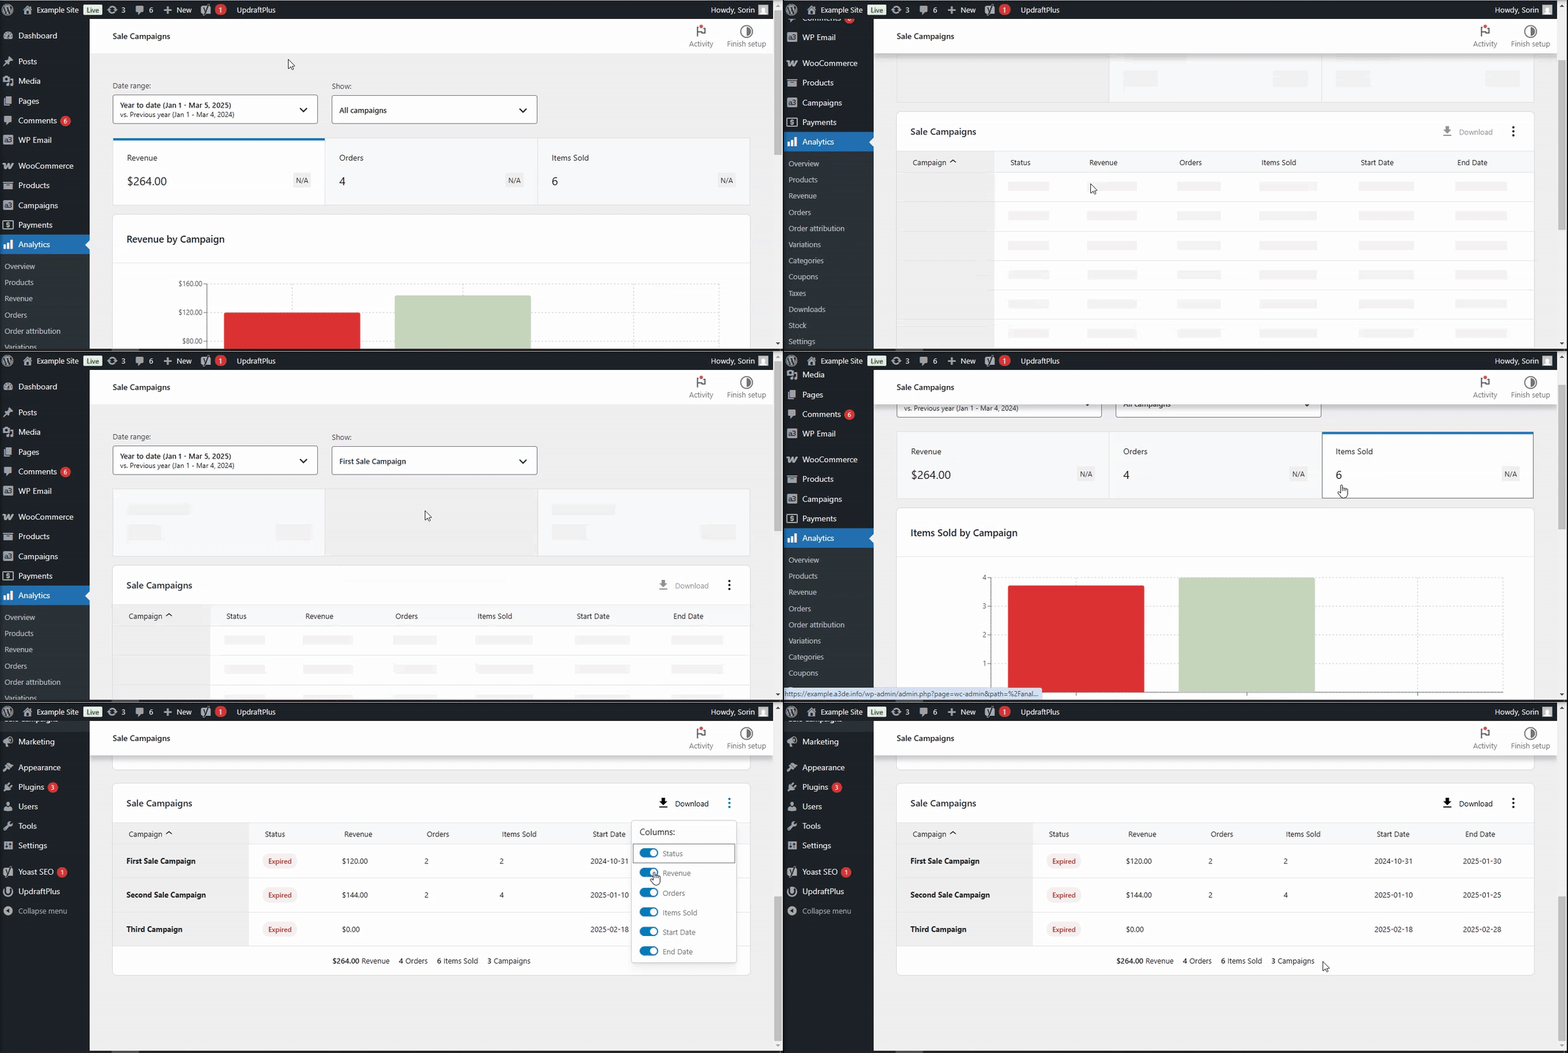
- Select a Date Range – Choose a custom period to analyze campaign performance.
- Filter by Campaign – Use the dropdown to show data for all campaigns or a specific campaign.
- Analyze Data – Review revenue, order count, and items sold in both chart and table format.
- Download Report – Click the Download button to export the data as a CSV file.
Available-Only Flash Sale Filter
Flash sale campaign taxonomy pages (like /product-sale/campaign-name/) are now automatically filtered to show only products that are currently available and in stock. This enhancement improves the customer experience by hiding out-of-stock or expired flash sale items and showcasing only the products that can be purchased right away.
Before this enhancement, campaign archive pages would list all products, including those out of stock or not currently on flash sale. Now, these pages are smart-filtered to display only products that meet the following conditions:
- The product is in stock.
- The product is assigned to the active flash sale campaign.
- The flash sale for the product is currently running (based on start and end date).
This makes campaign pages more relevant, helps boost conversions, and keeps customers focused on what’s actually available for purchase.
Real-World Example
You can see this feature live on Stilus Australia’s Clearance Sale page. The page only shows in-stock items that are part of the “Clearance Sale” flash sale campaign — no sold-out or unrelated products appear, ensuring a smoother and more intuitive shopping experience.
How It Works
There’s no setup required. This filter is applied automatically on all flash sale campaign taxonomy pages created by the plugin.
