Navigation
Installation
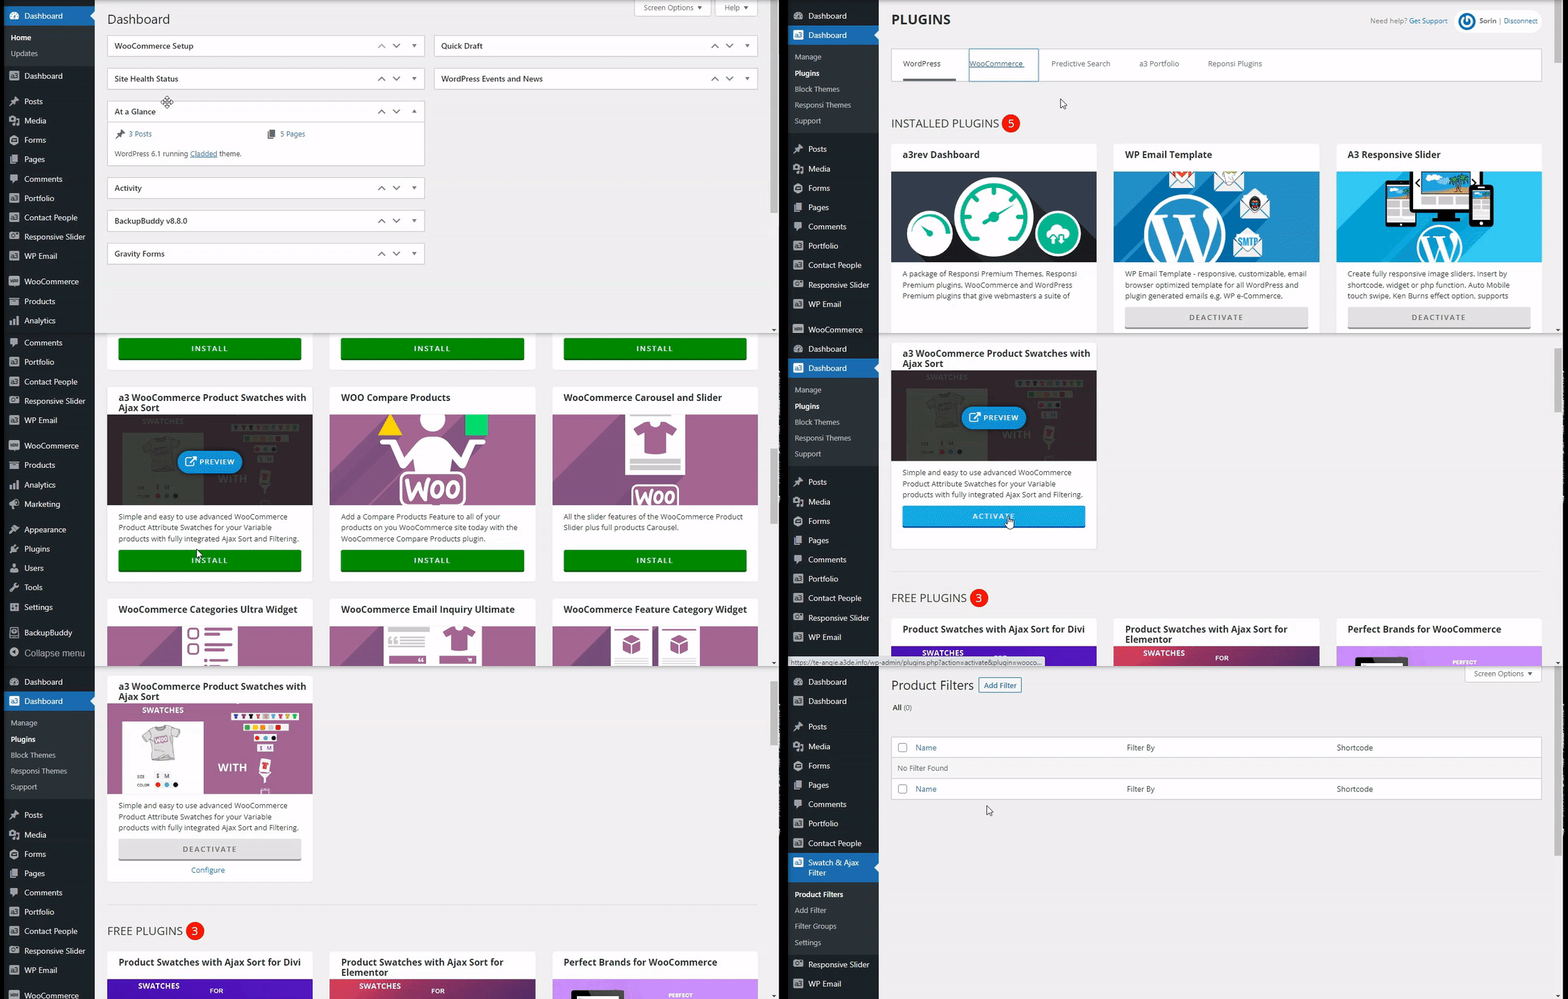
To Install and Activate the WooCommerce Product Swatches with Ajax Sort plugin access the a3 Dashboard > Plugins > WooCommerce tab and scroll till you find it. After the activation it’s auto-creates a admin section on your WordPress sidebar menu.
Here are some key features of the WooCommerce Product Swatches with Ajax Sort plugin:
- Add color swatches, image swatches, and text and radio buttons to your WooCommerce product page.
- Provides customers with a visual way to sort and filter products.
- Display swatches on catalog pages.
- Set up a customized attribute pricing structure quickly.
Getting Started
To work properly this plugin needs:
- WooCommerce
- Variable Products
- Categories/Tags/Attributes
Now that we have the plugin install will create some new filters, add swatches and style them. WooCommerce Product Swatches with Ajax Sort will help the users to filter your products easily by categories, attributes, prices and post metas without reloading the page.
On the plugin menu will have 4 sub menus: Product Filters, Add Filters, Filters Group and Settings.
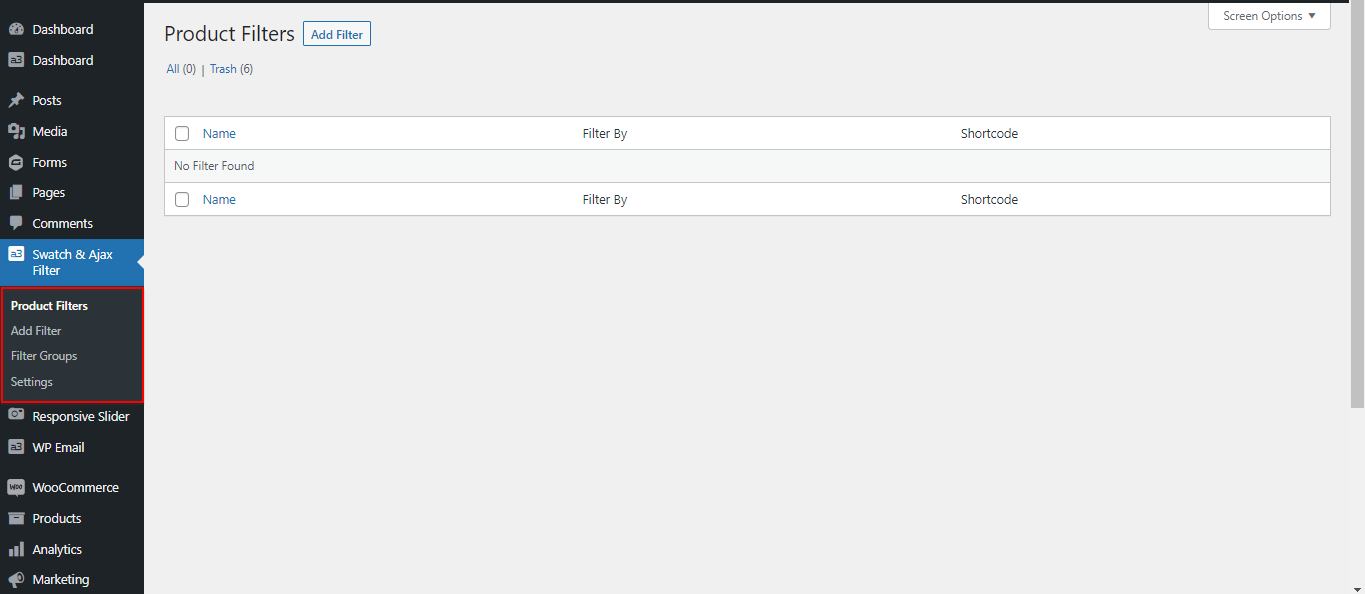
Product Filters
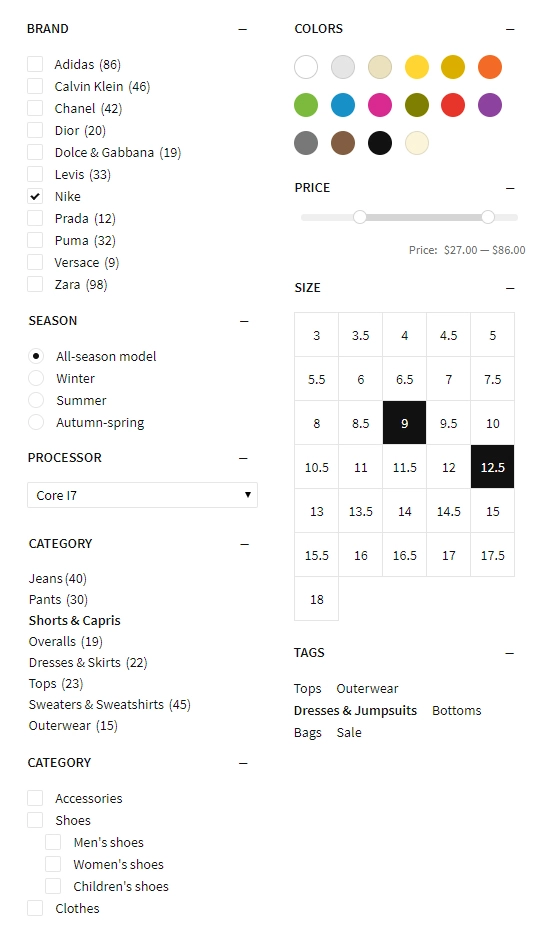
From this panel we can manage all our filters. Product Filtering (also known as faceted search) allows shoppers to refine product searches based on multiple attributes like price, color, size, categories etc. Using filters on your website can make it easier for users to navigate products by allowing them to search the way they want to. Not only does it allow your customers to view the physical colors of your products, but you can also show a preview of each variation’s actual appearance, so your customer has a clear sense of what they’re getting.
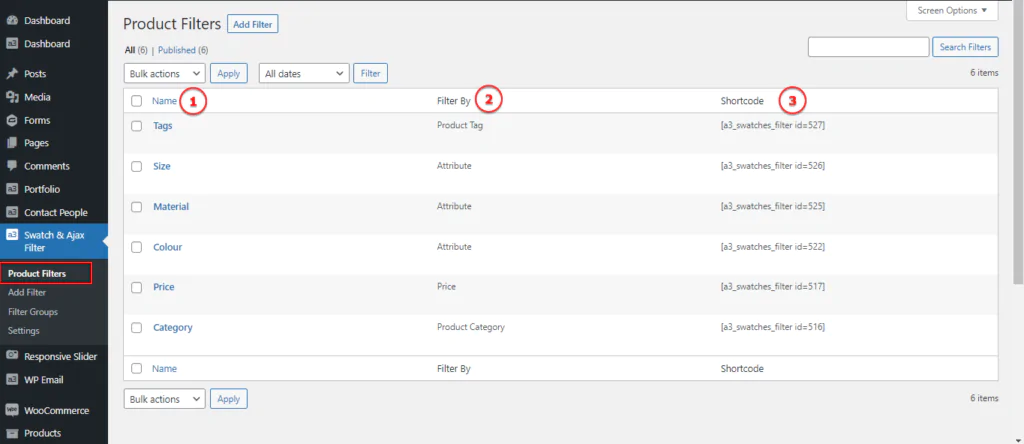
Image Legend:
1. Filter name – Show the filter by their name.
2. Filter by – Show the type of the filter.
3. Shortcode – Here is the shortcode that you need to show the filter on front end. This can be use every where on your site. If you want to add more than one is indicate to use Filter Groups for a better organization. See Filter Group section.
Add new Filter
From the next panel will add a new filter.
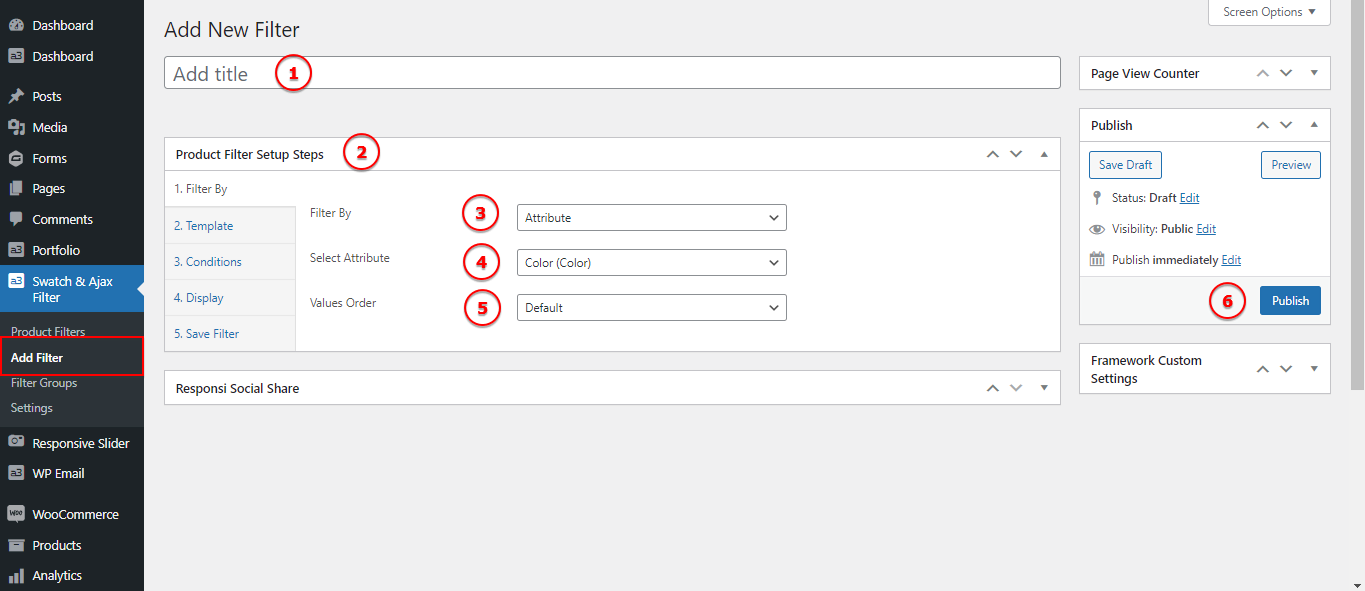
Image Legend:
1. Filter Title – To manage the filters better add them titles.
2. Product Filter Setup Steps – Here are the filter panel setup.
3. Filter By – Select the type of the filter. See bellow example on the type of the filters.
4. Select Attribute – All the attributes add on your WooCommerce store will show here.
5. Values Order – Select the order the attributes will be display on front end eg: A-Z or Z-A .
6. Publish – After you finish setting up the filter don’t forget to publish it.
Filter By
Filter by is from where you select the type of it. It can be a attribute, price filter, product tag, product category or on sale products. Each type of filter have their on option like you will see on the bellow video.

Template
After choosing the type of the filter we will need a template. The template it’s different for the attributes type and price, the category, tags and sales have same options:
- Checkbox Template
- Select Template

Use swatch settings for Attribute. See the section for Swatches Settings here.
Condition
Use custom conditions to set how and to who this filter will show. Any conditions set here DO NOT apply to this filter when added to a Group (the Group Conditions apply there).
Add a condition and choose to hide this filter from any device: desktop, tablet or mobile.

Display
Filter menus can be displayed Open or Closed on first load. Arrow Icon can be On and each filter title will show with an Open / Close Arrow icon.
Note, if this filter is added to any Group, that Groups Display options are used. So you can have one display type for a single filter, but when shown in a group another display type (the Groups) will apply.

Image Legend:
1. Legacy Browsers – PC, Laptop, Bigger Tablets
2. Mobile – Choose how the filter panels show on mobile devices. Can be open when first display or close.
Save Filter
After you setup the filter save it and publish it.

Attributes
You can display product colors, sizes, styles, and anything else in the better way which is not supported by default WooCommerce.
Add new attribute
Attributes let you define extra product data, such as size or color. You can use these attributes in the shop sidebar using the “layered nav” widgets.
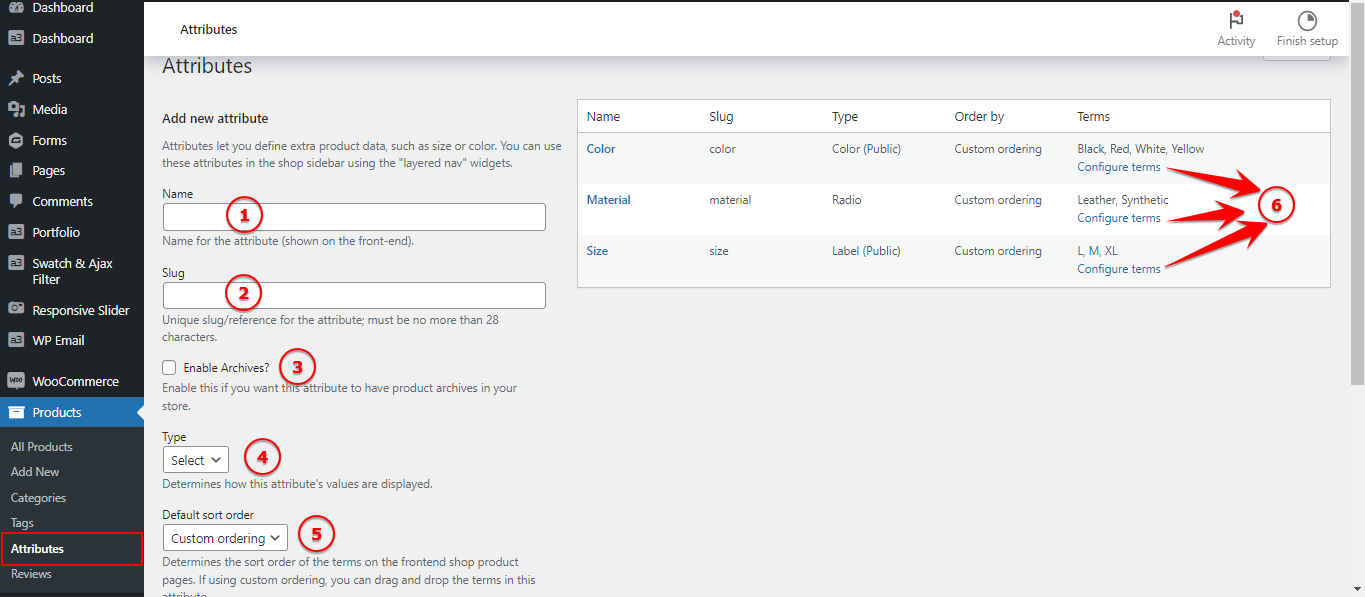
Image Legend:
1. Name – Name for the attribute (shown on the front-end).
2. Slug – Unique slug/reference for the attribute; must be no more than 28 characters.
3. Enable Archives – Enable this if you want this attribute to have product archives in your store (recommended to be check).
4. Type: Color, Image, Label, Radio – Determines how this attribute’s values are displayed.
5. Default sort order – Determines the sort order of the terms on the frontend shop product. pages. If using custom ordering, you can drag and drop the terms in this attribute.
6. Configure Terms – Select the “Configure terms” text to add attribute values.
Filter Groups
Filters can easily be grouped based on product categories, tags or attributes.
You can create filters groups which are collections of related filters. Groups help you to add filters search to your store pages faster. Each facet group has a shortcode that you can copy from the ‘Filter Groups’ page Shortcode from your WordPress dashboard.
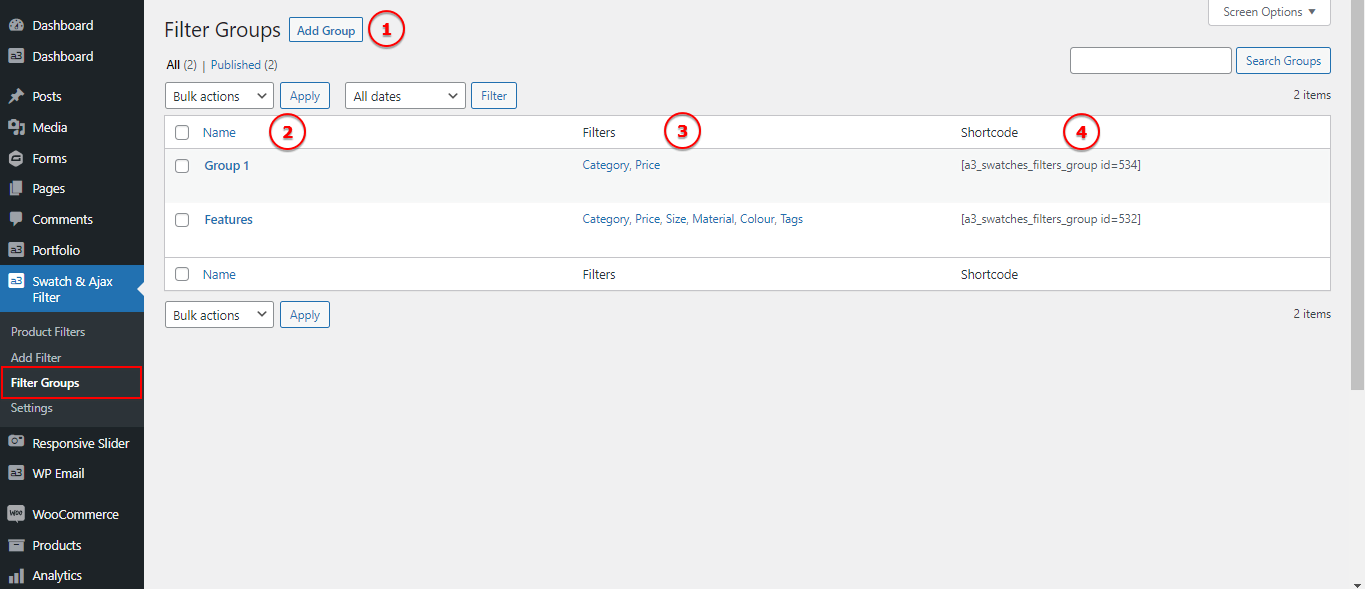
Image Legend:
1. Add Group – From here you can create a new group.
2. Group Name – Here you will see all the group that you have.
3. Filters – Display the filters add in this group.
4. Shortcode – Insert this group filter by the shortcode.
Add new group filter
By clicking Add Group a new page will open, from where we can setup the Group. We can have unlimited number of filter groups.
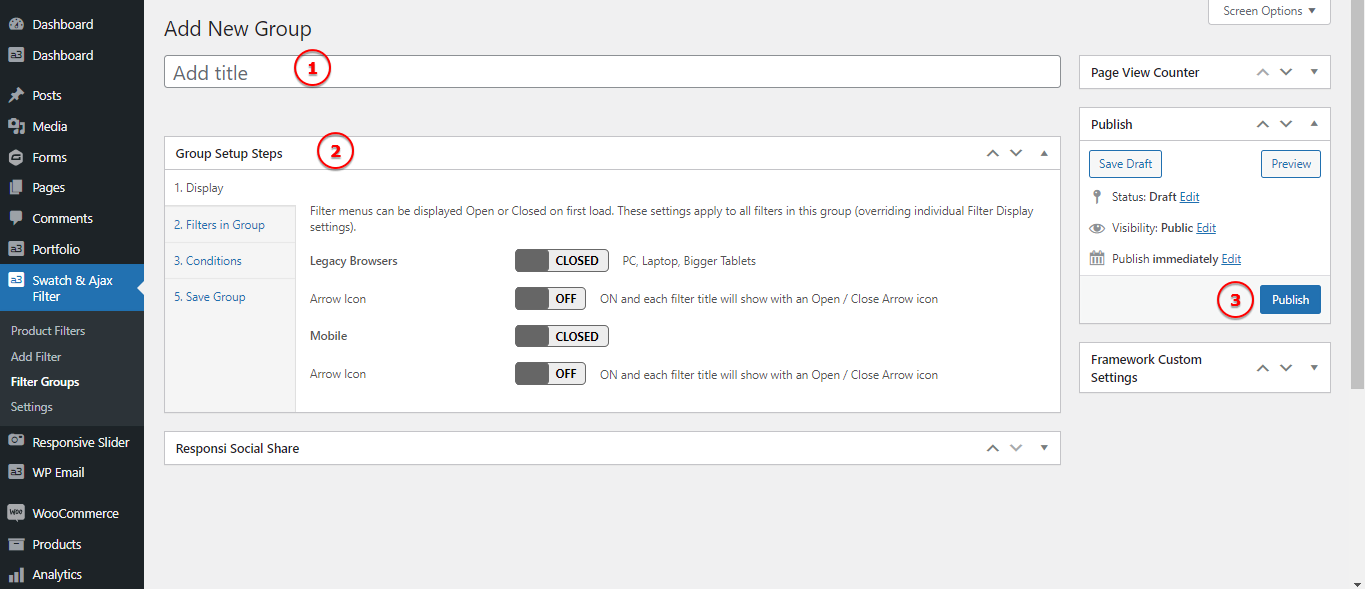
Image Legend:
1. Add Title – Name the group that you creating for easy filtering.
2. Group Setup Steps – Each group can have individual settings like: Display, Filters in Group, Condition and then save you Group.
3. Publish – When you are done don’t forget to publish the new group.
Display
Filter menus can be displayed Open or Closed on first load. These settings apply to all filters in this group (overriding individual Filter Display settings).

Filters in Group
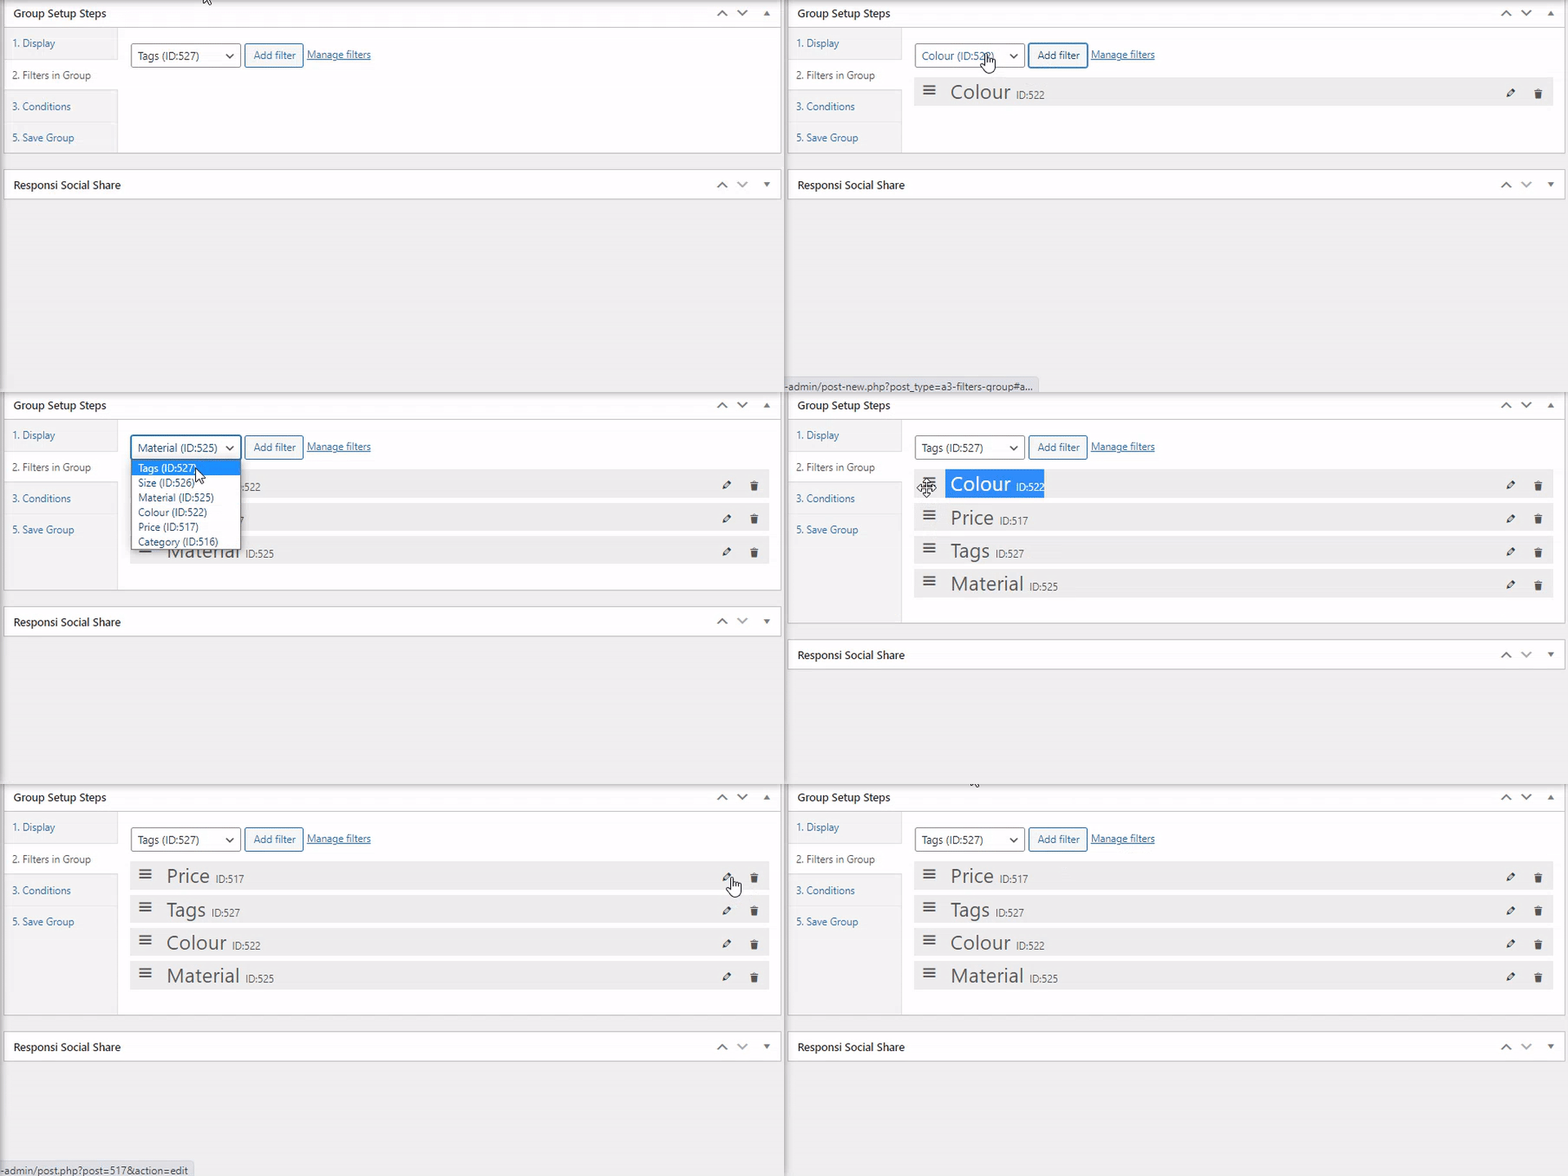
From this tab we choose the filters that we want for this Group. All the attributes can be found on that dropdown input field. After we select them we can order by dragging between them.
Condition
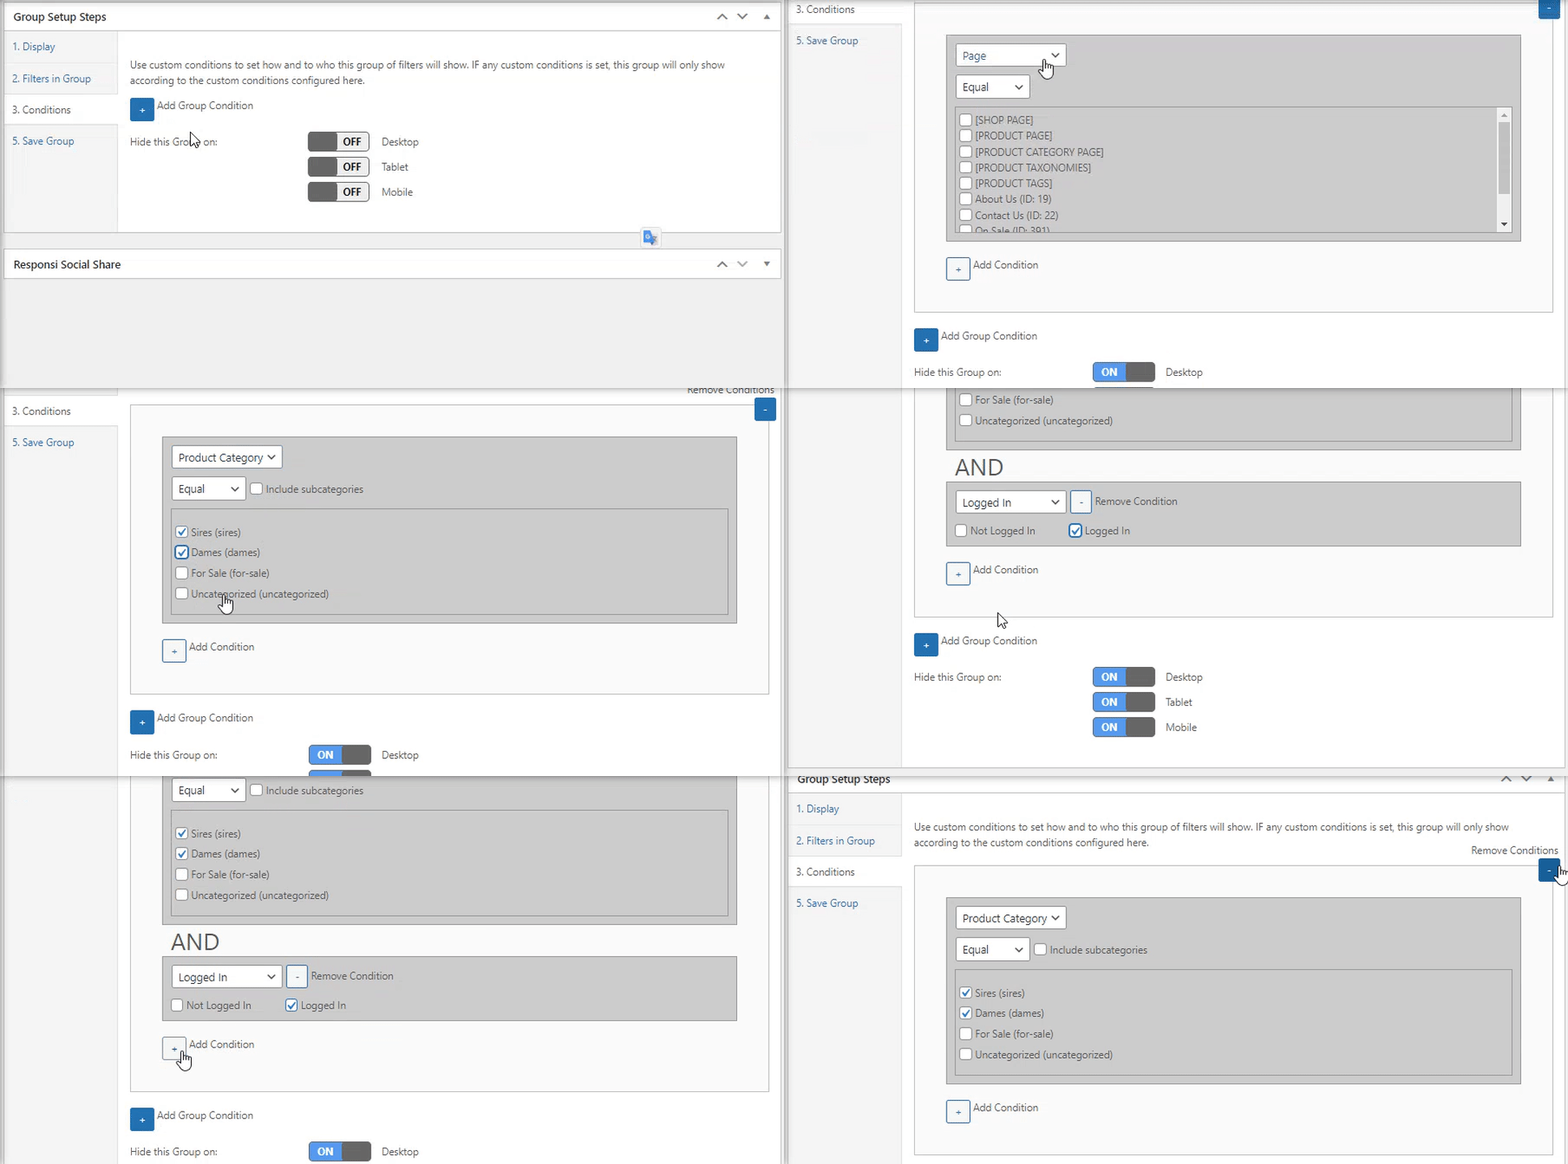
Use custom conditions to set how and to who this group of filters will show. If any custom conditions is set, this group will only show according to the custom conditions configured here.
Save Group
When we have done the Group setup we need to save it and then publish it.
Settings
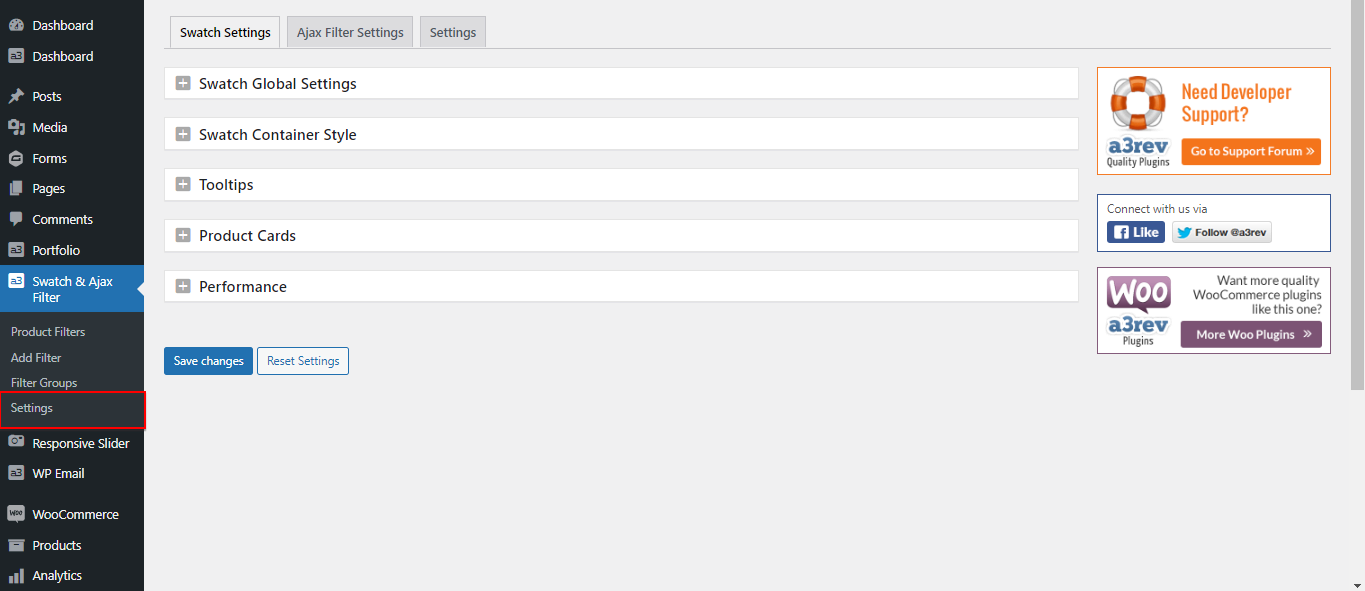
On settings menu will have the options for:
- Swatch Settings
- Ajax Filter Settings
- General Settings
Swatch Settings
By adding eye-catching color swatches, you can deliver a much improved customer experience and potentially net more sales as a result.
Remember, you can also add image swatches, radio, and text buttons if you want to. However, for the purpose of this tutorial, we will focus on color swatches.
We’re also making the assumption that you have already added color attributes to your products.
Swatch Global Settings
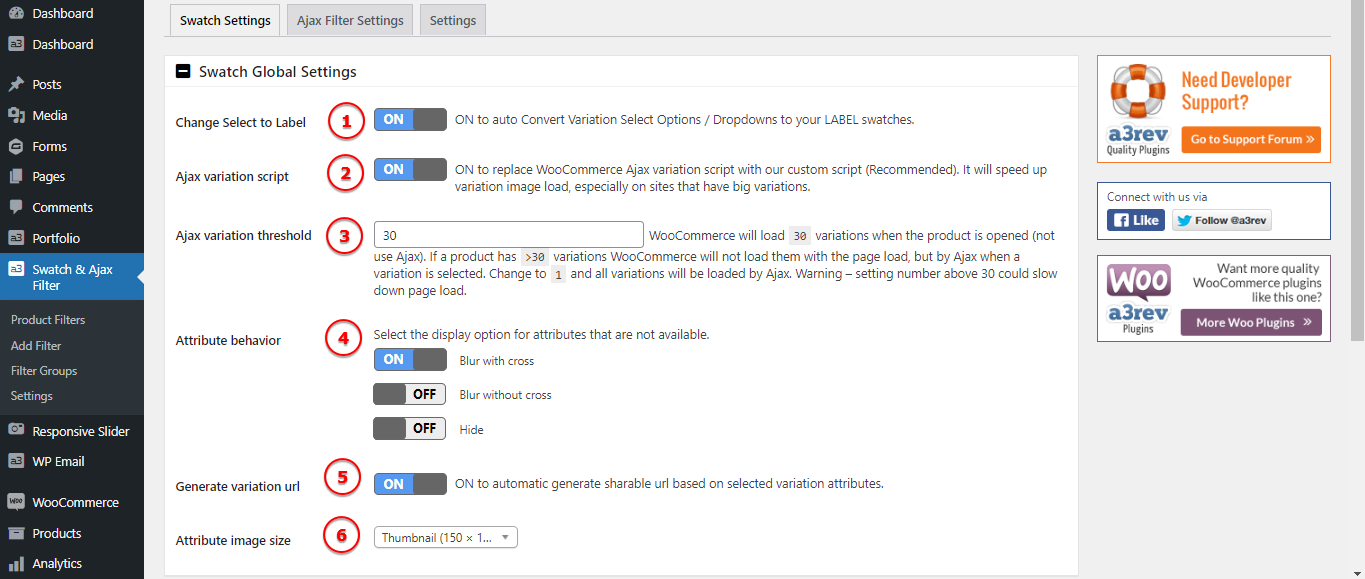
Image Legend:
1. Change Select to Label – ON to auto Convert Variation Select Options / Dropdowns to your LABEL swatches.
2. Ajax variation script – ON to replace WooCommerce Ajax variation script with our custom script (Recommended). It will speed up variation image load, especially on sites that have big variations.
3. Ajax variation threshold – WooCommerce will load 30 variations when the product is opened (not use Ajax). If a product has >30 variations WooCommerce will not load them with the page load, but by Ajax when a variation is selected. Change to 1 and all variations will be loaded by Ajax. Warning – setting number above 30 could slow down page load.
4. Attribute behavior – Select the display option for attributes that are not available from: Blur with cross, Blur without cross and Hide.
5. Generate variation url – ON to automatic generate sharable url based on selected variation attributes
6. Attribute image size
Swatch Container Style

Image Legend:
1. Swatches type – Applies to all Colour, Image & Label Swatches. Can change for any variation on any product. It can be Square or Circle.
2. Swatch Container – Note: LABEL swatches with SQUARE type set auto expand to fit the size of the Label text. From this section you can style the container by adding a custom font, choose a background color for the container, select a border size and color for it.
3. Swatch Container Hover – When user interact with the swatch crossing the pointer over the container it can have a custom font, background color and border style.
4. Swatch Container Selected – Same as hover when a swatch is selected it can be different from hover and normal ones. Style with a custom font, add a background color and border style.
Tooltips

Image Legend:
1. Product page – ON to show Tooltips on each product Attribute Swatch.
2. Product card – ON to Show Tooltips on Product Cards Attributes Swatch.
3. Tooltip text colour – Choose a custom color for the Tooltip text.
4. Tooltip background – Add a custom color for the background of the Tooltip container.
5. Tooltip image width – When you have a image instead of text in the Tooltip you will want to select a custom width.
Product Cards
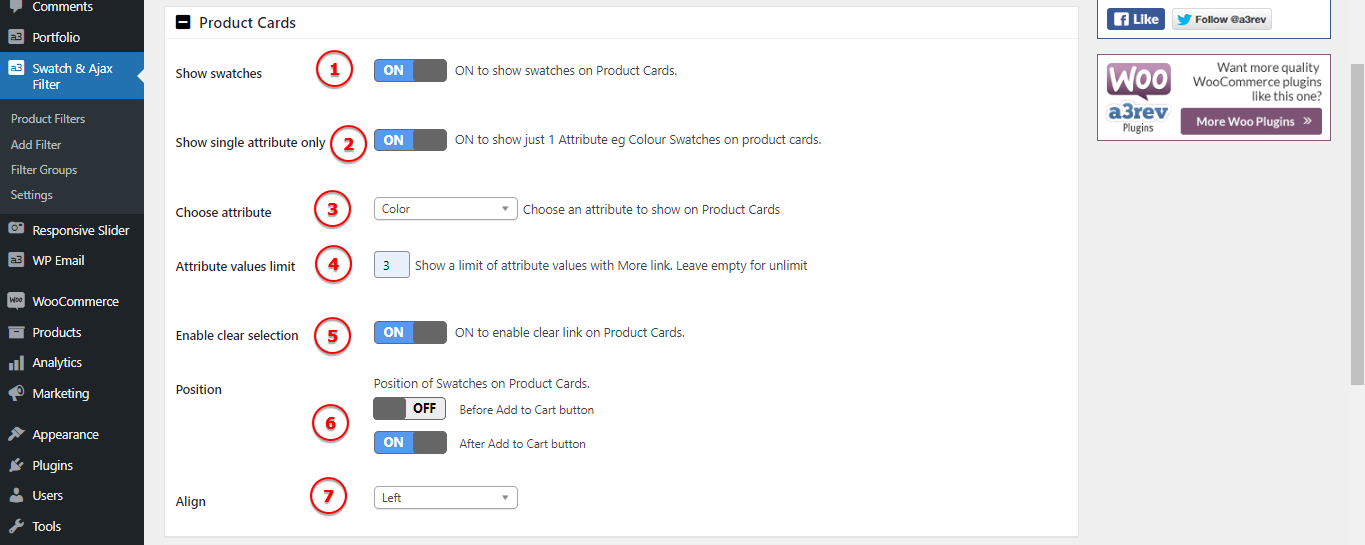
Image Legend:
1. Show swatches – ON to show swatches on Product Cards.
2. Show single attribute only – ON to show just 1 Attribute eg Colour Swatches on product cards.
3. Choose attribute – If the above Settings is On you will see also this feature. Choose an attribute to show on Product Cards.
4. Attribute values limit – Show a limit of attribute values with More link. Leave empty for unlimit.
5. Enable clear selection –
6. Position – Position of Swatches on Product Cards: Before Add to Cart button or After Add to Cart button.
7. Align – Align the swathes on product cards: Left, Center or Right.
Performance

Image Legend:
1. Defer load JS – Enable for defer Load JS for PageSpeed Score.
2. Use transient cache – WARNING! Only turn ON Transient Caching AFTER you have finished setting up and testing Swatches & Ajax Sort. Otherwise you won’t see your changes as they will be cached.
Ajax Filter Settings
Once you have created some Filters and maybe Filter Groups, you add them to the Shop and product archive pages (Product Categories & Product Tags) via 3 Widgets on the Widgets menu (Single Filter, Group Filter and Filter Reset Widgets) or Shortcodes. You will find the shortcodes on the Product Filters and Filter Groups listing pages). Below are some advanced display settings.
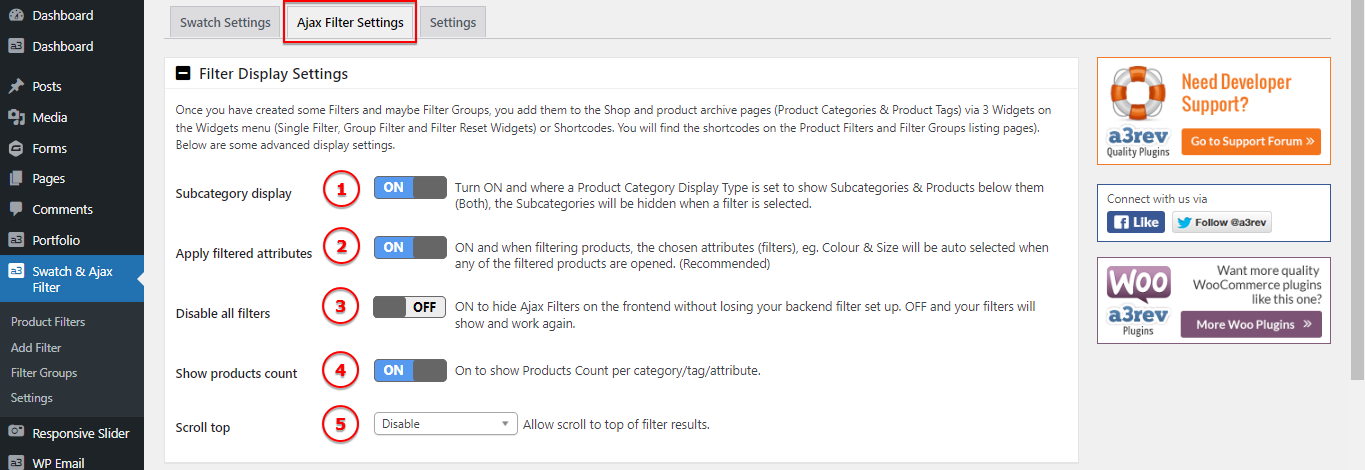
Image Legend:
1. Subcategory display – Turn ON and where a Product Category Display Type is set to show Subcategories & Products below them (Both), the Subcategories will be hidden when a filter is selected.
2. Apply filtered attributes – ON and when filtering products, the chosen attributes (filters), eg. Colour & Size will be auto selected when any of the filtered products are opened. (Recommended)
3. Disable all filters – ON to hide Ajax Filters on the frontend without losing your backend filter set up. OFF and your filters will show and work again.
4. Show products count – On to show Products Count per category/tag/attribute.
5. Scroll top – Allow scroll to top of filter results.
Filter AJAX loading
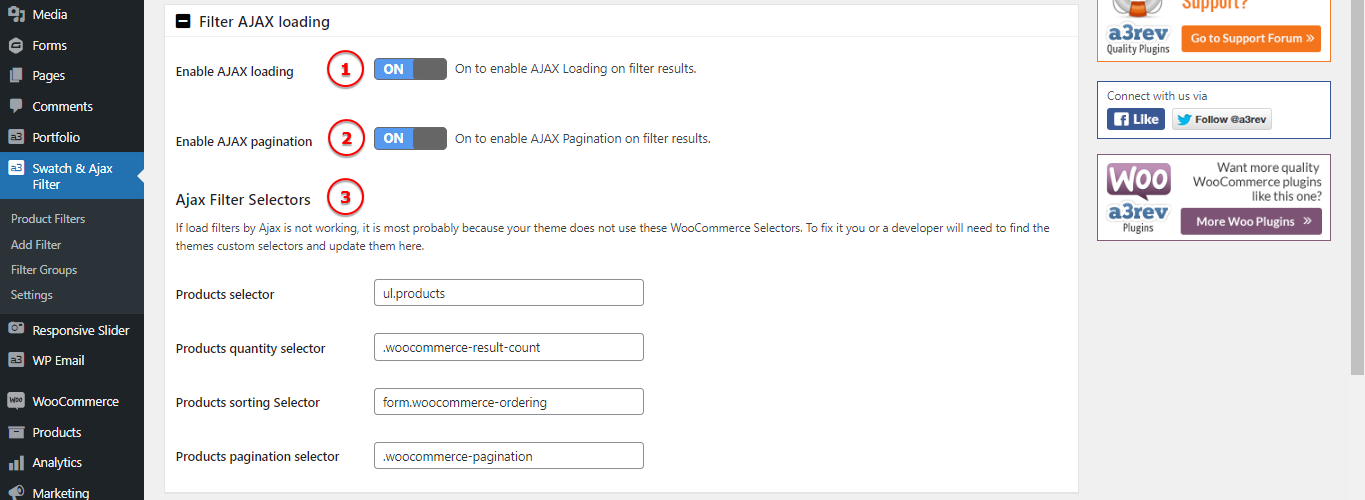
Image Legend:
1. Enable AJAX loading – On to enable AJAX Loading on filter results.
2. Enable AJAX pagination – On to enable AJAX Pagination on filter results.
3. Ajax Filter Selectors – If load filters by Ajax is not working, it is most probably because your theme does not use these WooCommerce Selectors. To fix it you or a developer will need to find the themes custom selectors and update them here.
Filter Name Display
When you create a new Filter give it a descriptive name, for example, Sort by Colour, Sort By Size, Filter by Price etc. That Filter Name is what shows to the user on the frontend. The settings below allow you to style the Filters name font, the name container (both when its is open and when it is closed) and the open and close arrows. Applies to filters added by Widget (single & group) and Shortcode.
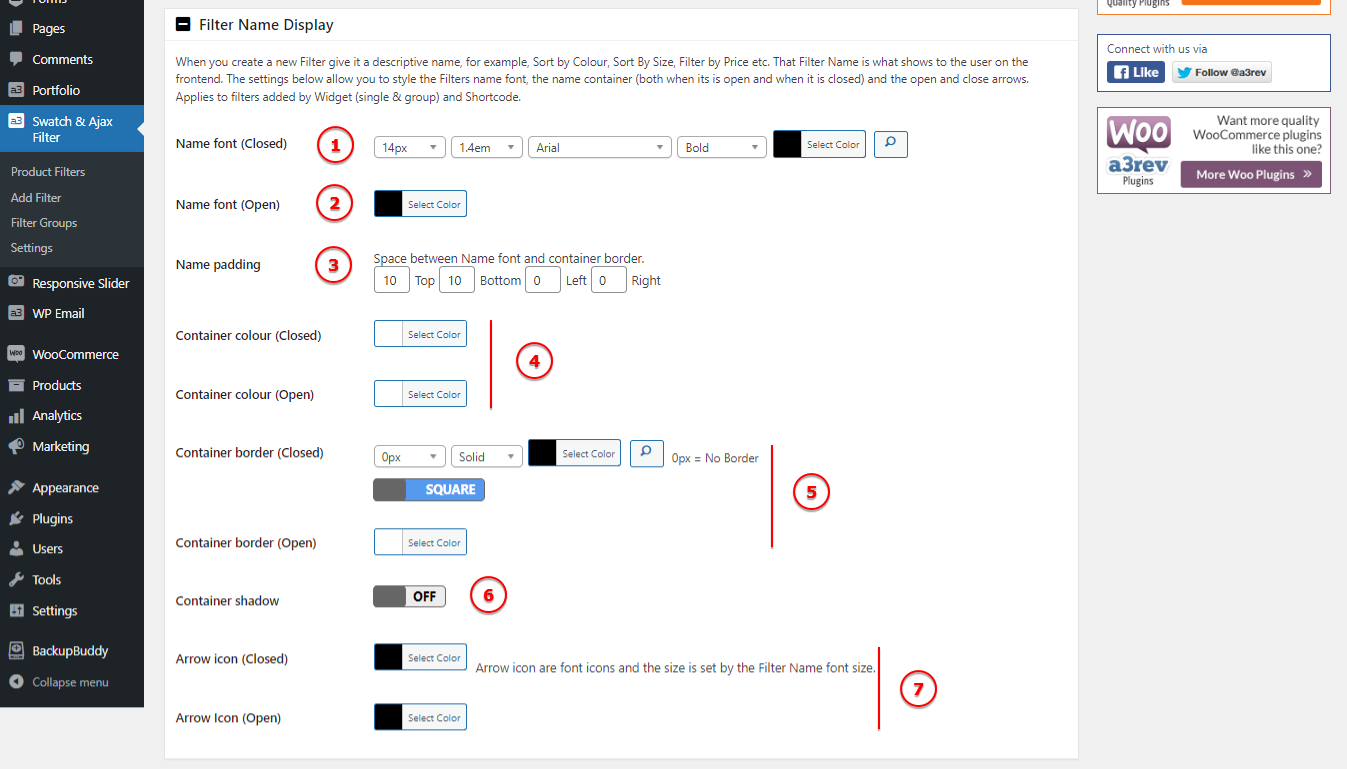
Image Legend:
1. Name font (Closed) – Choose a custom font for the Filter Name when it’s closed.
2. Name font (Open) – Choose the color for the title when you open the filter.
3. Name padding – Add space between Name font and container border.
4. Container colour (Closed/Open) – If you want to add a background for the Filter Name container when it’s open or close.
5. Container border (Closed/Open) – Choose a border for the container when the filter panel it’s open or close.
6. Container shadow – Customize a shadow if you need it.
7. Arrow icon (Closed/Open) – Select the colors of the arrow that open or close the filter panel.
Filter Reset Widget
Use the setting below to determine how the Reset Widget will show the Rest Filters feature on the frontend (Text or Button and the style), or you can just add your themes button Class on the widget if you know it. On the Filter Reset Widget you can edit the default “Clear Filters” text, and the display behavior. Works with Filters and Group Filters added by Widget & Shortcode.

Image Legend:
1. Button or Hyperlink text – Choose if to have a hyperlnk text or a button for the Reset Filter.
2. Horizontal align – Align the text: Left, Center or Right.
3. Margin – Select the space Above/Below the reset button/text.
4. Text font – Choose a custom font for the hyperlink text.
5. Text hover colour – When a user interact with the text the colour will change when hovering.
Filter Reset Shortcode
The Filter Reset Shortcode provides a button to reset all currently active live product filters. This is displayed when any active filters can be cleared. The button can be place anywhere on page with the condition to have the Ajax Sort Filter active on page.
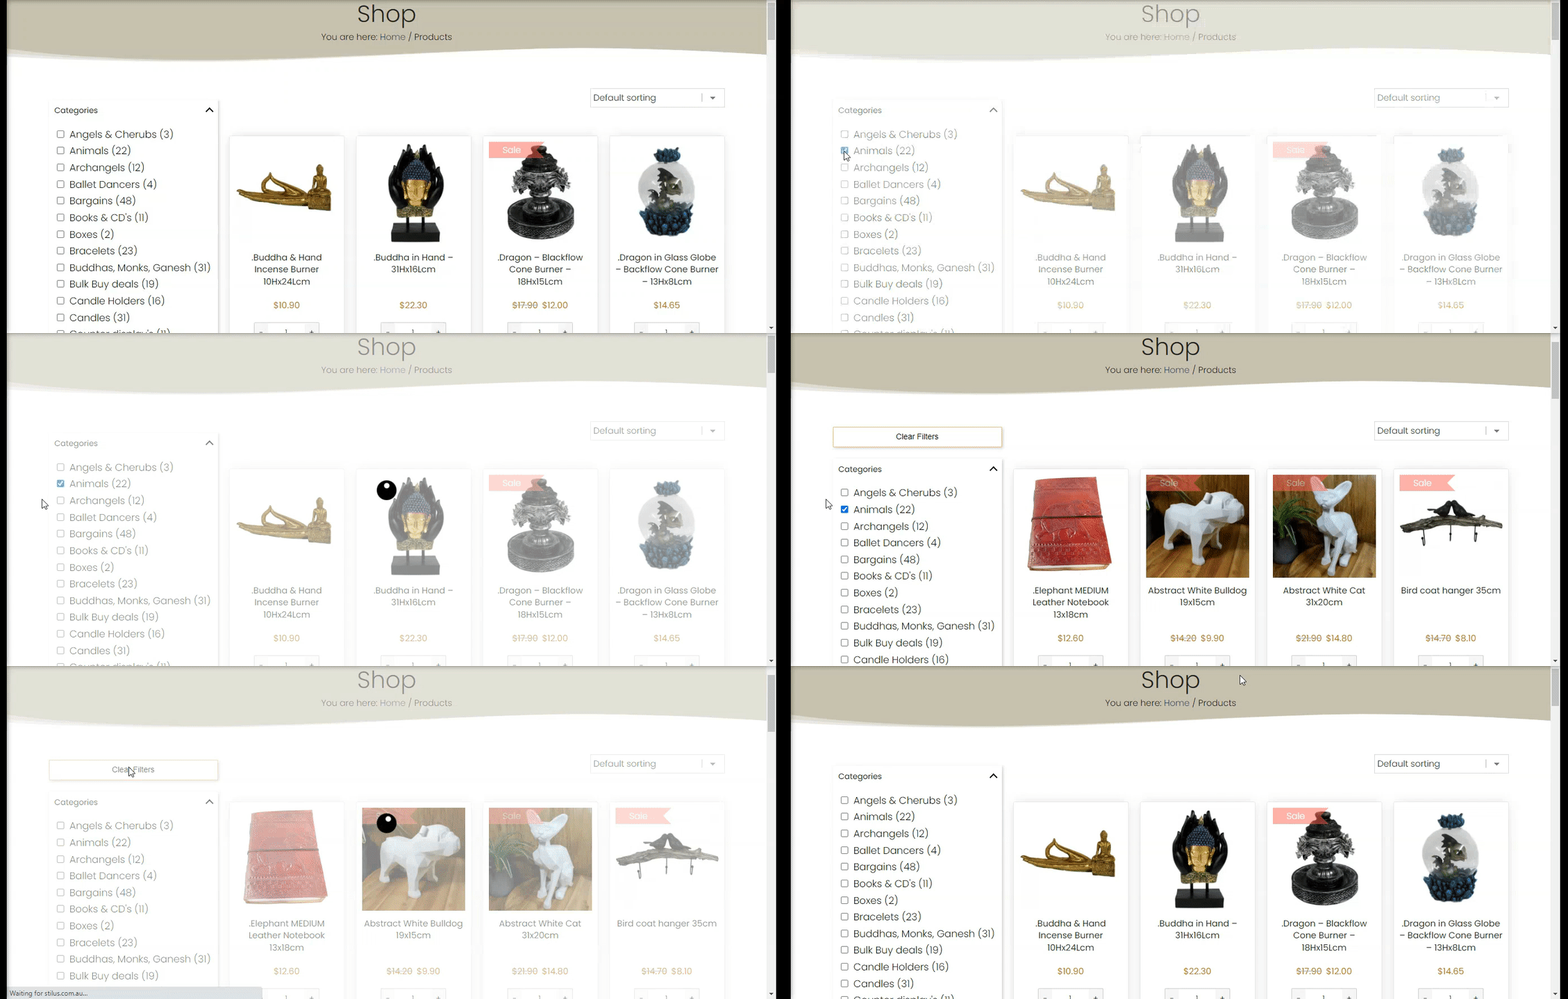
You can use the following shortcode attributes to customize the shortcode. We have 2 version of it:
[a3_swatches_filters_reset]The second version of the shortcode contain parameters to style the Reset Filter button.
[a3_swatches_filters_reset bt_text="Clear Filter" bt_class="abc" first_load_hidden=1 desktop_hidden=0 tablet_hidden=1 mobile_hidden=0 ]- bt_text : button text , leave empty to use default text ‘Clear Filters’
- bt_class : extra button classname
- first_load_hidden : 0|1 Hide the Reset button at first load when not have any filtered on current page
- desktop_hidden : 0|1 Hide the Reset button on Desktop
- tablet_hidden : 0|1 Hide the Reset button on Tablet
- mobile_hidden : 0|1 Hide the Reset button on Mobile
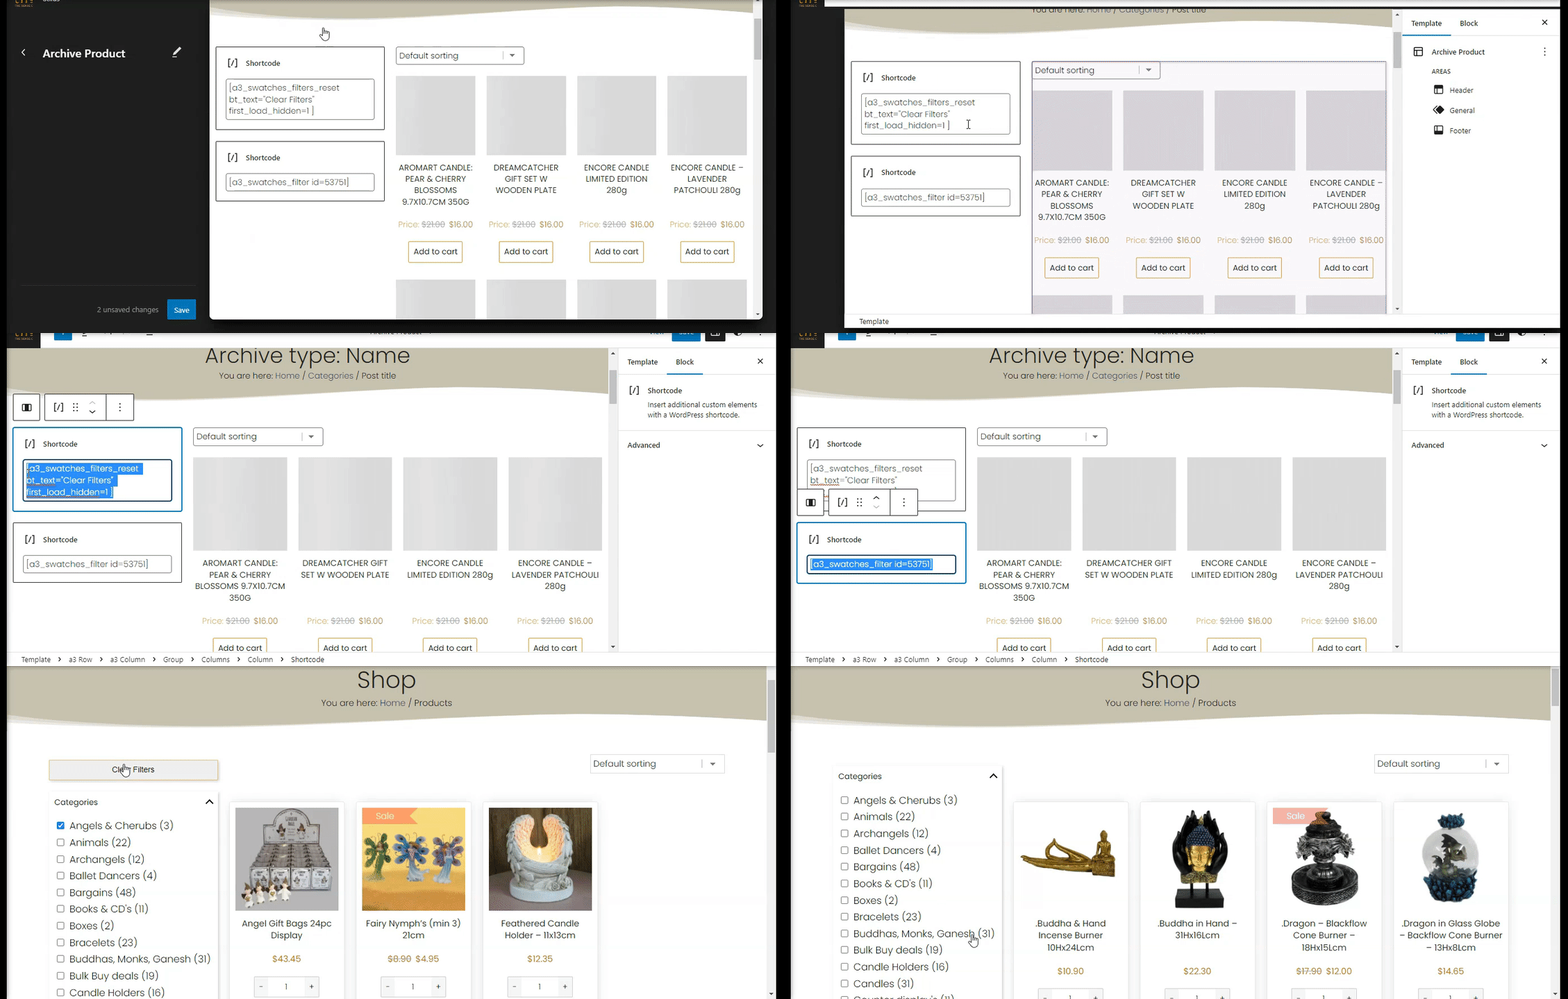
Filter SEO

Image Legend:
1. SEO friendly URLs – On to change the filters url to SEO friendly URLs.
2. URL decoding – On to decode all symbols in URL to prevent errors on server side.
3. SEO meta – On to apply SEO for Title, meta description.
4. SEO meta structure – Text that is displayed on search engine result pages and browser tabs.
General Settings
Plugin Framework Global Settings
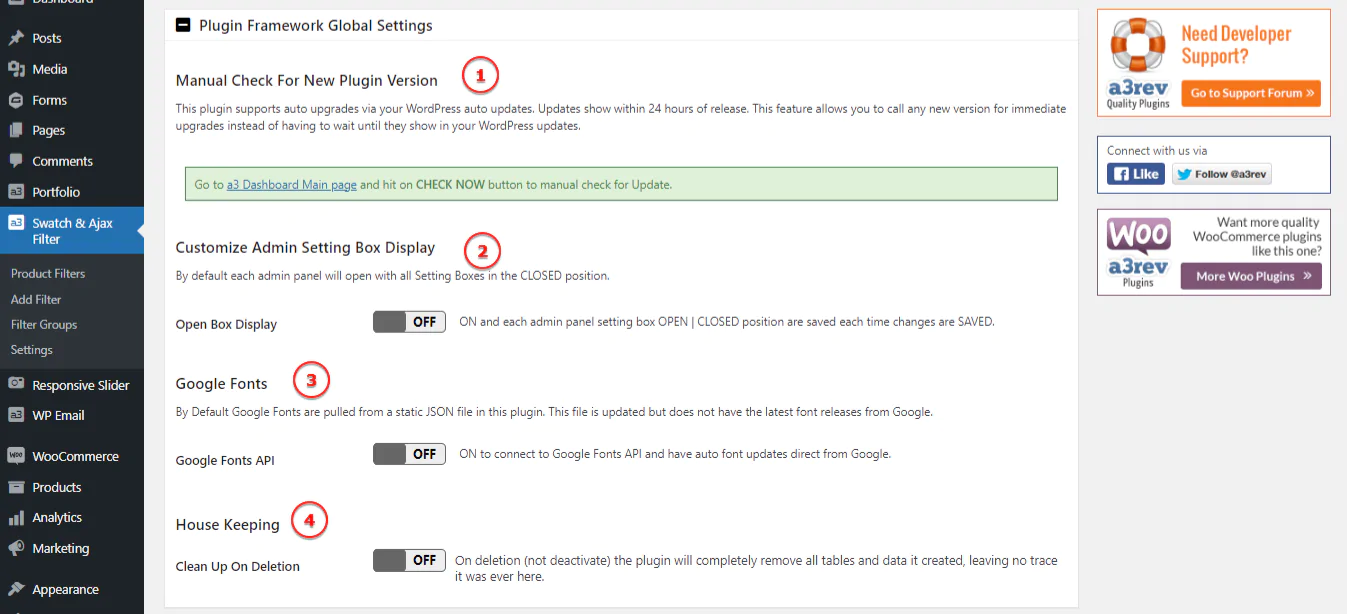
Image Legend:
1. Manual Check For New Plugin Version – This plugin supports auto upgrades via your WordPress auto updates. Updates show within 24 hours of release. This feature allows you to call any new version for immediate upgrades instead of having to wait until they show in your WordPress updates.
2. Customize Admin Setting Box Display – ON and each admin panel setting box OPEN | CLOSED position are saved each time changes are SAVED.
3. Google Fonts – By Default Google Fonts are pulled from a static JSON file in this plugin. This file is updated but does not have the latest font releases from Google.
4. House Keeping – On deletion (not deactivate) the plugin will completely remove all tables and data it created, leaving no trace it was ever here.
Add a filter to the front end
So now that we have create, style and setup our filters it’s time to showcase them on front end. We can do that by 2 ways:
- Widgets/Blocks – We have 3 widgets that can be used from WordPress Widget: Single Filter, Group Filter and Filter Reset Widgets.
- Shortcode – Find the shortcodes on the Product Filters and Filter Groups listing pages.
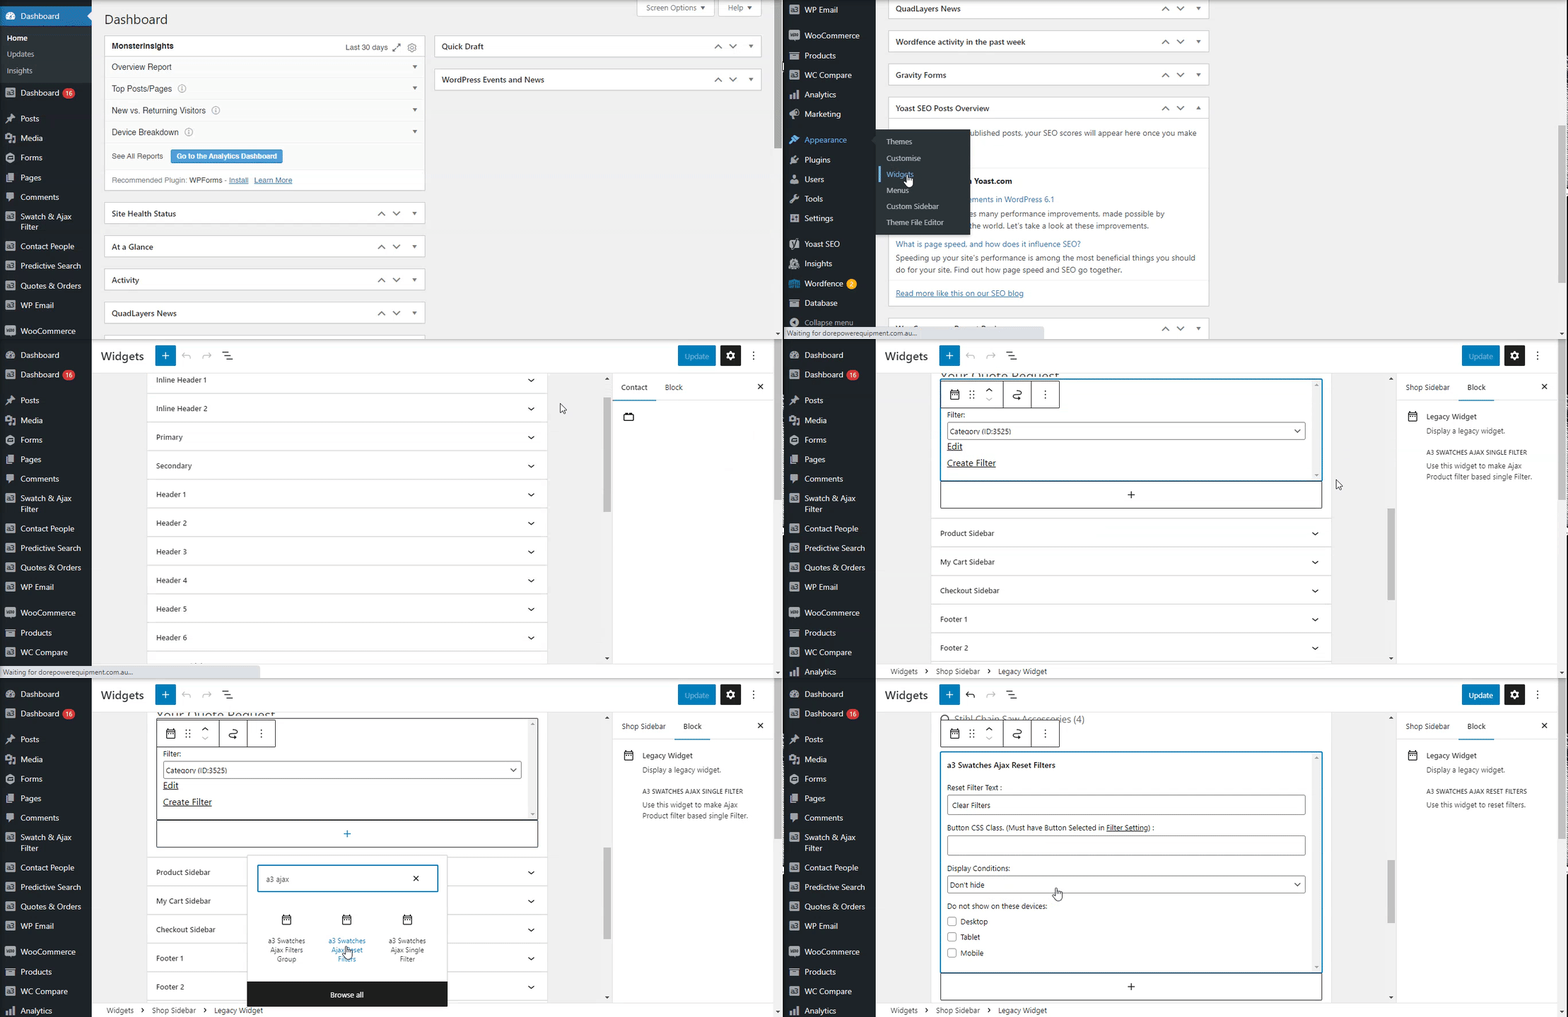
Add by Widget
Access the Widget menu from WordPress and look for the a3 Ajax Legacy Widget and insert it to the sidebar you want.
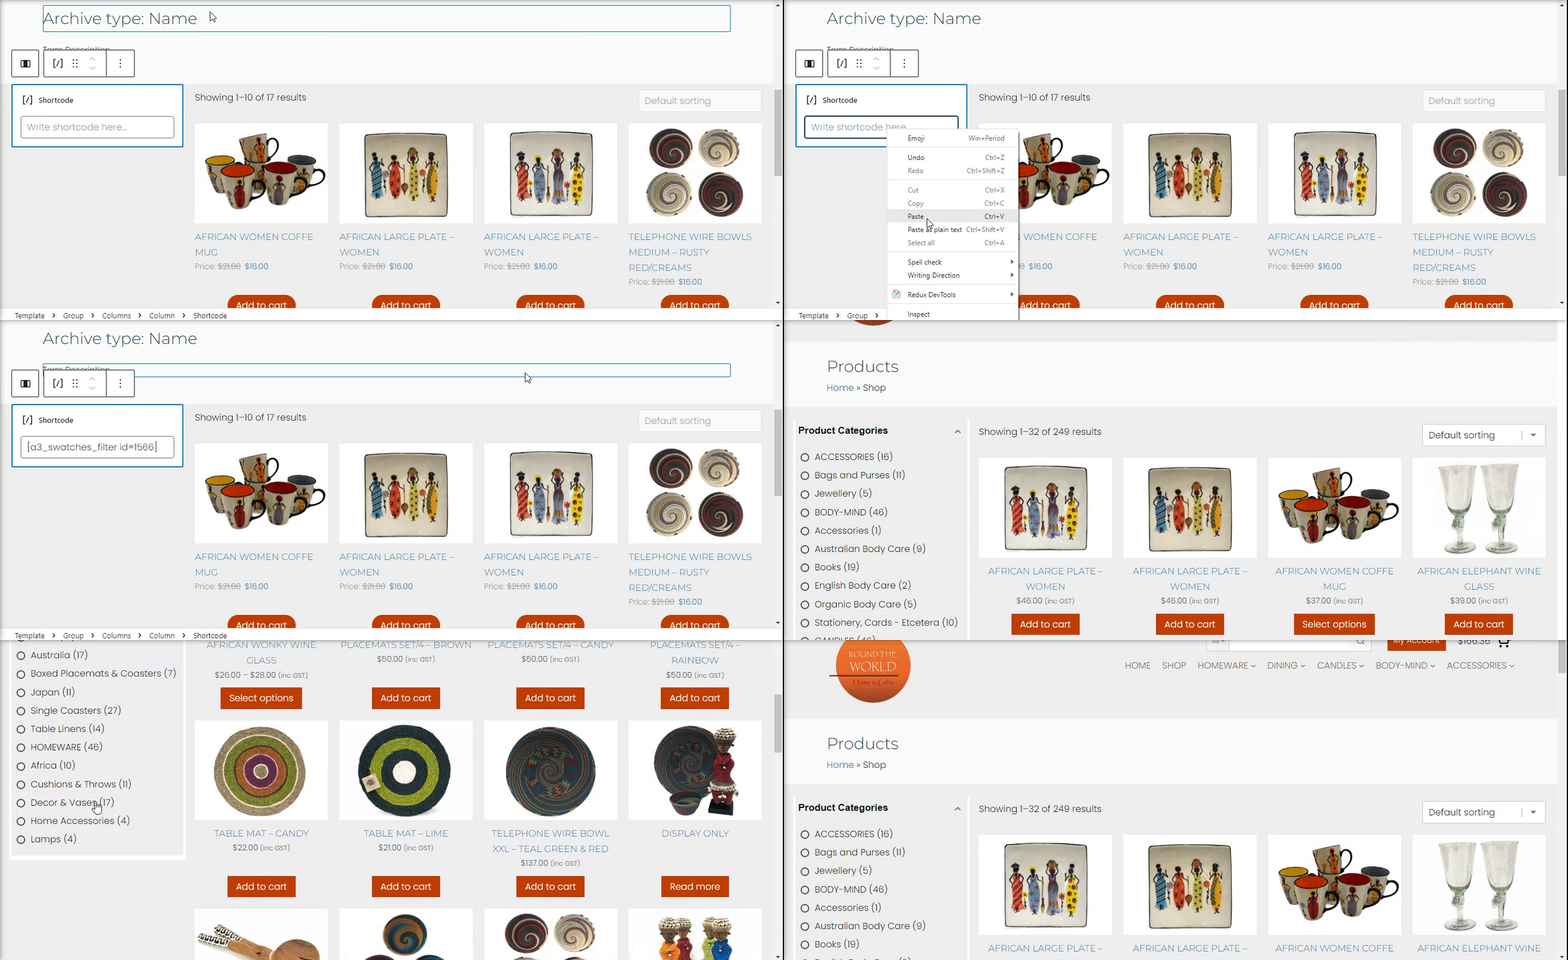
Add by Shortcode
To add the filters by shortcode you will need to find them on the Product Filters and Filter Groups listing pages.
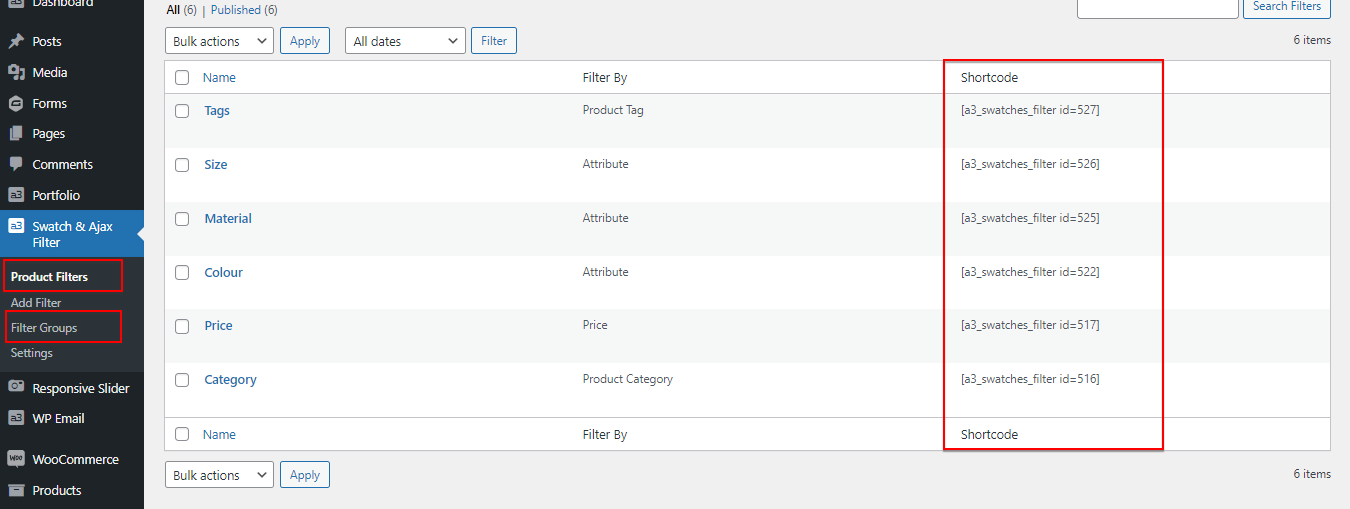
Just add those shortcode where you need them.
Product Swatches With Ajax Sort For Elementor
This add-on plugin has no settings, it adds full compatibility for the a3 WooCommerce Product Swatches with Ajax Sort with Elementor Theme / Page Builder.
Product Swatches With Ajax Sort For Divi
This add-on plugin adds full compatibility for the a3 WooCommerce Product Swatches with Ajax Sort with Divi Theme / Page Builder. It adds 3 Ajax Filter Divi Modules and 2 Price Filter Templates to the parent plugin.
