
Housekeeping
Plugin Install
Free Lite Version – Use the WordPress plugins uploader. Under Plugins Click > Add New and search ‘WP Email Template’ to find the plugin in the WordPress repository. Once you find it Click Install.
Pro Version – Here is a link where to get your License key and Pro version download on the a3rev My Account dashboard after you have purchased you License.
Important
If you are upgrading from the Lite Version of the plugin to the Pro License version you must deactivate the Lite Version before you try and activate the Pro version – if you don’t you will get a ‘Fatal Error’ – Cannot Re-Declare Class message. This happens because the plugins share the same folder and WordPress will not create duplicate folders.
Support
Lite Version – The Lite version is provided Free without a License key and hence we offer no support. We will always keep the plugins source code compatible with the latest version of WordPress. If you require support you do have 2 options:
1. You can read through the topics posted by Pro License Holders on the plugins a3rev support forum and see if you can find the answer there. Only Pro License holders have ‘write’ access to the forum.
2. Post your support request to the plugins WordPress support Forum – another Lite Version user may decide they can help you.
Pro License Holder – Post your support request to the plugins and we will do our utmost to reply within 24 hours (that is our goal).
Email Support – If you are a Lite Version user and send us an email requesting support – you will not get a reply. If you are a Pro License Holder we will respond but it will take 7 to 14 days. We are terrible at answering emails.
How to navigate these docs.
The most efficient way to use these docs is:
1. Sections – These docs are broken up into sections. There is a ‘View Docs’ button at the top of each of the plugins dashboard admin pages with links to that section of the docs. A table of Contents at the top of the docs takes you straight to the selected section of the docs.
2. Images, Numbers and Images notes. Each section has a full image of that part of the dashboard with Coloured numbers. Below the image is a Corresponding text explanation of what each numbered feature does. We do it like this so that that don’t speak or read English can use Google translator to be able to get value from the docs.
3. Coloured Numbers for quick Version reference.
VERSION NUMBER KEY
Colour numbers visually show you which version of the plugin the feature is activated on.
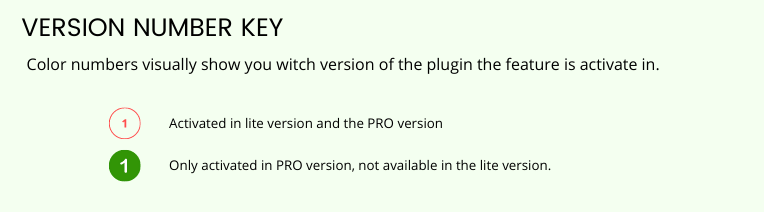
1. Red Circle – Activated in Lite Version and by default in the Pro Version and the Ultimate Versions.
2. Green Circle – Pro version Features, not available in Lite version.
4. Hints and Tips – These are usually easily spotted as they are highlighted in a Red Box.
5. Quick Links – Under each section you will see Quick links. Designed to be a short cut to relevant information and the docs.
6. Troubleshooting – We try and post any known issues and the fix in the Troubleshooting section at the end of the doc. This includes known Theme or plugin conflicts.
The Plugin Dashboard
When installed the plugin adds its own admin panel to your wp-admin sidebar dashboard.


Image Legend
1. On your WordPress admin dashboard click on WP Email.
2. You’ll see the Email Template admin panel open.
General
The default open tab is the GENERAL tab.
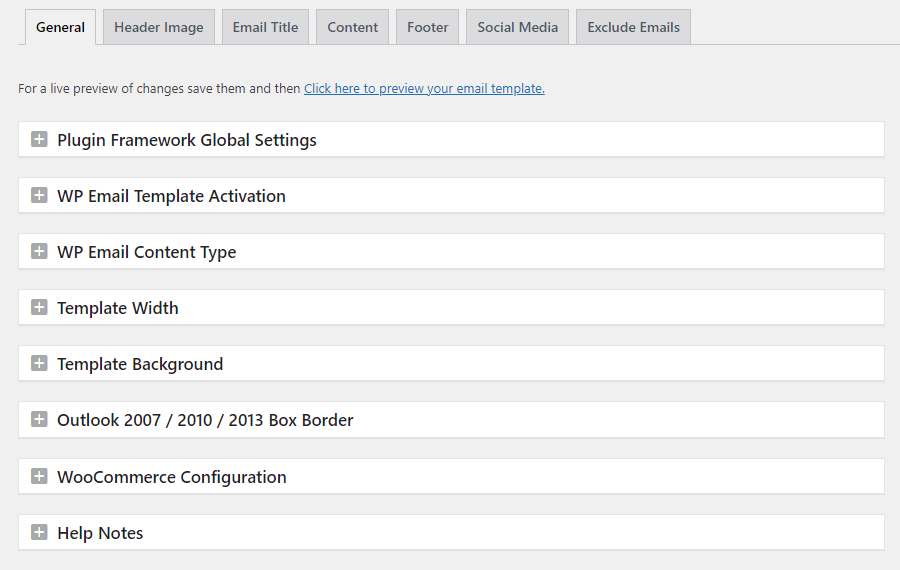
Live Preview

You can preview the email template as you style it. After saving the changes you have made, and view them right from the admin panel.
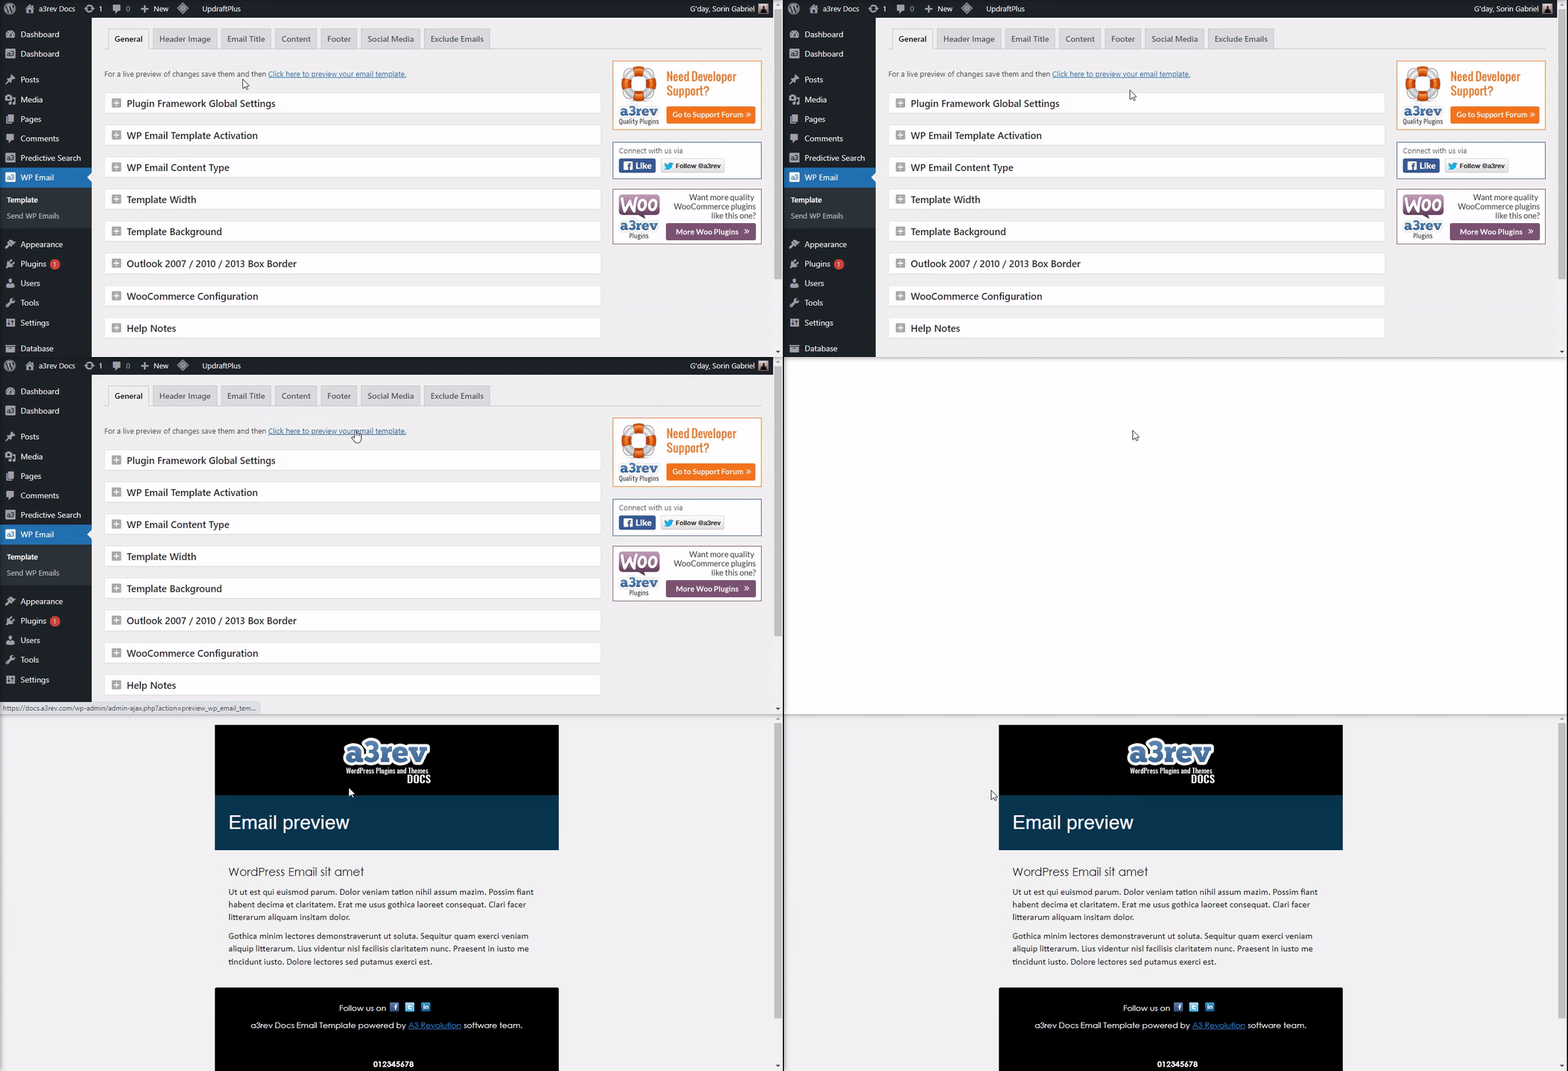
Image Legend
1. Click the link to see the Live preview.
2. Preview opens in a new window.
Plugin Framework Global Settings
This plugin supports auto upgrades via your WordPress auto updates. Updates show within 24 hours of release. This feature allows you to call any new version for immediate upgrades instead of having to wait until they show in your WordPress updates.

Image Legend
1. ON and each admin panel setting box OPEN | CLOSED position are saved each time changes are SAVED
2. ON to connect to Google Fonts API and have auto font updates direct from Google.
3. On deletion (not deactivate) the plugin will completely remove all tables and data it created, leaving no trace it was ever here.
WP Email Template Activation

Image Legend
1. ON will apply templates to all emails are sent via wp_mail() function of WordPress.
WP Email Content Type
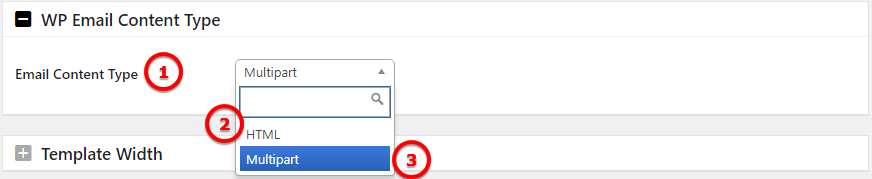
Image Legend
1. Email Content Type – Select the content you want to use for the email.
2. HTML – The email message body is composed of text formatted in hyper-text mark-up language
3. Multipart – The mail is constructed to have a body which is either text/plain or text/html and may have one or more attachments.
Template Width

Image Legend
1. Width – Chose a custom size for the template width or leave the recomandate one
Template Background
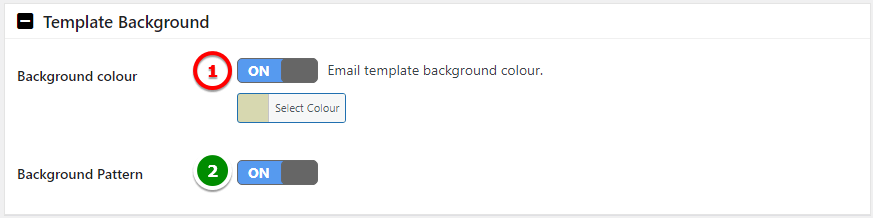
Image Legend
1. Background Color – Choose your custom color
2. Background Pattern – Close or Use the background pattern
Outlook 2007 / 2010 / 2013 Box Border

Image Legend
Box Border – ON will show a white box border around email Template in Outlook. Outlook does not support border colour, size or type. Any Border style created with the dynamic settings will not show in Outlook.
WooCommerce Configuration

Image Legend
Apply to WooCommerce emails – If WooCommerce is installed, select YES to apply this template to all WooCommerce emails.
Help Notes – Email Fonts
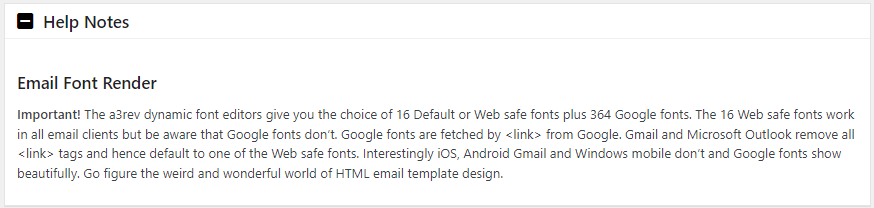
Original Statement Breakdown and update as of Feb 2025
For those who want a more in-depth explanation of the state of play in email font render across email clients and devices please read on. The Help note on the plugin dashboard where written 10 years ago – not much has changed.
“The a3rev dynamic font editors give you the choice of 16 Default or Web safe fonts plus 364 Google fonts.“
The concept of “web-safe fonts” (system fonts pre-installed on most devices) still exists, and tools like this typically provide such options for reliability. The mention of “364 Google fonts” is outdated, Google Fonts now offers over 1,500 font families as of 2025, though not all would be practical or licensed for email use. Modern email template editors often integrate a broader range of Google Fonts, but the principle of offering both web-safe and custom fonts persist.
“The 16 Web safe fonts work in all email clients but be aware that Google fonts don’t.”
This remains mostly true. Web-safe fonts like Arial, Helvetica, Times New Roman, and Verdana are still supported universally because they don’t rely on external resources. However, the blanket statement that “Google Fonts don’t work” oversimplifies today’s reality. Support for web fonts, including Google Fonts, has improved in some email clients, but it’s still far from universal. Gmail (web and mobile), Yahoo Mail, and most versions of Outlook (especially desktop) still don’t support custom web fonts fully, defaulting to system fonts instead. Meanwhile, clients like Apple Mail, iOS Mail, and some Android native email apps have better support, as we’ll explore further.
“Google fonts are fetched by <link> from Google. Gmail and Microsoft Outlook remove all <link> tags and hence default to one of the Web safe fonts.”
Gmail: Gmail’s web and mobile apps continue to strip <link> tags and don’t support externally fetched web fonts (via <link> or @import). Exceptions exist: Gmail does render two Google Fonts—Roboto and Google Sans—natively because they’re part of its own interface, but this is limited to Google’s ecosystem and not a general endorsement of web fonts. Richard that is why within the email you are seeing some fonts render correctly in mobile in Gmail
Microsoft Outlook: Desktop versions of Outlook (2007–2021, including the “New Outlook” for Windows) use the Word rendering engine, which ignores <link> tags and doesn’t support web fonts. Even with the @font-face method (an alternative to <link>), Outlook often reverts to Times New Roman unless specific workarounds (like MSO conditionals) are applied to enforce a fallback. Outlook.com (web) and the Outlook mobile app have slightly better support for web fonts, but it’s inconsistent and depends on the implementation.
Key Update: The <link> method remains poorly supported, but alternatives like @font-face (embedding font files directly) have gained traction in some clients. However, Gmail and Outlook desktop still largely ignore these, reinforcing the reliance on web-safe fallbacks.
“Interestingly iOS, Android Gmail and Windows mobile don’t and Google fonts show beautifully.”
This part is partially inaccurate or outdated – here is the latest update:
iOS: iOS Mail (on iPhone/iPad) does support web fonts, including Google Fonts, when implemented via @font-face or <link>, as long as the font is properly embedded and the device can fetch it. This remains true in 2025, making iOS a strong platform for custom fonts.
Android Gmail: The Gmail app on Android does not support Google Fonts or other web fonts—it strips <link> and ignores most custom font declarations, defaulting to system fonts like Roboto (its native font) or a fallback like Arial. The statement might have confused the Android native email client (not Gmail) with the Gmail app. The default Android email client (pre-Lollipop or non-Gmail apps) historically had better web font support, but Gmail’s dominance has shifted focus away from that.
Windows Mobile: Windows Mobile, as a platform, is largely defunct by 2025 (replaced by Windows 10/11 ecosystems). The old Windows Phone mail app had patchy support for web fonts, but it’s irrelevant now. The modern Outlook mobile app (iOS/Android) offers limited web font support, but it’s not as robust as iOS Mail and often falls back to system fonts.
“Go figure the weird and wonderful world of HTML email template design.”
This sentiment is timeless! Email rendering remains a quirky, fragmented space due to differing rendering engines, security policies, and client priorities. Even in 2025, HTML email design is a balancing act between creativity and compatibility.
Updated Truth in 2025
The core idea of the statement—that web-safe fonts are universally reliable while Google Fonts (and web fonts generally) face inconsistent support—still holds.
Web-Safe Fonts: These (e.g., Arial, Helvetica, Times New Roman) remain the gold standard for guaranteed rendering across all email clients, from Gmail to Outlook to niche apps.
Google Fonts Support:
Supported: Apple Mail, iOS Mail, Thunderbird, Samsung Mail, and some Android native clients (not Gmail) can render Google Fonts if implemented correctly (preferably with @font-face over <link>). Outlook.com and Outlook mobile have partial support.
Not Supported: Gmail (web and app), Yahoo Mail, AOL Mail, and most Outlook desktop versions (2007–2021) still block or ignore web fonts, defaulting to system fonts like Arial, Calibri, or Times New Roman.
Special Case: Gmail supports Roboto and Google Sans natively, but other Google Fonts won’t work without being locally installed on the recipient’s device (rare).
Conclusion: Is the Statement Still True?
Mostly, yes, but with caveats. The 16 web-safe fonts would still “work in all email clients” as a reliable baseline. Google Fonts, fetched via <link>, indeed don’t work in Gmail or most Outlook versions, defaulting to web-safe fallbacks. The landscape has shifted slightly with better web font support in some clients, but the “weird and wonderful” variability persists.
Microsoft 365 Setup
WP Email Template Pro can send WordPress emails through Microsoft 365 using the Microsoft Graph API.
This connection uses app-only authentication, which means the website authenticates as a Microsoft Entra application. A Microsoft 365 user does not need to sign in each time an email is sent.
The setup has two main parts:
- Create and configure an application in Microsoft Entra.
- Enter the application credentials in WP Email Template Pro and send a test email.
Before You Begin
You will need:
- Access to the Microsoft 365 tenant with permission to register an application.
- Administrator permission to grant tenant-wide consent.
- A licensed Microsoft 365 mailbox or a shared mailbox that WP Email Template Pro will use as the sender.
- WP Email Template Pro installed and activated on the WordPress website.
- A secure place, such as a password manager, where you can temporarily store the Client Secret Value.
Important: Do not use a client’s Microsoft 365 tenant unless you have been authorised to make these changes.
Part 1: Register the Microsoft Entra Application
Step 1: Open App Registrations
Sign in to the Microsoft Entra admin center using an account that has permission to register applications.
From the left navigation menu:
- Open Entra ID.
- Select App registrations.
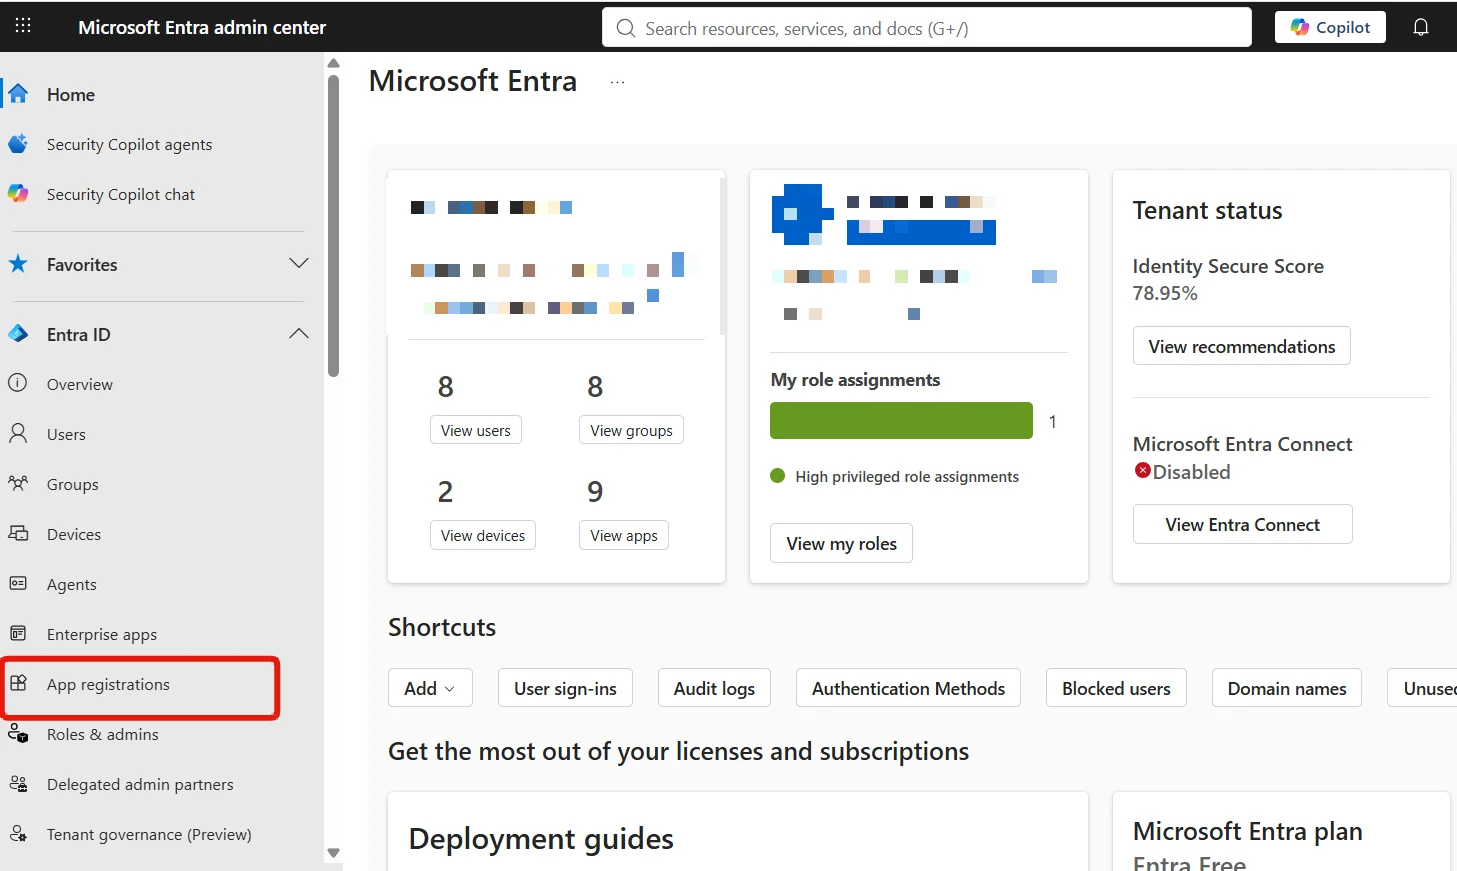
Microsoft Entra uses app registrations to establish the identity that an application uses when connecting to Microsoft services.
Step 2: Create a New Registration
On the App registrations page, select New registration.
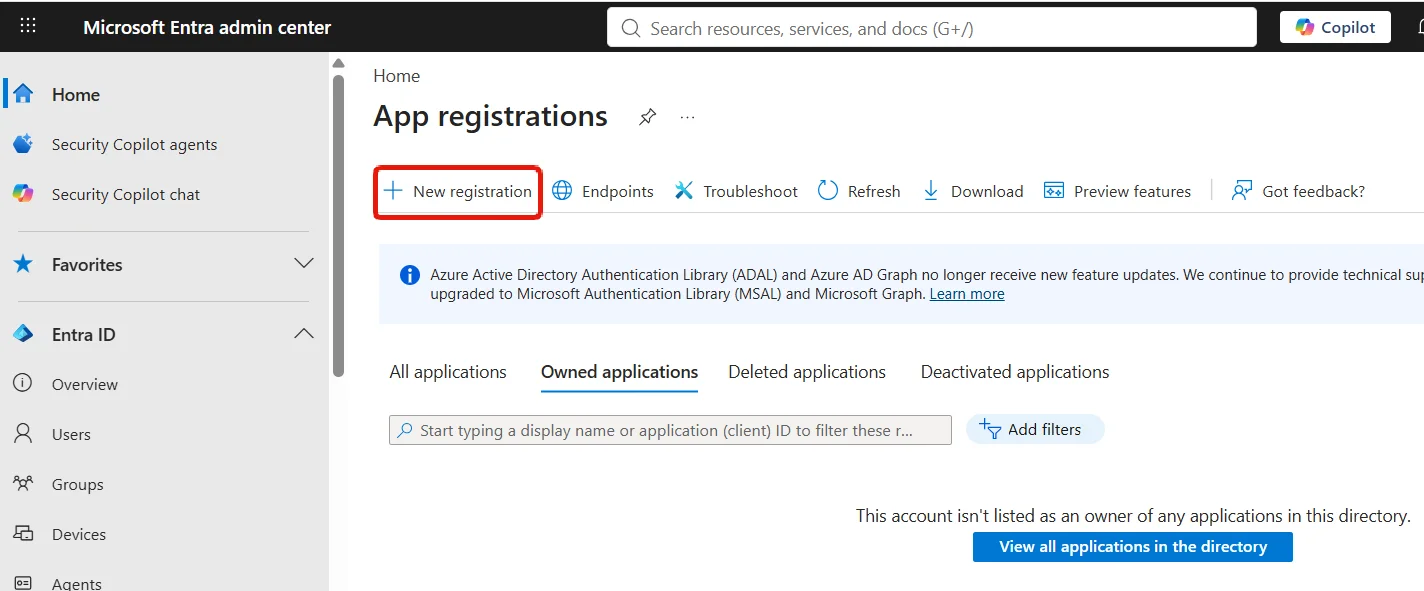
This opens the application registration form.
Step 3: Register the Website Mailer Application
Complete the registration form as follows:
Name
Enter a descriptive name for the application, such as:
Website Mailer
This name is used only to help administrators identify the application and can be changed later.
Supported account types
Select:
Accounts in this organizational directory only — Single tenant
This limits the application to the Microsoft 365 organisation in which it is registered.
Redirect URI
Leave the Redirect URI fields empty.
WP Email Template Pro uses app-only authentication rather than an interactive Microsoft user sign-in, so a redirect URI is not required for this connection.
Select Register.
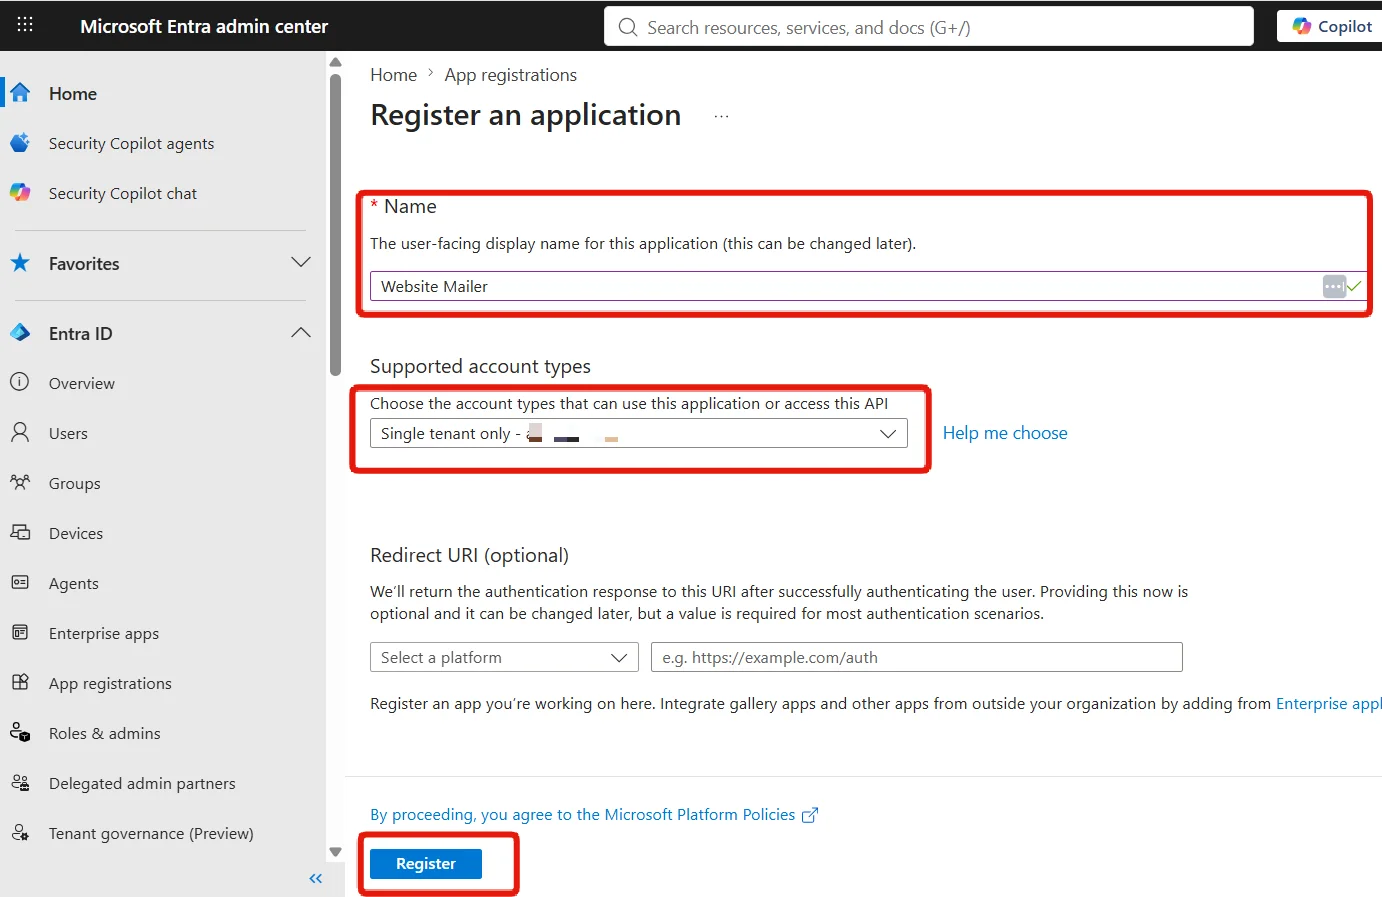
Microsoft recommends the single-tenant option for applications intended to operate only inside one organisation. The app-only client credentials flow runs without a signed-in user.
Part 2: Add the Microsoft Graph Permission
Step 4: Open API Permissions
After the application has been created, Microsoft displays its configuration page.
From the application menu:
- Select API permissions.
- Select Add a permission.
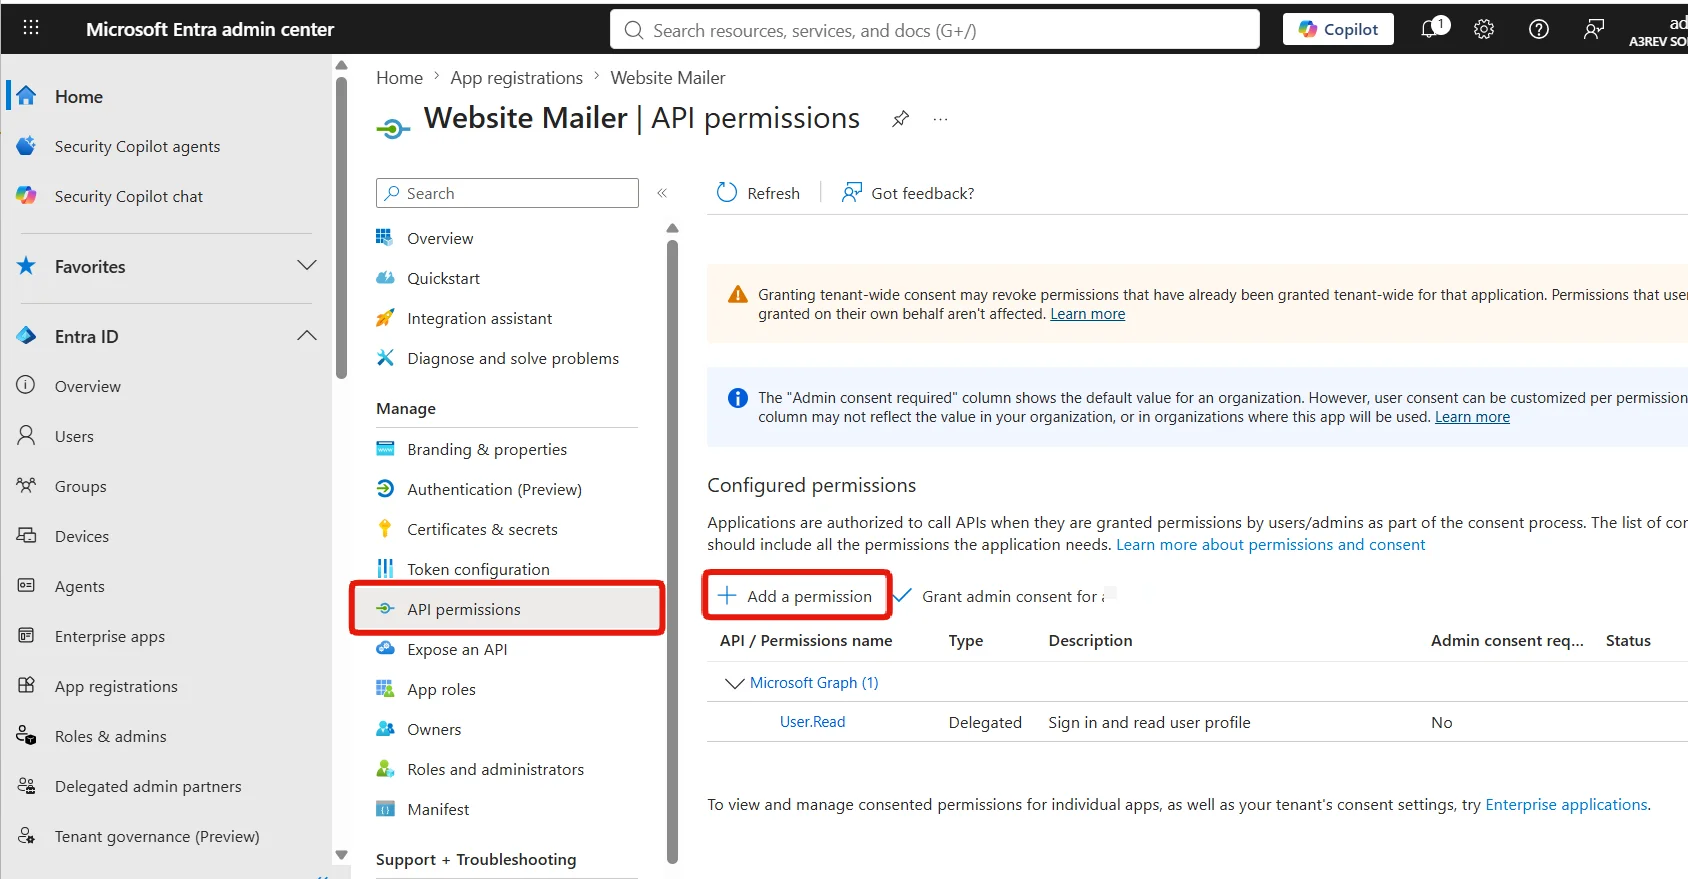
Microsoft may automatically add the delegated User.Read permission when the application is registered. WP Email Template Pro does not use that permission for sending email. The required permission is Mail.Send with the type Application.
Step 5: Select Microsoft Graph
In the Request API permissions panel, select:
Microsoft Graph
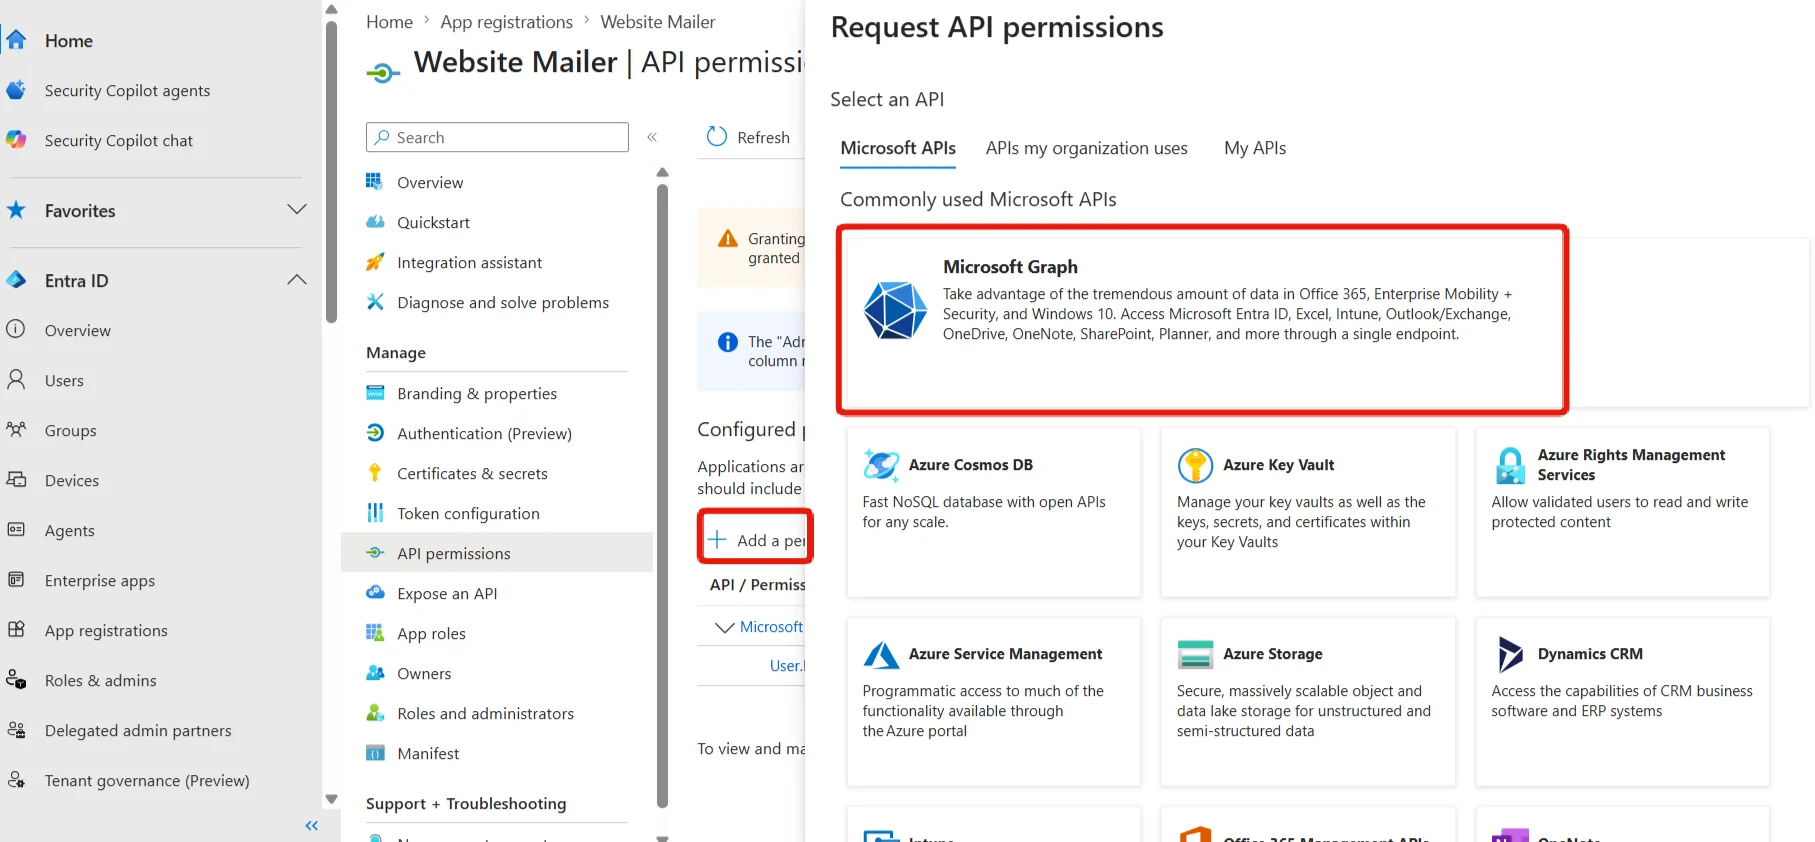
Microsoft Graph provides the API used by WP Email Template Pro to send email through Microsoft 365.
Step 6: Select Application Permissions
Microsoft asks which type of permission the application requires.
Select:
Application permissions
Do not select Delegated permissions.
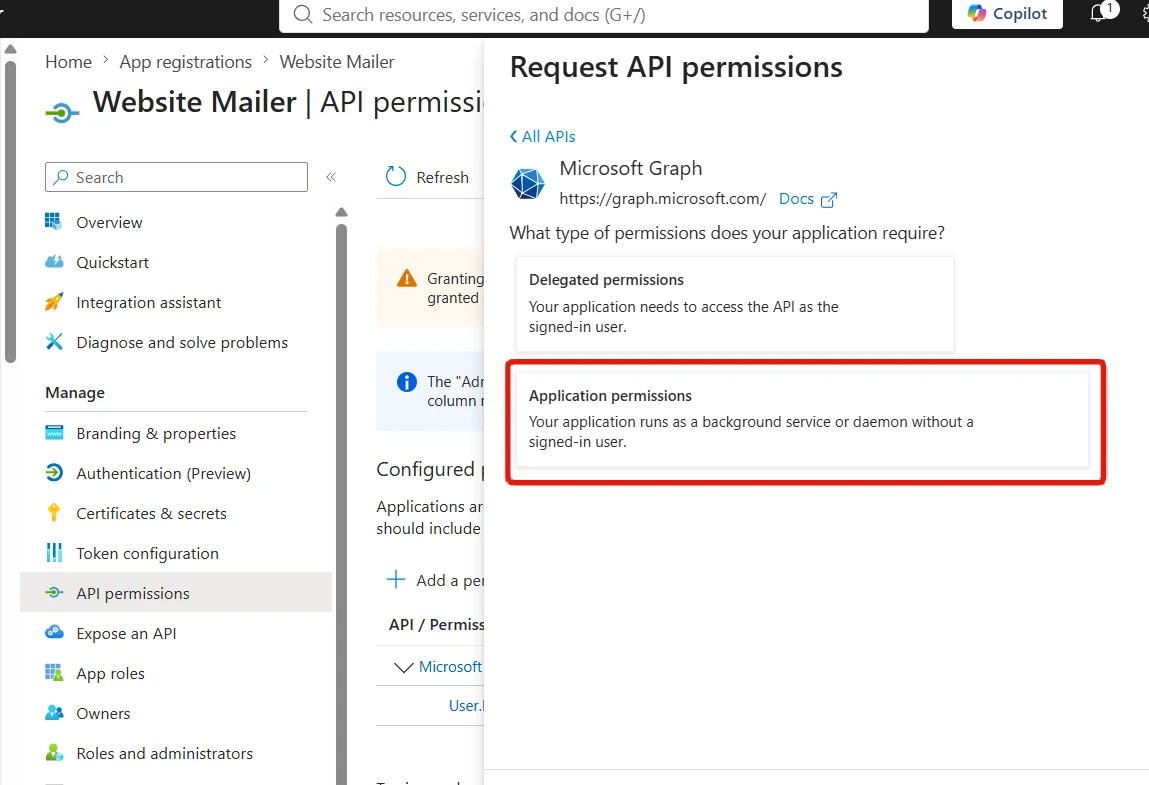
Application permissions allow the website to authenticate and send email as a background service without a Microsoft 365 user being signed in.
Important: WP Email Template Pro requires the Application version of
Mail.Send. The Delegated version requires an interactive signed-in user and is not suitable for this app-only connection.
Step 7: Add Mail.Send
Under Select permissions:
- Enter
Mail.Sendin the search field. - Expand the Mail category.
- Select the
Mail.Sendpermission described as Send mail as any user. - Select Add permissions.
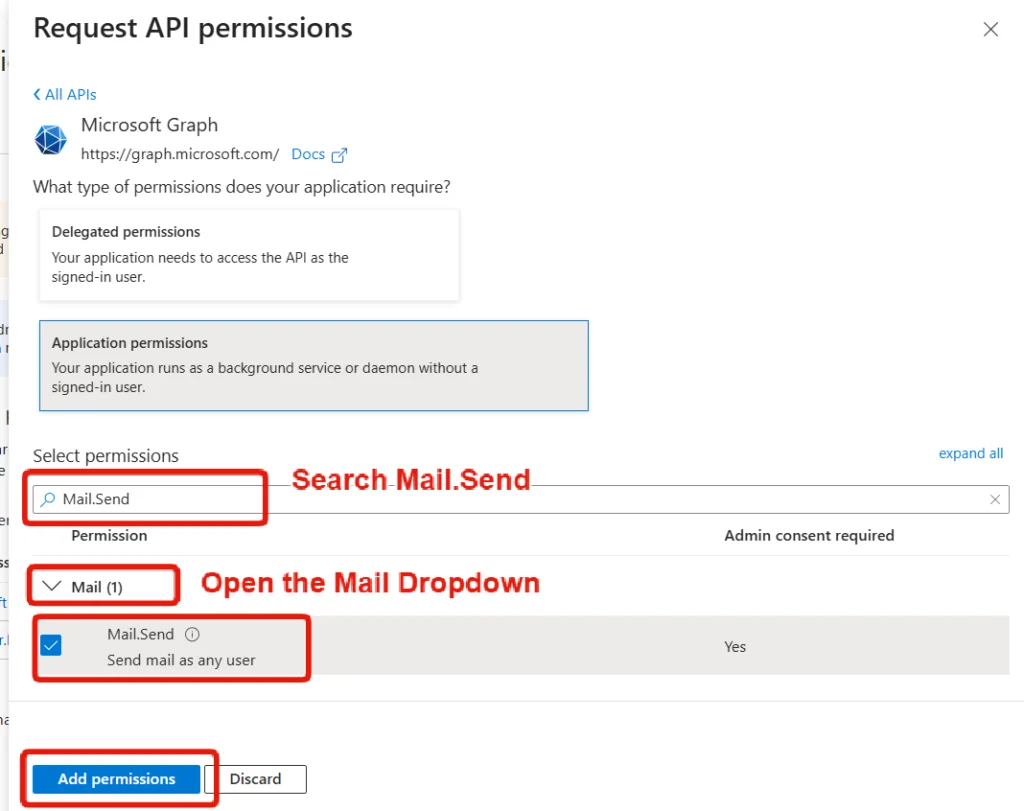
Confirm that the selected permission has:
- Permission:
Mail.Send - Type: Application
- Description: Send mail as any user
- Admin consent required: Yes
The Mail.Send Application permission allows the application to send email without a signed-in user and requires administrator consent. By default, the permission is tenant-wide, which is why mailbox restriction is discussed later in the security section.
Part 3: Grant Administrator Consent
Step 8: Grant Admin Consent
After adding Mail.Send, it appears in the configured permissions table, but it is not yet active.
The Status column will display:
Not granted
Select:
Grant admin consent for [your organisation]
Confirm the Microsoft prompt when it appears.
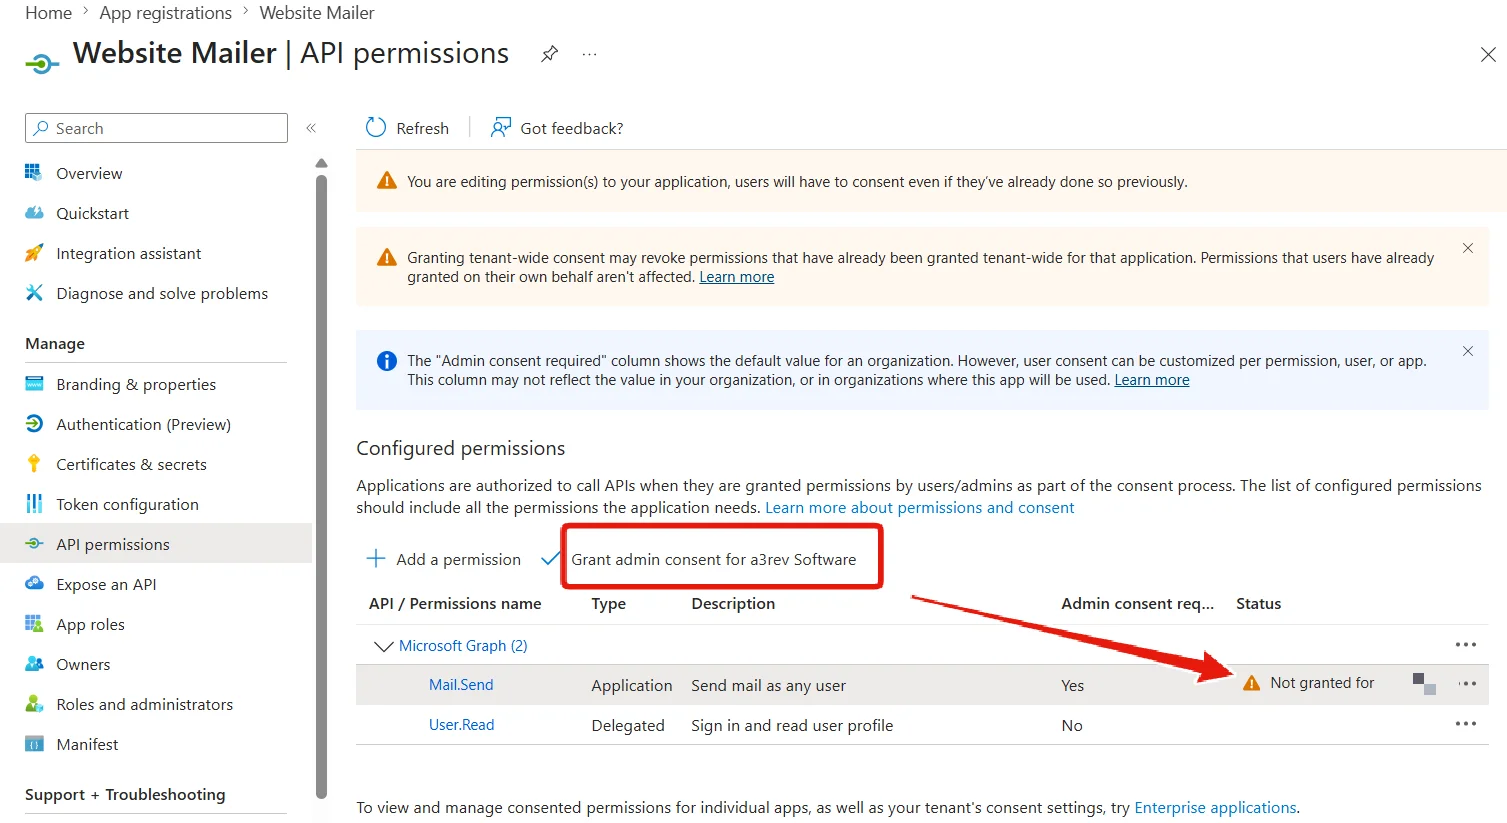
Do not skip this step: Adding
Mail.Senddoes not activate the permission. WP Email Template Pro will not be able to send email until a Microsoft 365 administrator grants consent.
This is one of the most commonly missed steps during setup.
Step 9: Confirm That Consent Was Granted
After granting consent, verify that the Mail.Send row displays:
- A green check mark.
- Granted for [your organisation] in the Status column.
Microsoft should also display a confirmation message stating that administrator consent was successfully granted.
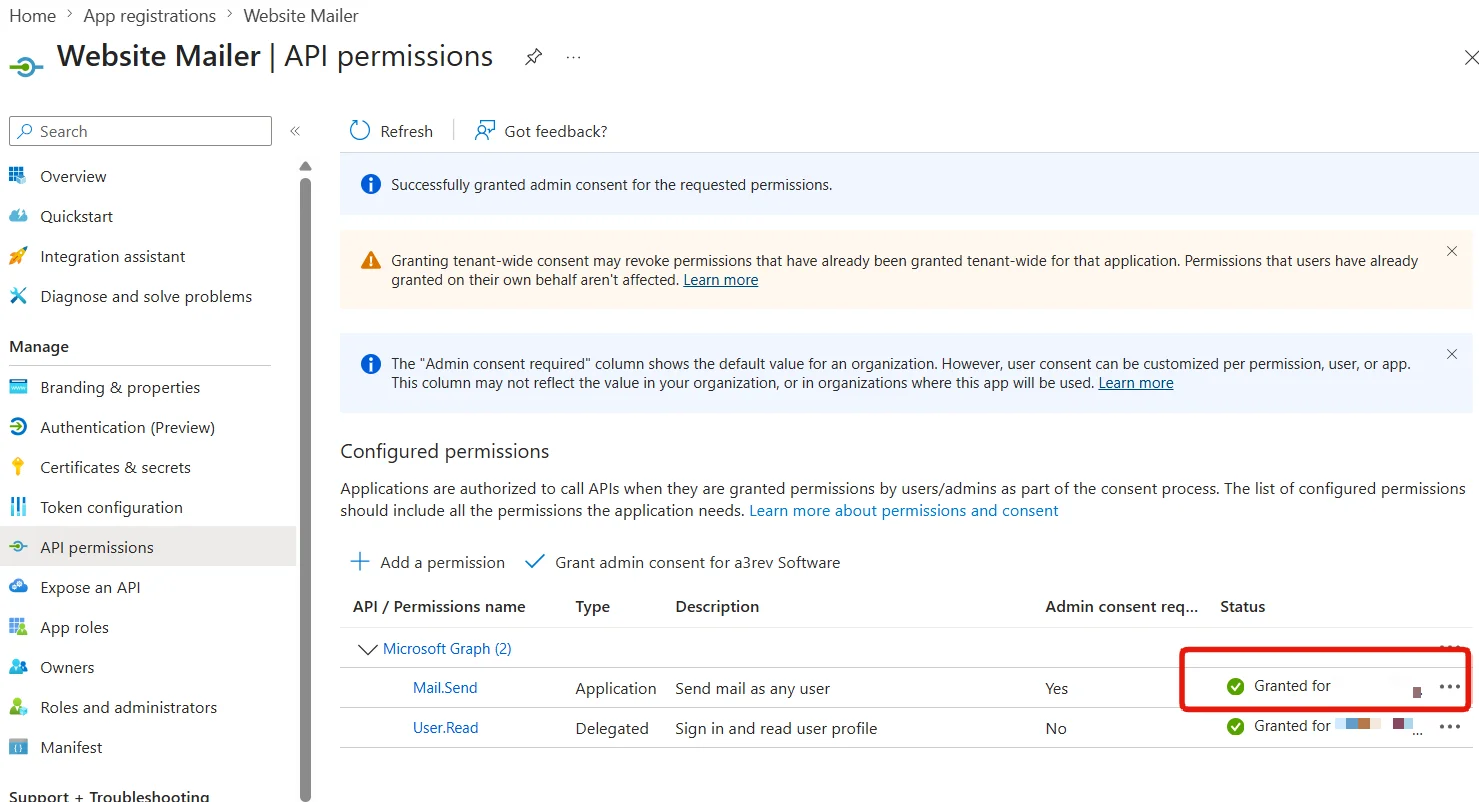
Do not continue while the Mail.Send permission still displays Not granted.
Microsoft Entra’s documented admin-consent process requires the administrator to grant consent and then verify the Granted status.
Part 4: Create the Client Secret
Step 10: Open Client Secrets
From the application menu:
- Select Certificates & secrets.
- Open the Client secrets tab.
- Select New client secret.
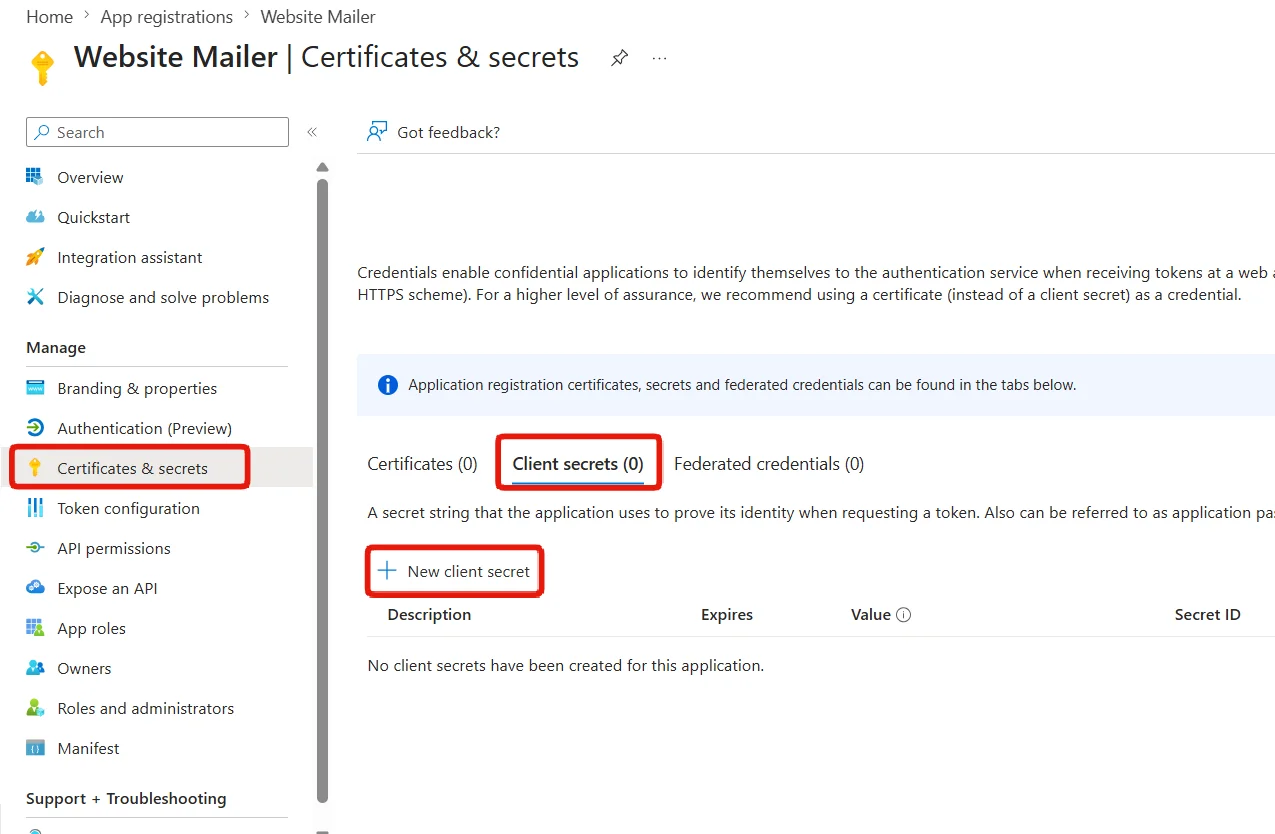
The client secret is the credential WP Email Template Pro uses to prove the application’s identity when requesting access to Microsoft Graph.
Treat the client secret like a password.
Step 11: Configure the Secret
In the Add a client secret panel:
Description
Enter a descriptive name, such as:
Website Mailer
Expires
Select an expiration period allowed by your organisation’s security policy.
The Microsoft Entra portal allows a client secret lifetime of up to 24 months. Microsoft recommends choosing a period of less than 12 months where practical.
Select Add.
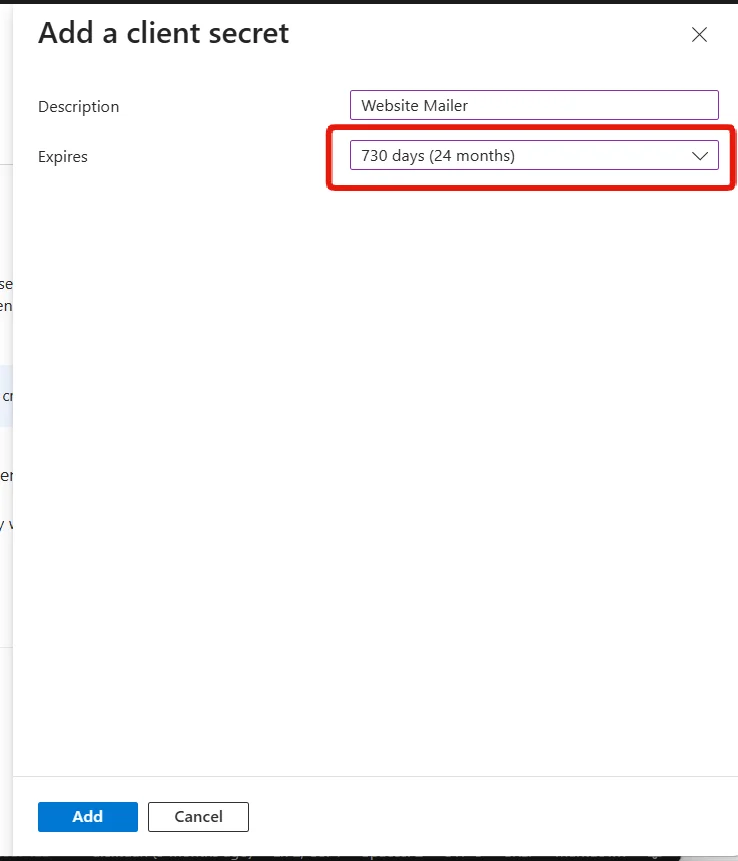
Important: Client secrets expire. Record the expiration date and create a reminder to renew the secret before that date. Email delivery will stop when the secret expires unless the plugin is updated with a new Client Secret Value.
Microsoft limits client secrets to 24 months or less and recommends a shorter lifetime for improved security.
Step 12: Copy the Client Secret Value
After the secret is created, Microsoft displays it in the Client secrets table.
Immediately copy the credential shown under:
Value
Use the copy icon next to the Value field and store it securely.
Critical: Copy the Value, not the Secret ID.
The Client Secret Value is the credential required by WP Email Template Pro. The Secret ID identifies the secret record but cannot be used to authenticate the plugin.
Microsoft displays the Client Secret Value only once. After you leave or refresh this page, the Value cannot be retrieved again. If it is lost, you must create a new client secret.
Do not:
- Paste the Client Secret Value into an email.
- Include it in screenshots.
- Add it to public documentation.
- Share it in a public support ticket.
- Store it in an unprotected document.
Part 5: Collect the Application Details
Step 13: Find the Client ID and Tenant ID
Select Overview from the application menu.
Under Essentials, locate and copy:
Application (client) ID
This uniquely identifies the Website Mailer application.
Enter this value in the plugin’s Client ID field.
Directory (tenant) ID
This identifies the Microsoft 365 organisation where the application was registered.
Enter this value in the plugin’s Tenant ID field.
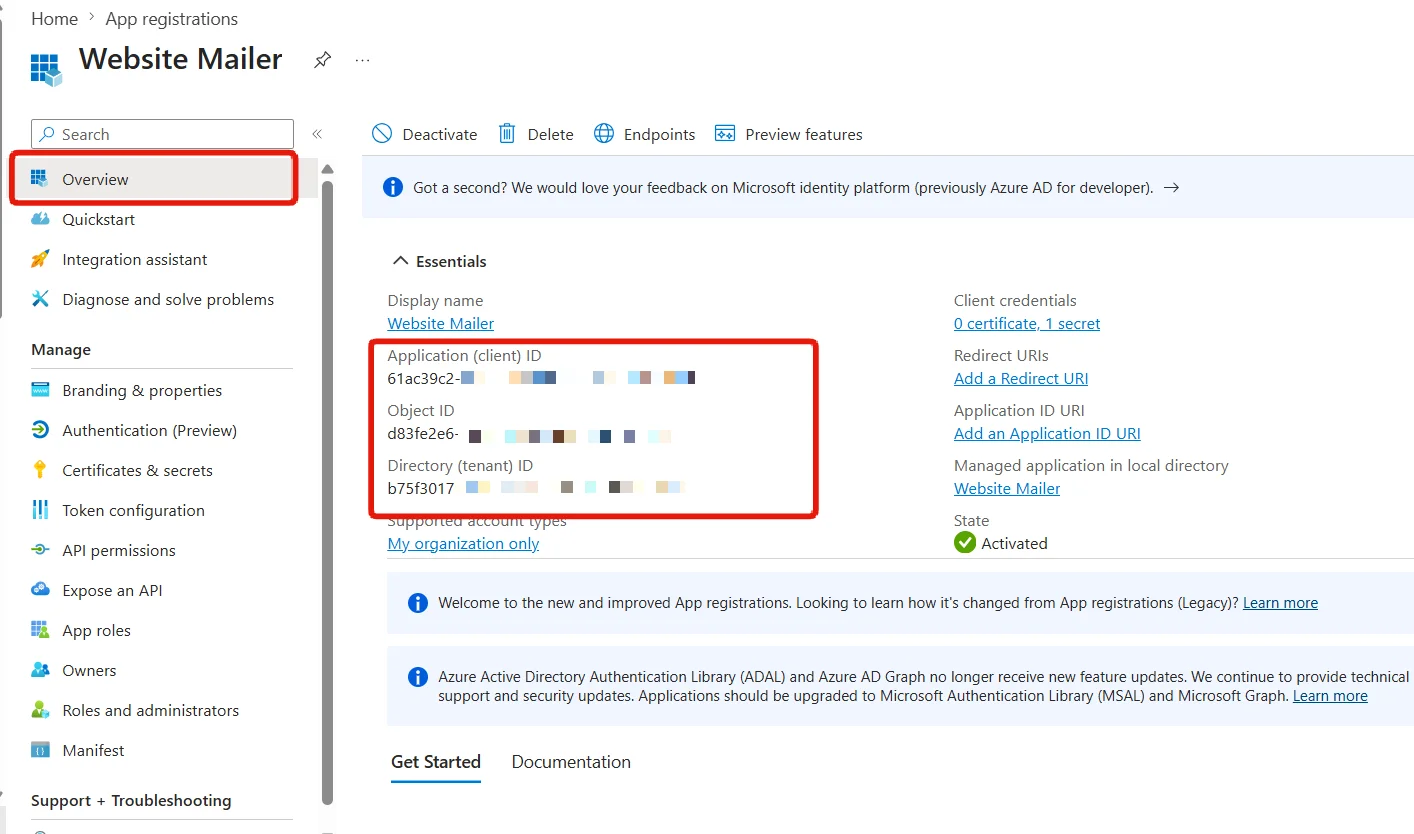
Note: The Object ID shown on the Overview page is not required by WP Email Template Pro.
You should now have the three credentials required by the plugin:
- Directory (tenant) ID
- Application (client) ID
- Client Secret Value
Keep these values available while completing the WordPress configuration.
Part 6: Connect WP Email Template Pro
In the WordPress dashboard, open the WP Email Template Pro settings and locate the:
Microsoft 365 Activation panel.
Enter the Microsoft Entra credentials into their matching fields:
Tenant ID
Paste the Directory (tenant) ID copied from the Microsoft Entra application Overview page.
Client ID
Paste the Application (client) ID copied from the Overview page.
Client Secret
Paste the Client Secret Value copied from the Client secrets page.
Do not enter the Secret ID.
Sender Mailbox
Enter the full Microsoft 365 email address of the mailbox the website will send from.
This must be a valid mailbox in the same Microsoft 365 tenant as the registered application. It can be:
- A licensed user mailbox.
- A properly configured shared mailbox.
Save or activate the Microsoft 365 connection.
Part 7: Send a Test Email
After saving the Microsoft 365 settings:
- Locate Send a Test Email.
- Enter an email address that you can access.
- Send the test.
- Confirm that the plugin displays a successful result.
- Check the receiving inbox.
- Check the Spam or Junk folder if the message is not immediately visible.
Also verify that:
- The expected Microsoft 365 mailbox is shown as the sender.
- The email contains the WP Email Template design.
- No Microsoft Graph or authentication error is displayed.
Do not consider the setup complete until a test email has been delivered successfully.
Security Recommendation for Microsoft 365 Administrators
The Mail.Send Application permission is broad. Without additional Exchange Online restrictions, the application can potentially send email as mailboxes across the Microsoft 365 organisation.
For production websites, Microsoft 365 administrators should restrict the application so it can access only the designated website sender mailbox.
Microsoft’s current recommended method is:
Role Based Access Control for Applications in Exchange Online
App RBAC allows an administrator to assign application permissions together with a resource scope that limits which mailboxes the application can access.
Microsoft’s older Application Access Policies can also scope application permissions, but Microsoft now classifies that system as legacy and recommends App RBAC for new configurations.
Restricting mailbox access is an advanced Microsoft 365 administration task and should be completed by the organisation’s Microsoft 365 or Exchange administrator.
After applying a mailbox restriction, send another test email from WP Email Template Pro.
Renewing the Client Secret
Client secrets expire and cannot be extended.
Before the current secret expires:
- Open the Website Mailer application in Microsoft Entra.
- Go to Certificates & secrets.
- Open Client secrets.
- Select New client secret.
- Create the replacement secret.
- Copy the new Value immediately.
- Replace the existing Client Secret in WP Email Template Pro.
- Save the plugin settings.
- Send a test email.
- After confirming that the new secret works, delete the expired or superseded secret from Microsoft Entra.
Do not delete the old secret until the new one has been entered into the plugin and successfully tested.
An expired secret may produce Microsoft Entra error AADSTS7000222
Troubleshooting
Invalid Client Secret
Possible Microsoft error
AADSTS7000215: Invalid client secret is provided
What it means
Microsoft could not authenticate the application using the Client Secret entered in the plugin.
Common causes
- The Secret ID was entered instead of the secret Value.
- The Client Secret Value was copied incorrectly.
- The secret belongs to another application.
- The Client ID and secret do not belong to the same app registration.
- The secret has expired.
How to fix it
- Check that the plugin contains the Client Secret Value, not the Secret ID.
- Verify the Client ID and Tenant ID.
- If the original Value is no longer available, create a new client secret.
- Copy its Value immediately.
- Replace the secret in WP Email Template Pro.
- Save and send another test email.
Microsoft identifies AADSTS7000215 as an invalid client-secret error and AADSTS7000222 as an expired-secret error.
Admin Consent Not Granted
Possible Microsoft error
ErrorAccessDeniedAccess is deniedInsufficient privileges- HTTP
403
What it means
The application may have the Mail.Send permission listed, but the tenant administrator has not granted consent, or the wrong type of permission was added.
How to fix it
- Open the Website Mailer application in Microsoft Entra.
- Select API permissions.
- Confirm that
Mail.Sendhas the type Application. - Select Grant admin consent for [your organisation].
- Confirm the prompt.
- Verify that the Status column shows a green check mark and Granted.
- Return to WordPress and send another test email.
Microsoft Graph uses HTTP 401 and 403 responses for authentication and authorisation failures.
Sender Mailbox Not Found
Possible Microsoft error
Resource not foundUser not foundMailbox not foundRequest_ResourceNotFound
What it means
Microsoft Graph cannot locate or use the mailbox entered as the sender.
Common causes
- The sender email address contains a spelling error.
- The mailbox does not exist in the Microsoft 365 tenant.
- The mailbox belongs to a different tenant.
- The mailbox has been deleted or disabled.
- A newly created mailbox has not finished provisioning.
- An App RBAC or legacy access policy does not include the selected mailbox.
How to fix it
- Confirm the exact mailbox address in the Microsoft 365 admin center.
- Verify that the mailbox belongs to the same tenant identified by the configured Tenant ID.
- Confirm that it is an active licensed mailbox or shared mailbox.
- Confirm that any mailbox access restriction includes this mailbox.
- Update the sender mailbox in WP Email Template Pro.
- Save and send another test email.
The Microsoft Graph sendMail operation supports the Mail.Send application permission and sends through the selected user mailbox.
Header Image
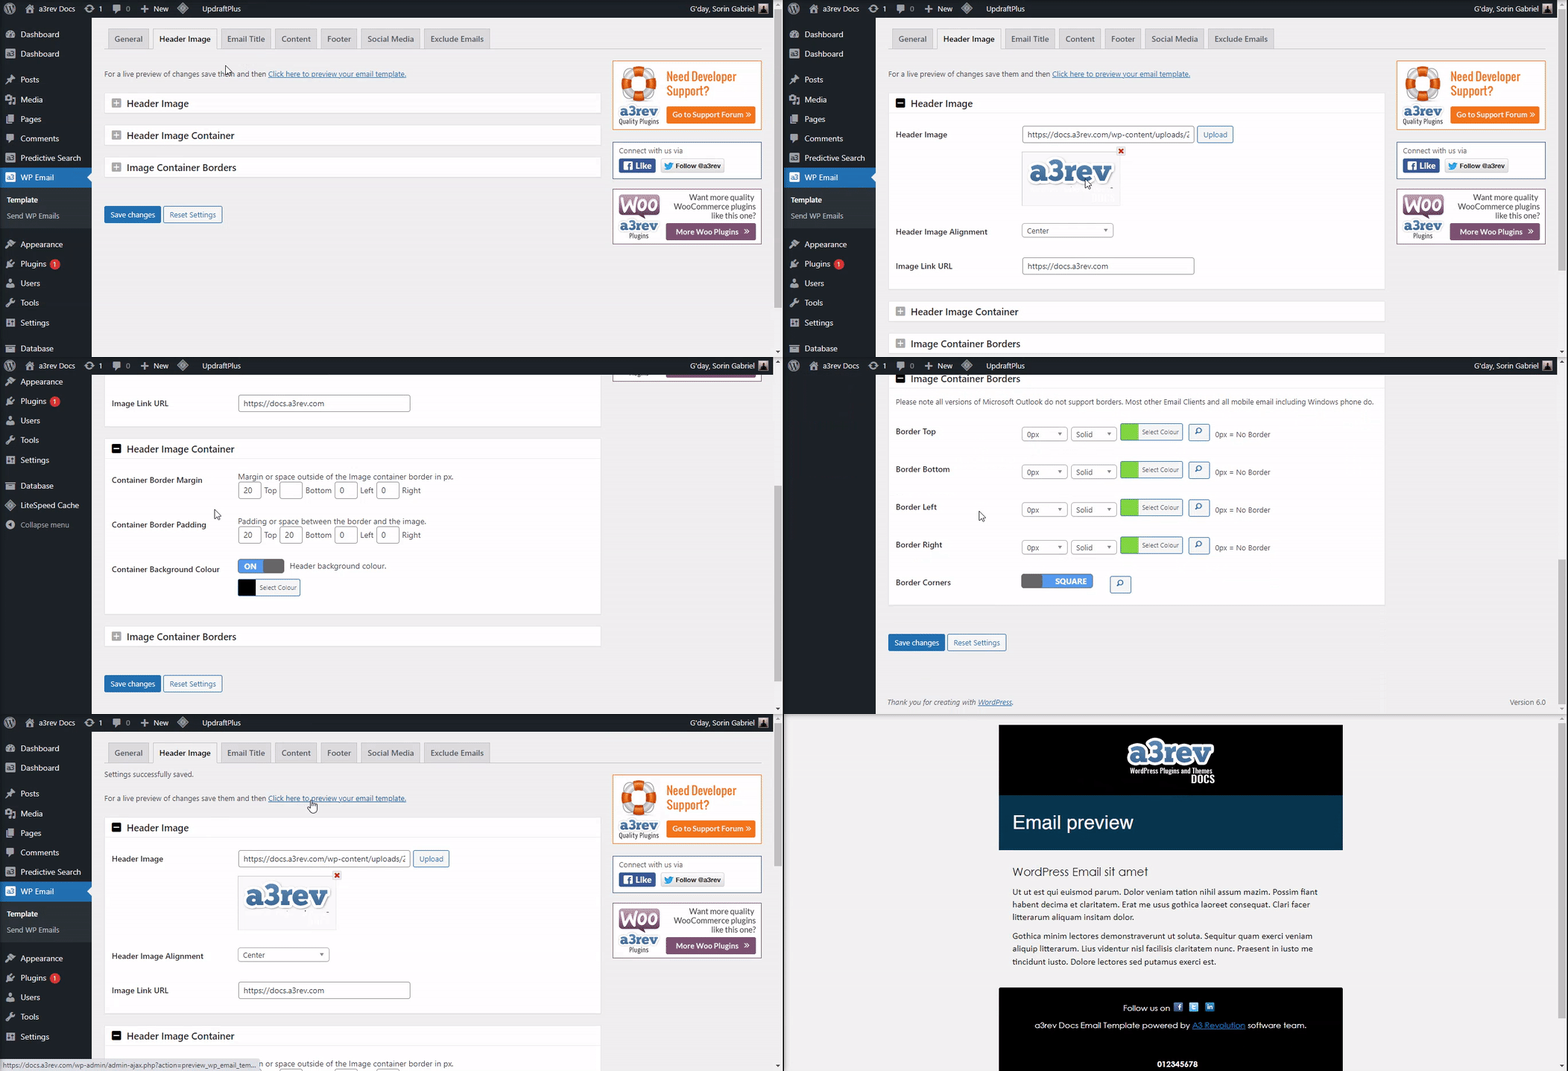
Instructions for adding your logo / image to the template header. Remember that almost all email browser initially block images by default. The receiver must manually choose to allow images to show.
Header Image

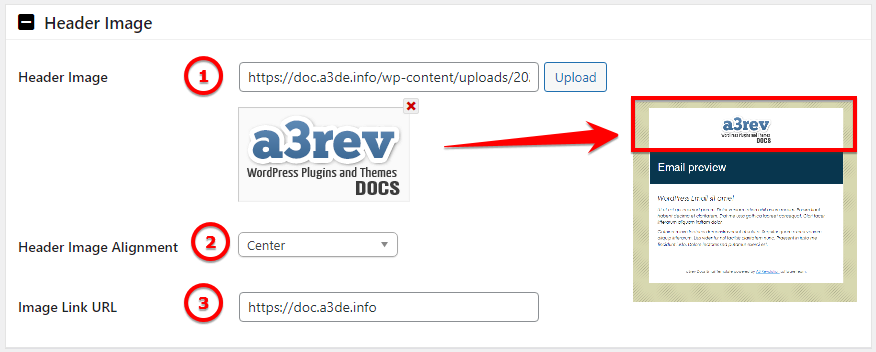
Image Legend
1. Header Logo – From here you can upload your logo image
2. Choose a alignment for the image – Left / Center / Right
3. Add a link url to the image you have upload
Header Image Container
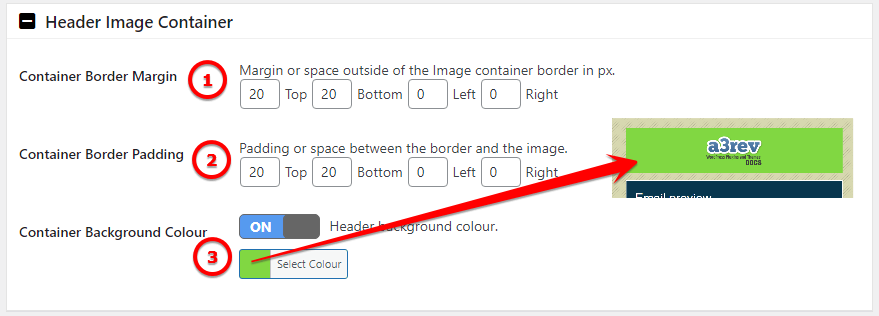
Image Legend
1. Container Border Margin – Margin or space outside of the Image container border in px.
2. Container Border Padding – Padding or space between the border and the image.
3. Container Background Colour – Choose a color for the header section
Image Container Borders
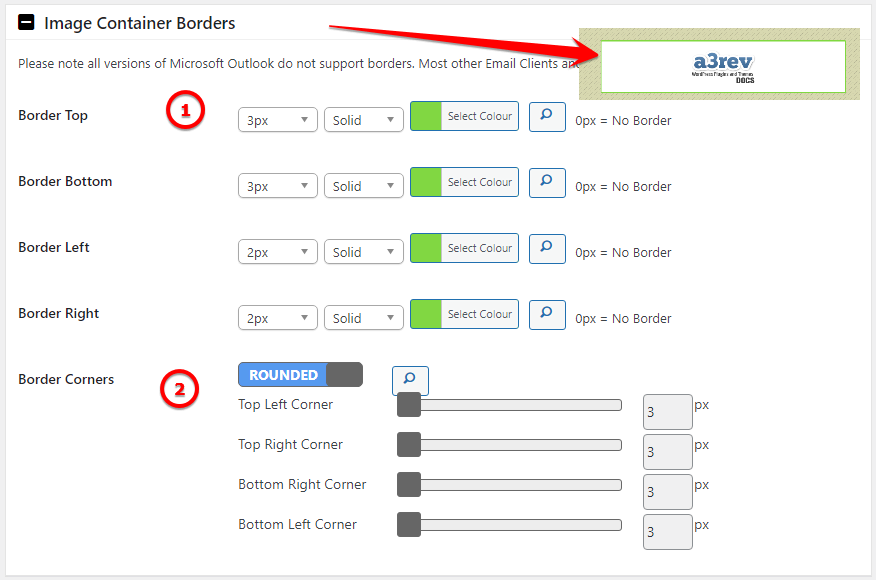
Image Legend
1. Choose to use a border for your header container section. We have options for weight, border type and color.
2. This option allows you to have round corners for your header container. The container corners can be round or square.
Email Title
Set the email header background colour and the Email Title font specs.
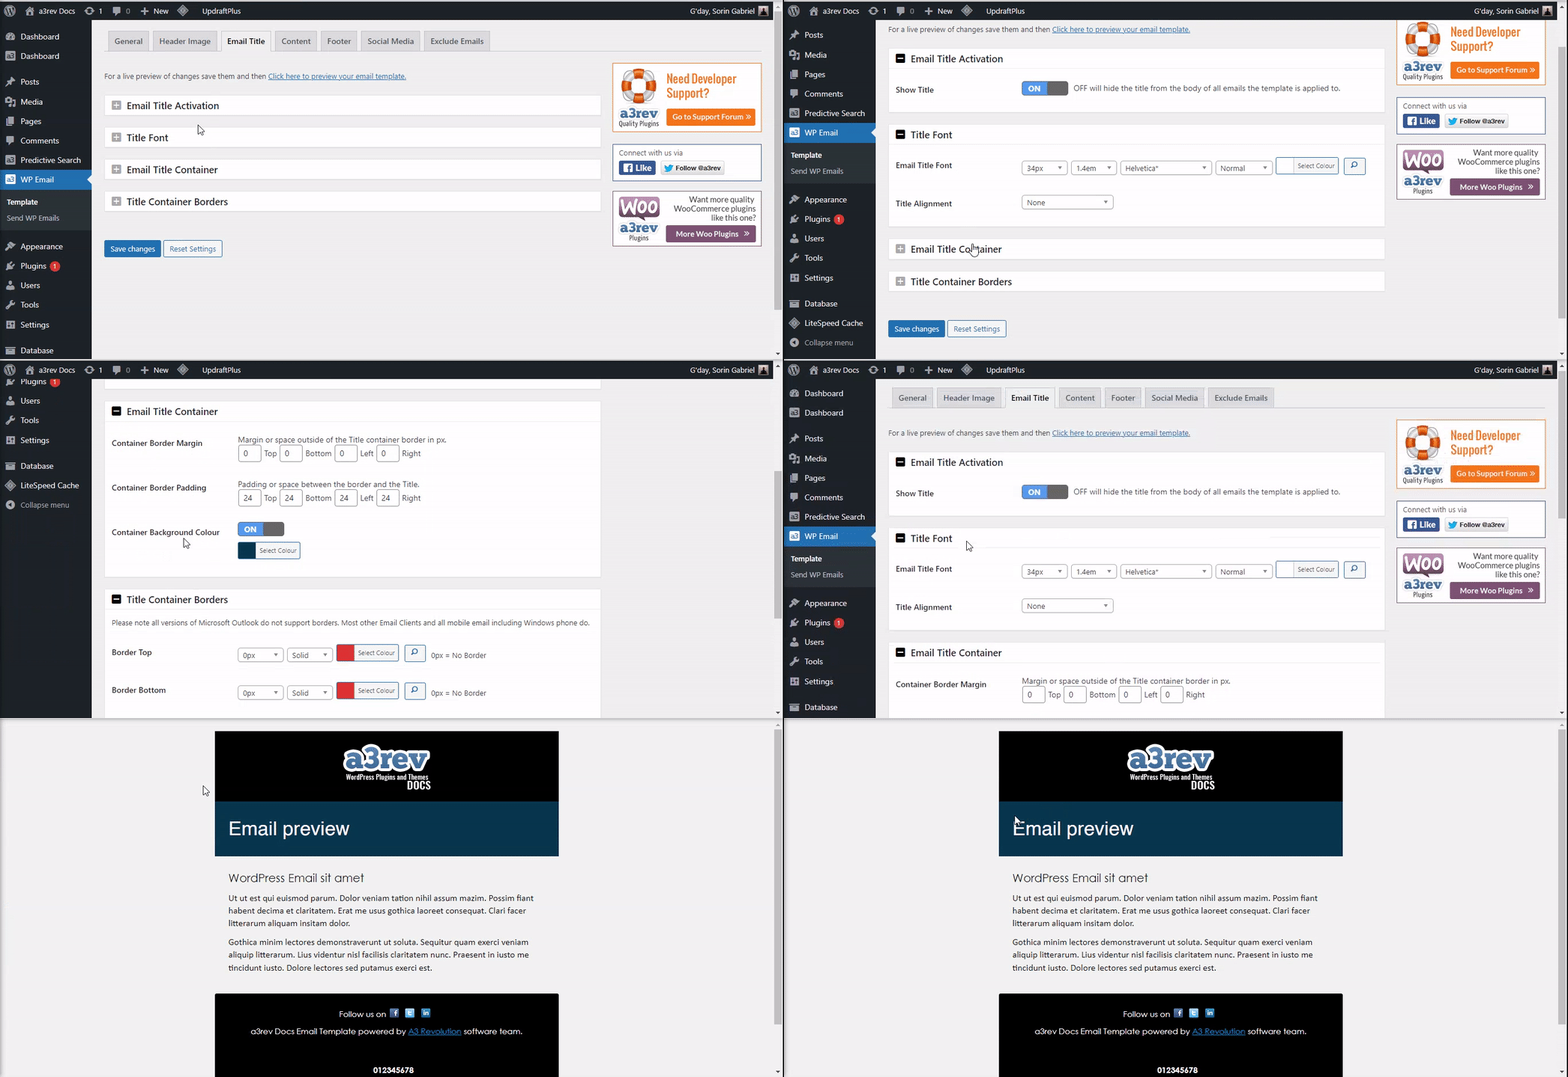
Email Title Activation

Image Legend
1. Turn On or OFF the email title
Title Font
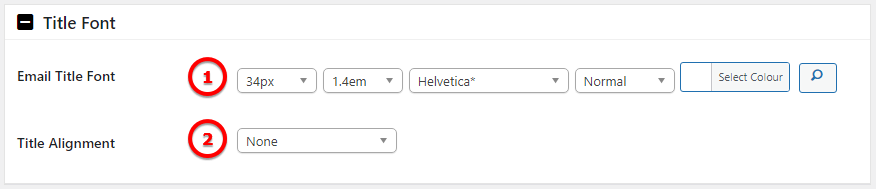
Image Legend
1. Email Title Font – You can have a custom font with weight, line height, font style and color
2. Align your tile to left/right/center
Email Title Container
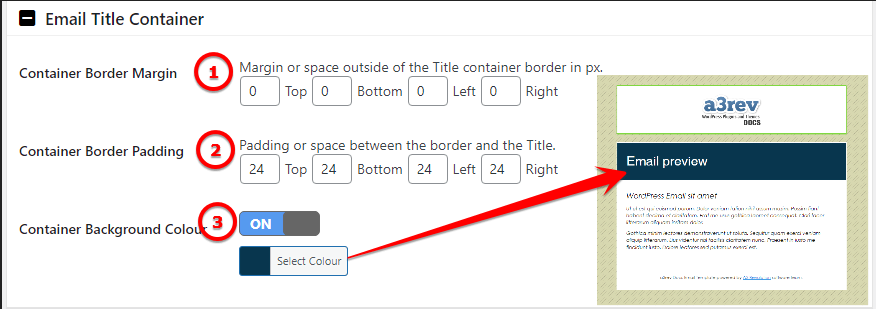
Image Legend
1. Container Border Margin – Margin or space outside of the title container border in px.
2. Container Border Padding – Padding or space between the border and the title.
3. Container Background Colour – Choose a color for the title section
Title Container Borders
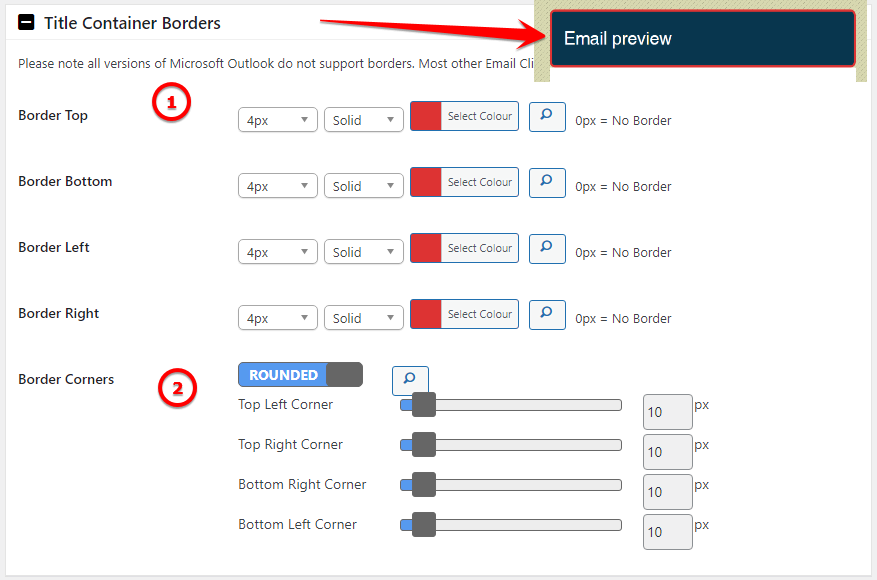
Image Legend
1. Choose to use a border for your header container section. We have options for weight, border type and color.
2. This option allows you to have round corners for your header container. The container corners can be round or square.
Content
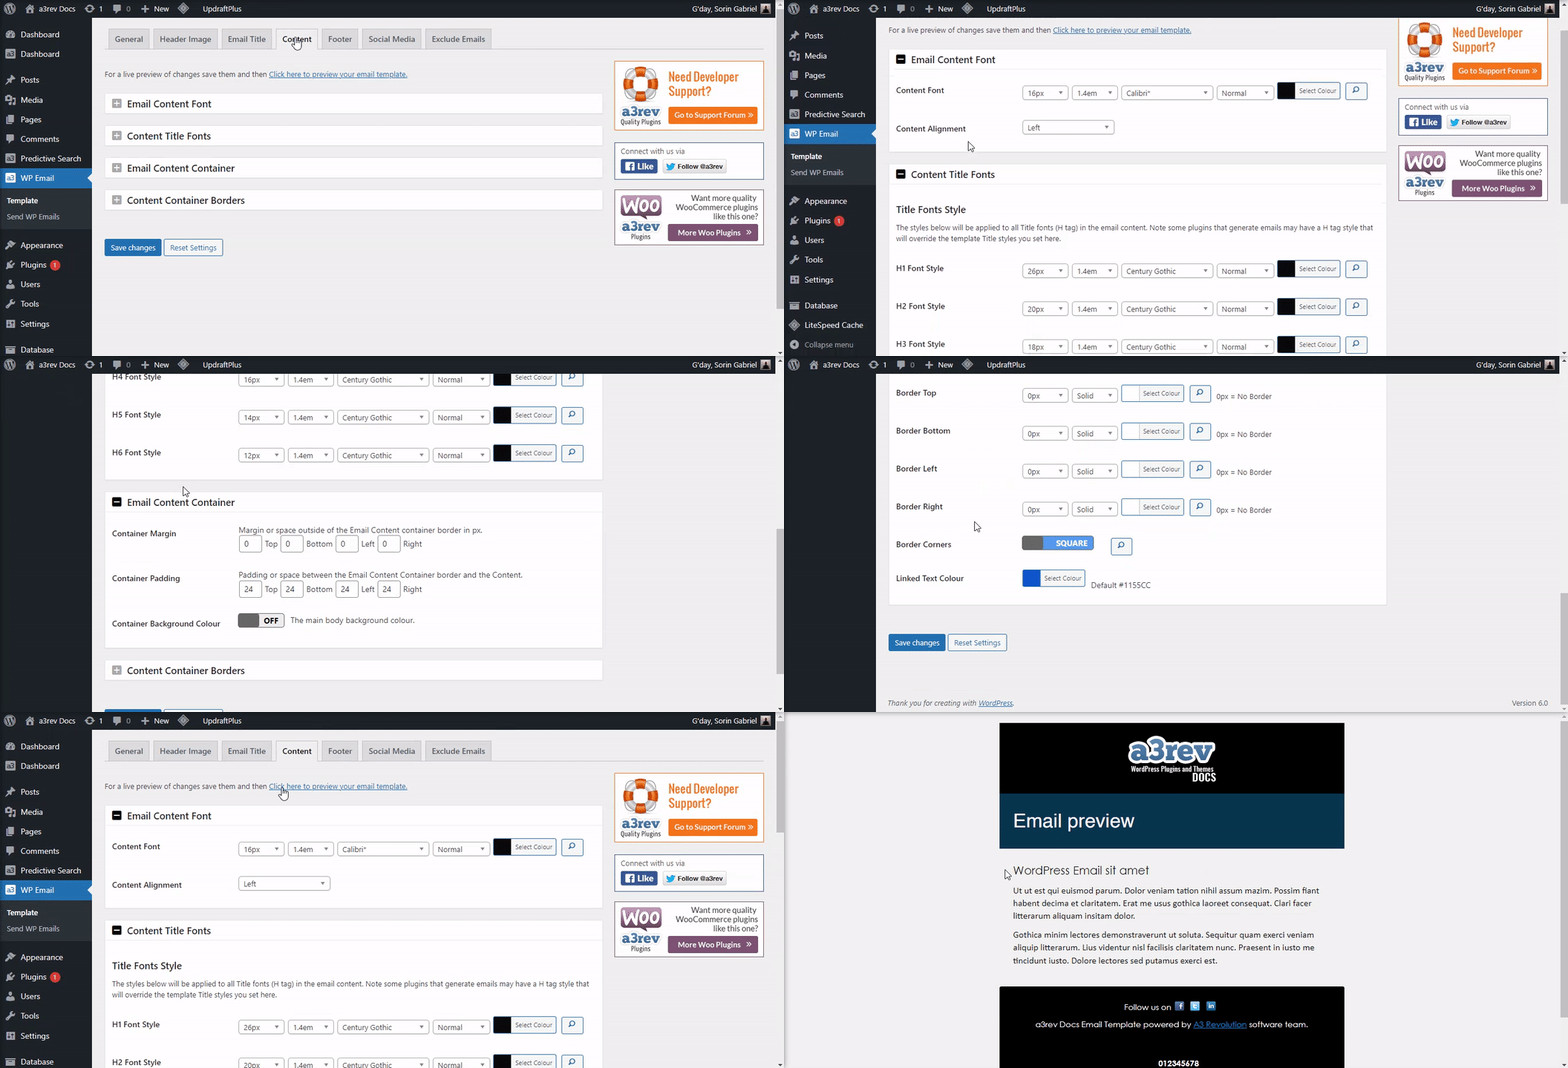
Set the email body and the font settings
Email Content Font
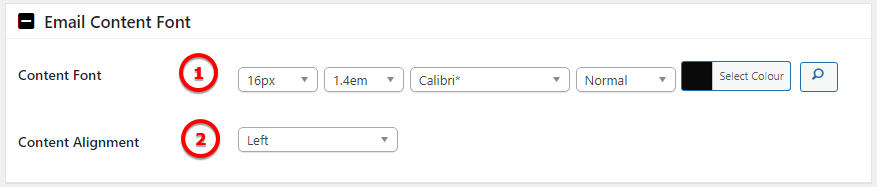
Image Legend
1. Email Content Font – You can have a custom font with weight, line height, font style and color
2. Align you content the to left/right/center
Content Title Fonts
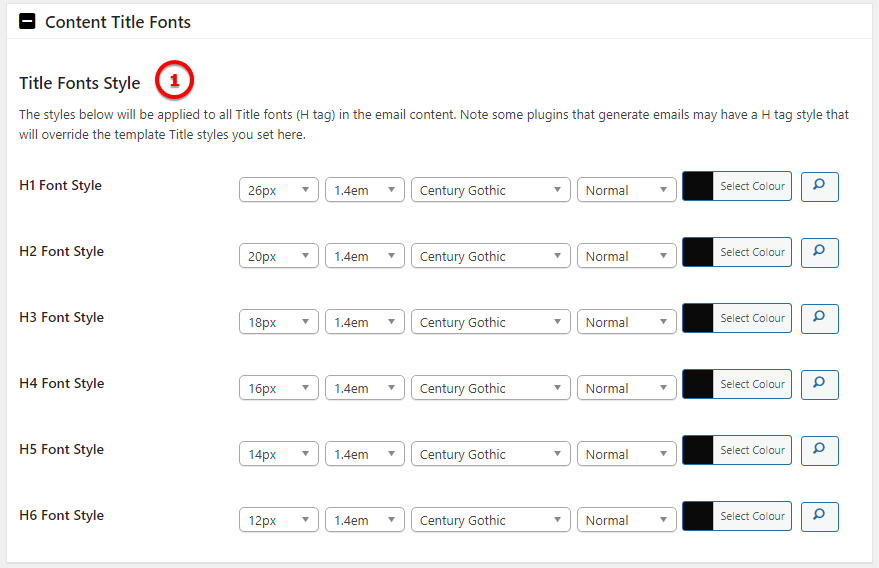
Image Legend
The styles below will be applied to all Title fonts (H tag) in the email content. Note: some plugins that generate emails may have a H tag style that will override the template Title styles you set here.
Email Content Container
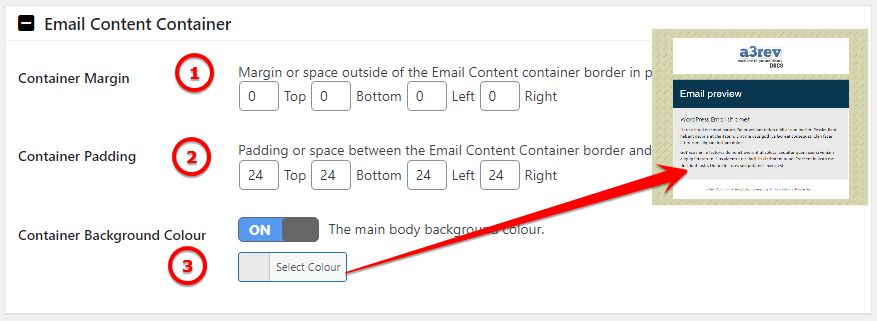
Image Legend
1. Container Margin – Margin or space outside of the Email Content container border in px.
2. Container Padding – Padding or space between the Email Content Container border and the Content
3. Container Background Color – The main body background colour.
Content Container Borders
Please note all versions of Microsoft Outlook do not support borders. Most other Email Clients and all mobile email including Windows phone do.
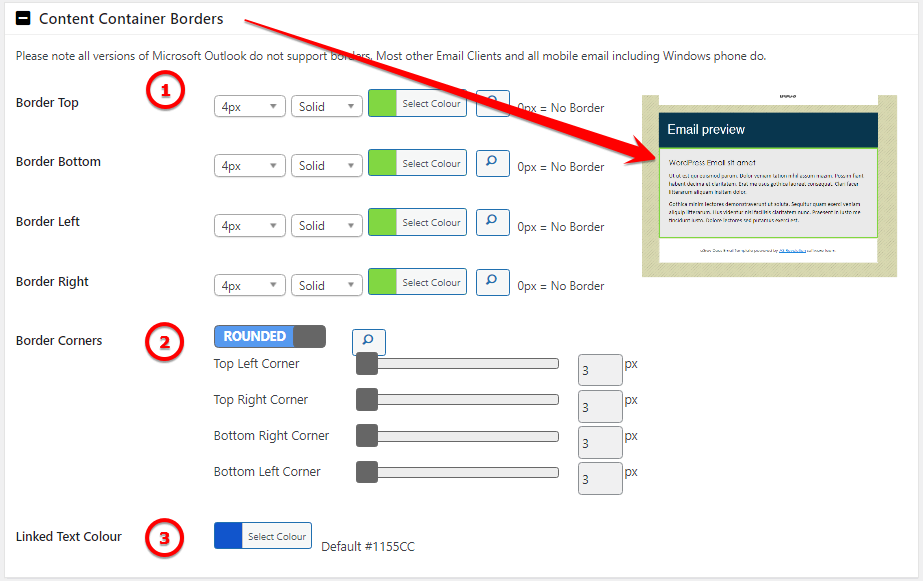
Image Legend
1. Choose to use a border for your header container section. We have options for weight, border type and color.
2. This option allows you to have round corners for your header container. The container corners can be round or square.
3. Linked Text Color – Set up a custom color for the links used in body content
Footer
Use the WordPress text editor to style the footer of your email.
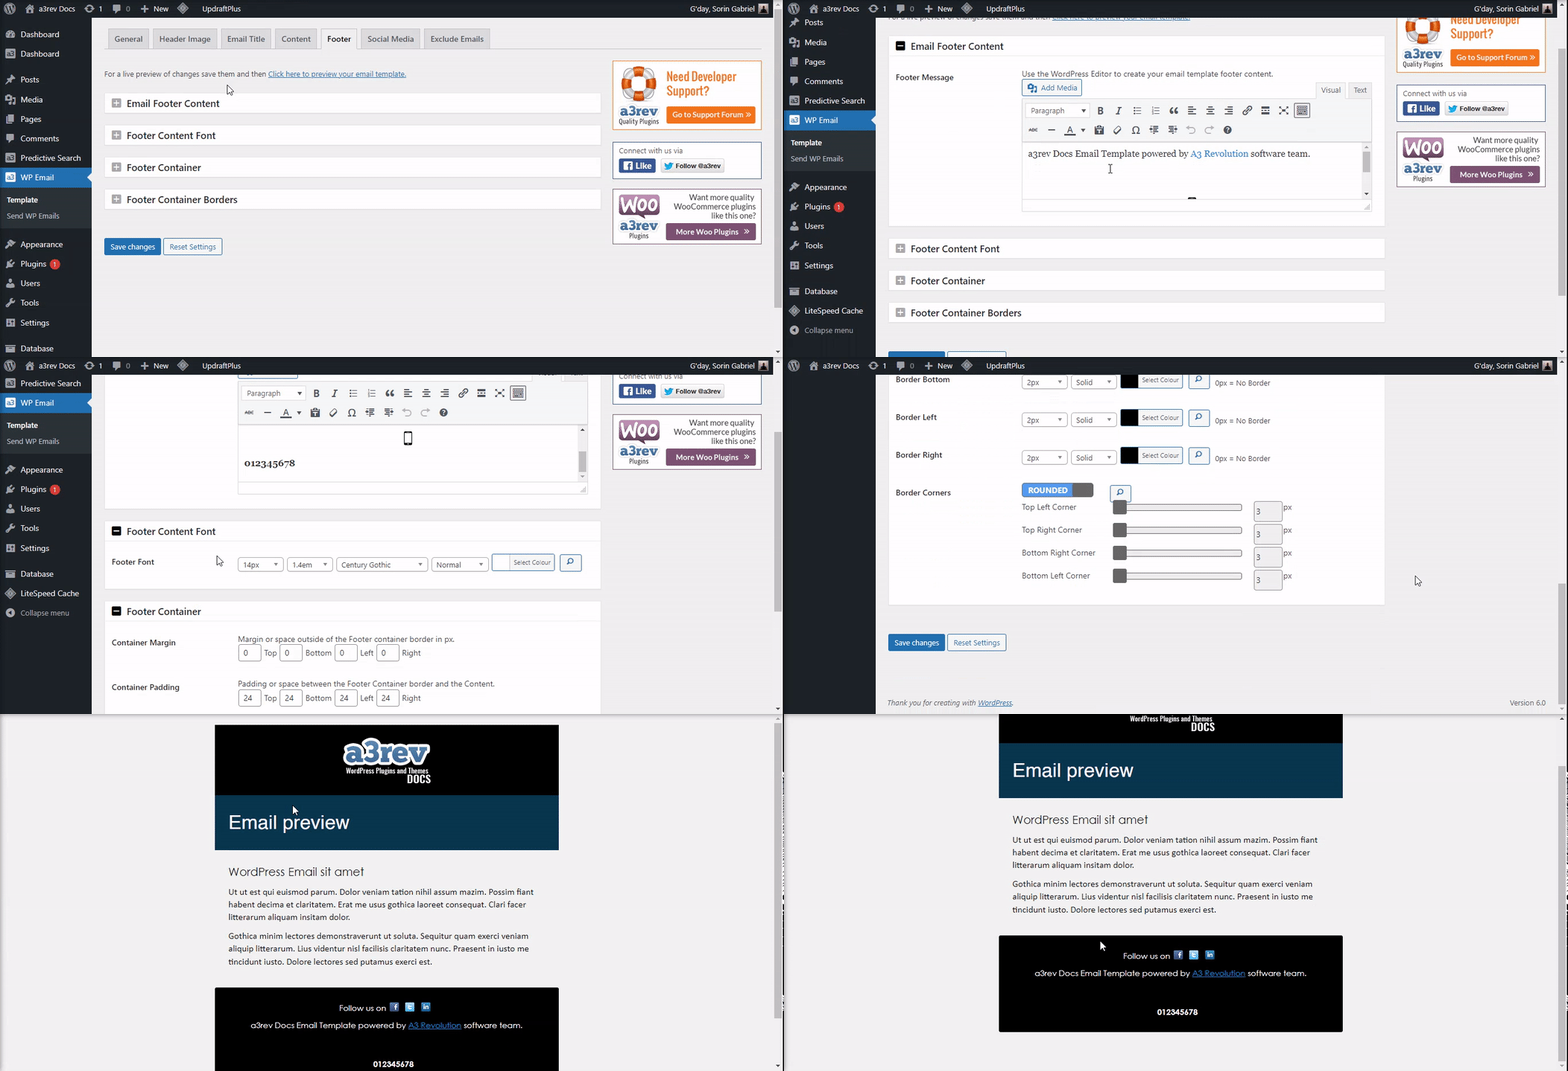
Email Footer Content
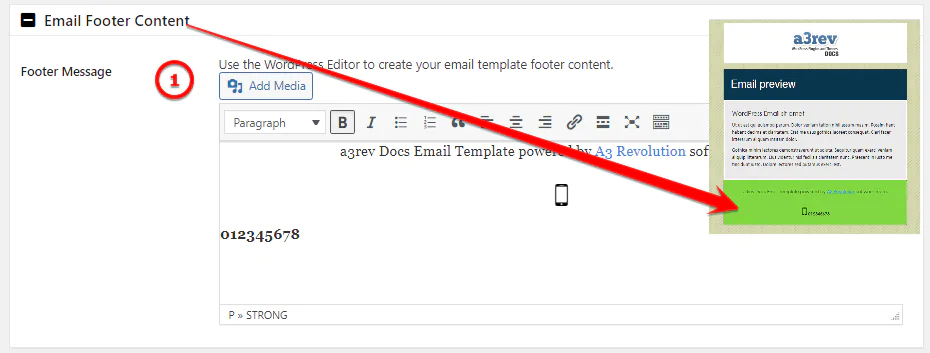
Image Legend
1. Email Footer Content visual editor. Use the WordPress visual / HTML editor yo add text, links, images and style to the email footer.
2. Scroll to the bottom of the page and click Save. Click on the preview email template link and you’ll see the footer design you have created.
Footer Content Font

Image Legend
1. Email Content Font – You can have a custom font with weight, line height, font style and color
Footer Container
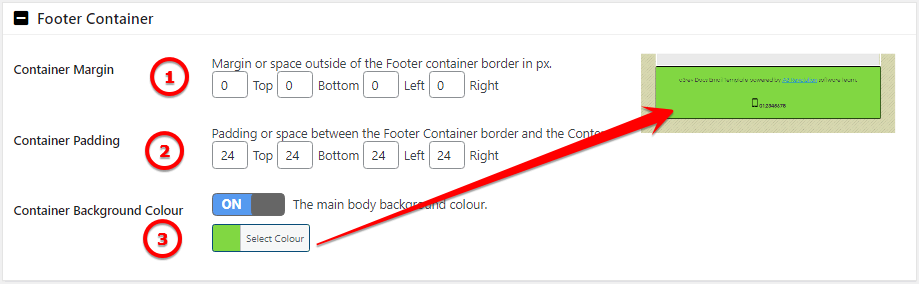
Image Legend
1. Container Margin – Margin or space outside of the Email footer container border in px.
2. Container Padding – Padding or space between the Email footer Container border and the Content
3. Container Background Color – The main body background colour of your footer container
Footer Container Borders
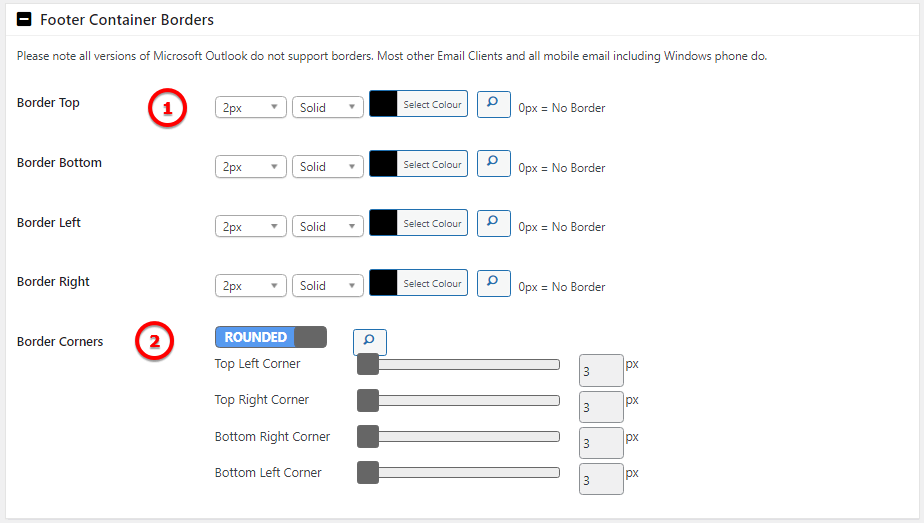
Image Legend
1. Choose to use a border for your footer container section. We have options for weight, border type and color.
2. This option allows you to have round corners for your footer container. The container corners can be round or square.
Social Media
Easily add links to you social media channels.
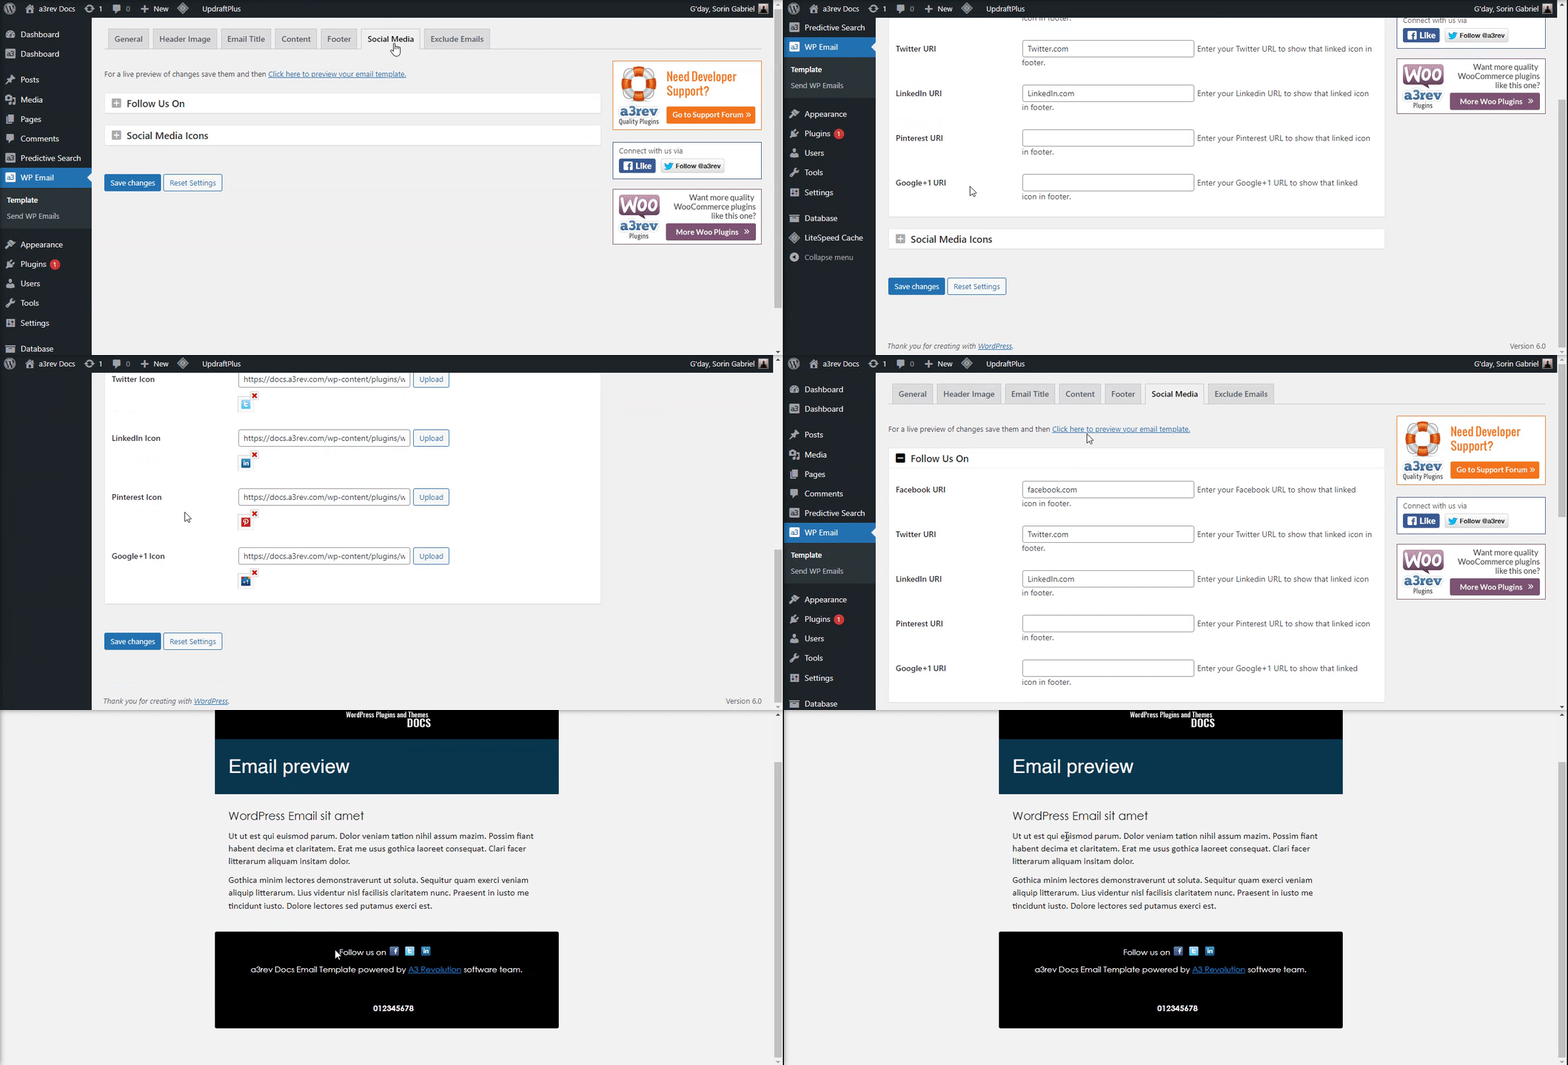
Follow Us On
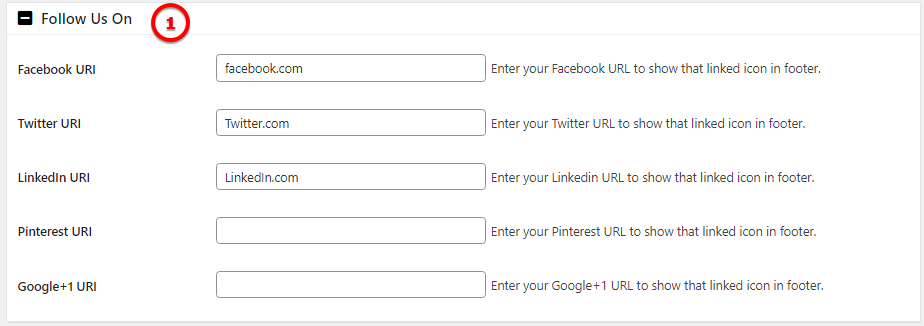
Image Legend
1. There you can enter you profile url of the chosen social media channel.
Social Media Icons
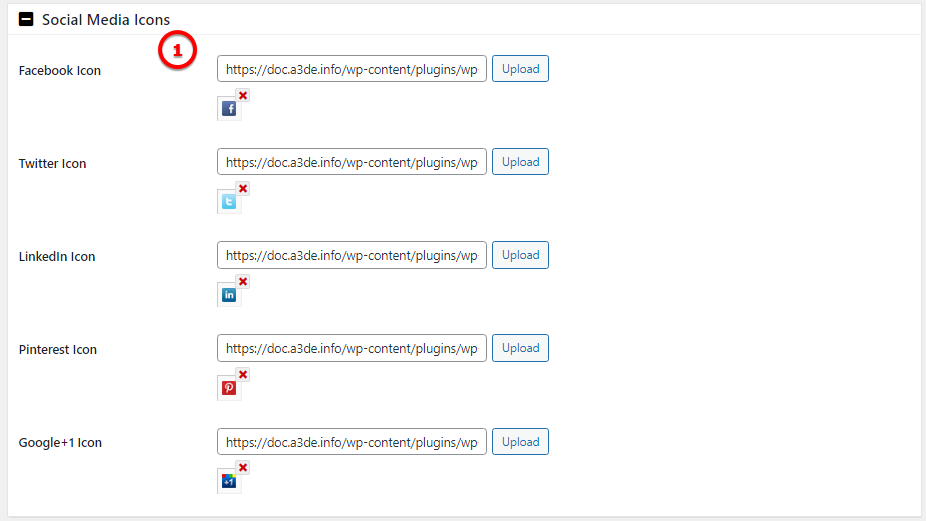
Image Legend
1. Here you can upload your custom social media image.
Exclude Emails
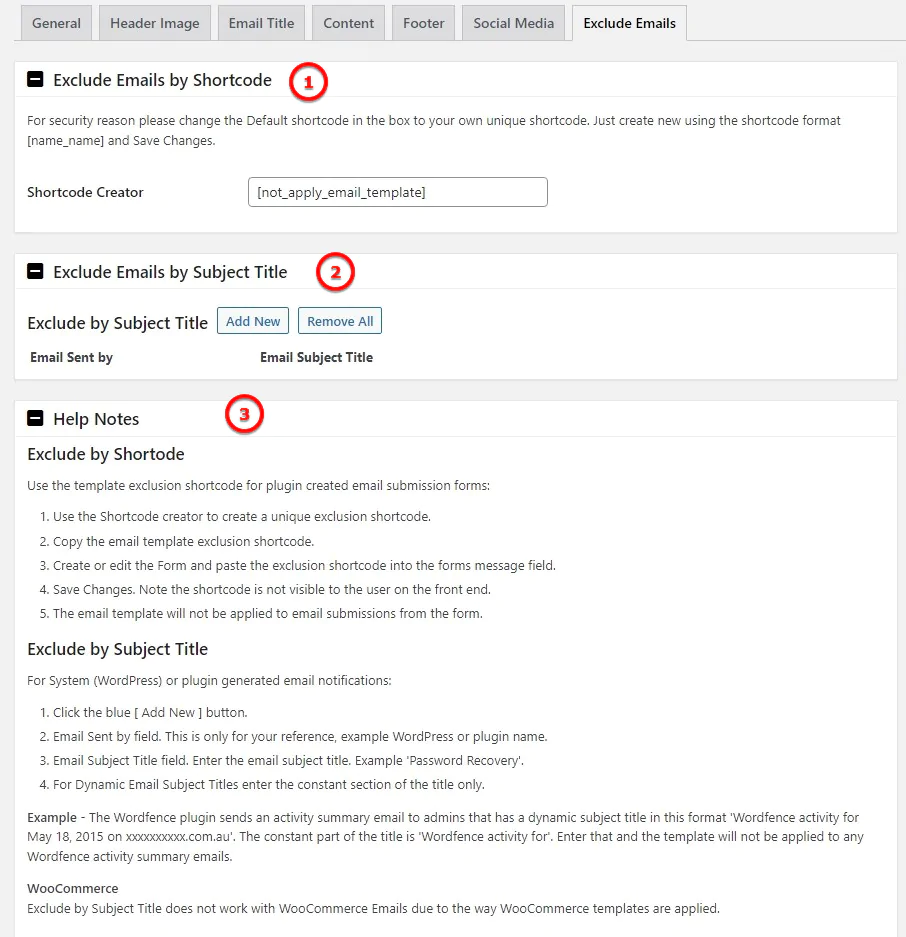
Image Legend
1. Exclude Emails by Shortcode – Use the template exclusion shortcode for plugin created email submission forms:
2. Exclude Emails by Subject Title – For System (WordPress) or plugin generated email notifications:
3. Help Notes