Installation
To install WooCommerce Widget Product Slideshow:
- Purchase and Download the WooCommerce Widget Product Slideshow Pro plugin or Download the Free Lite Version > Coming to WordPress Soon
- Upload the woocommerce-widget-product-slideshow plugin zip folder to your /wp-content/plugins/ directory
- Activate ‘WooCommerce Widget Plugin Slideshow’ from the Plugins menu within WordPress
Features
- Create Product Picture Slideshows in any Widgetized area, sidebar or footer.
- Create a slideshow of products from any Product Category
- Create a slideshow of products from any product Tag.
- Create an ‘On Sale’ Product Slideshow. Auto shows any product that has a reduced price.
- Plugin has no settings. Each widget has its own setting panel.
- 5 Different transition effects.
- Set transition effect speed and time between transitions.
Settings
The WooCommerce Widget Product Slideshow plugin has not admin panel or settings. Each Widget has its own admin panel for setting and customizing that widgets gallery slideshow.
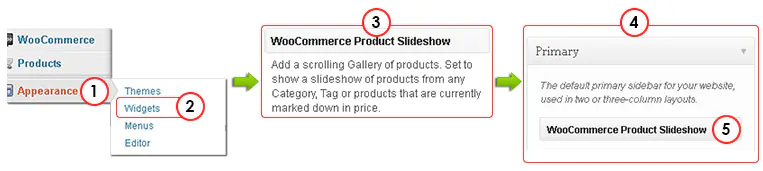
Image Legend
1. After installing and activating the plugin from your wp-admin dashboard go to the Appearance tab in the sidebar.
2. Put your mouse over Appearance and you will see Widgets in the pop out. Click on Widgets to go to the Widgets dashboard.
3. Scroll down the list of available Widgets until you find WooCommerce Product Slideshow.
4. Use your mouse to drag and drop the WooCommerce Product Slideshow into any Widgetized area or sidebar.
5. Image show the WooCommerce Product Slideshow widget positioned in the Primary Sidebar.
Category Products slideshow.
Open the Widget and Create a Slideshow of Products from any Product Category.
Image Legend
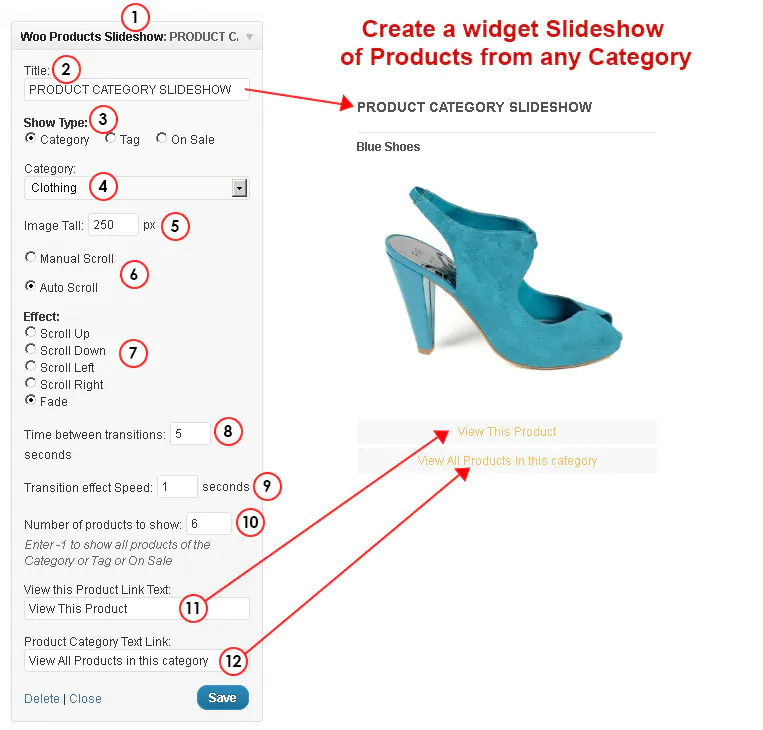
1. The WooCommerce Products Slideshow widget.
2. Title: Enter the Title that you want to show for this widget.
3. Show Type: Select the type of Slideshow you want to Create. In this example its Products from a category. Hence O Category is selected.
4. Category: Select a Product category from the drop down.
5. Image Tall: set the tall or height of the images to show in px. The tall affects the wide of the images as they are always scaled from the centre of the gallery to show perfectly in proportion withing the gallery tall you set.
6. Manual Scroll or Auto Scroll – Set Manual to allow users to use the left / right arrow controls on the image to manually scroll through the gallery. Set Auto to automatically start the slideshow when the page is opened.
7. Effect: Set the image transition effect. Transition is the movement from one image to the next image. There are 5 Transition effects to choose from:
O Scroll Up
O Scroll Down
O Scroll Left
O Scroll Right
O Fade
8. Time between transitions in seconds – set how long you want the Product to show in the gallery after transitioning in and before transitioning to the next product.
9. Transition effect speed in seconds – set the time you want the transition effect to take.
10. Number of Products to show – set the number of products you want to show in the slideshow. Set at -1 to show all.
Please Note – If you have a Category or tag that has 100’s of products and you set the gallery at -1 the images will take a long time to go as the gallery must get all of the images while it is loading. Each time a person clicks to a new page the gallery reloads – think about the average time people spend on a page on your site – if its 60 seconds and you have the total time and transition speed set at 6 + 2 = 8 seconds – this means that during that time 7 to 8 images will transition through the slideshow. Setting it to show hundreds of images from a category or a tag is a waste of time.
11. View this product Link text – Enter the text you want to show as the link through to the current image in the Galleries Product page.
12. Product category Text link – Enter the text you want to show on the front end as a link to the Product category.
Tags Product Slideshow
Tags offer the greatest flexibility in creating a product slideshow. Create any Tag you want for example ‘Featured’ Then assign that tag to any Product from any category and make them into a slideshow.
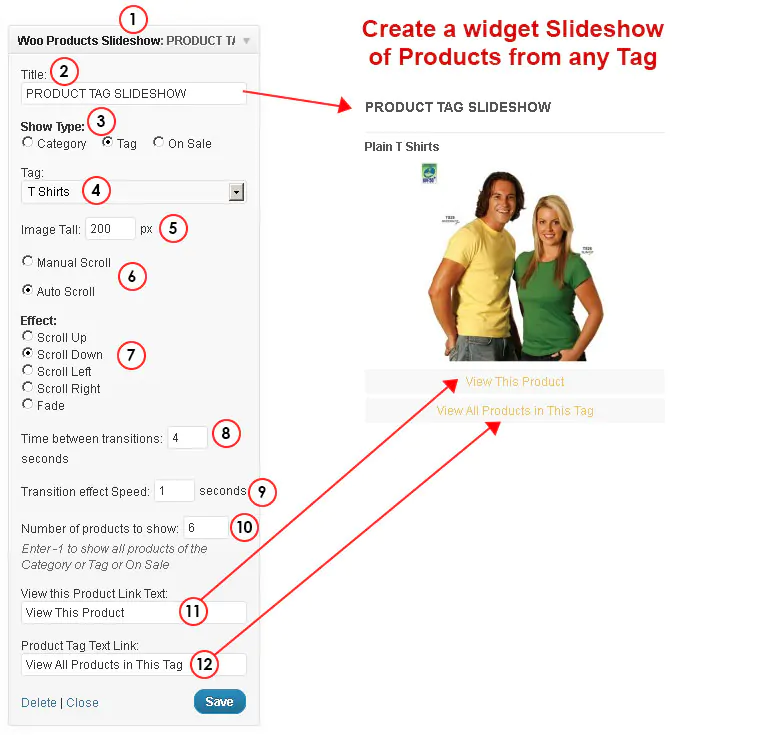
Image Legend
1. The WooCommerce Products Slideshow widget.
2. Title: Enter the Title that you want to show for this widget.
3. Show Type: Select the type of Slideshow you want to Create. In this example its Products from a Tag. Hence O Tag is selected.
4. Tag: Select a Product Tag from the drop down.
5. Image Tall: set the tall or height of the images to show in px. The tall affects the wide of the images as they are always scaled from the centre of the gallery to show perfectly in proportion withing the gallery tall you set.
6. Manual Scroll or Auto Scroll – Set Manual to allow users to use the left / right arrow controls on the image to manually scroll through the gallery. Set Auto to automatically start the slideshow when the page is opened.
7. Effect: Set the image transition effect. Transition is the movement from one image to the next image. There are 5 Transition effects to choose from:
O Scroll Up
O Scroll Down
O Scroll Left
O Scroll Right
O Fade
8. Time between transitions in seconds – set how long you want the Product to show in the gallery after transitioning in and before transitioning to the next product.
9. Transition effect speed in seconds – set the time you want the transition effect to take.
10. Number of Products to show – set the number of products you want to show in the slideshow. Set at -1 to show all.
Please Note – If you have a Category or tag that has 100’s of products and you set the gallery at -1 the images will take a long time to go as the gallery must get all of the images while it is loading. Each time a person clicks to a new page the gallery reloads – think about the average time people spend on a page on your site – if its 60 seconds and you have the total time and transition speed set at 6 + 2 = 8 seconds – this means that during that time 7 to 8 images will transition through the slideshow. Setting it to show hundreds of images from a category or a tag is a waste of time.
11. View this product Link text – Enter the text you want to show as the link through to the current image in the Galleries Product page.
12. Product category Text link – Enter the text you want to show on the front end as a link to the Product category.
‘On Sale’ Products Slideshow
If you have products that have a marked down or Specials price the ‘On Sale’ Slideshow is a must have. Just set it and forget it. As Products are placed “on Sale” they auto show in the slideshow. As soon as they go back to the normal price they no longer show. Its all automated so you can just set and forget.
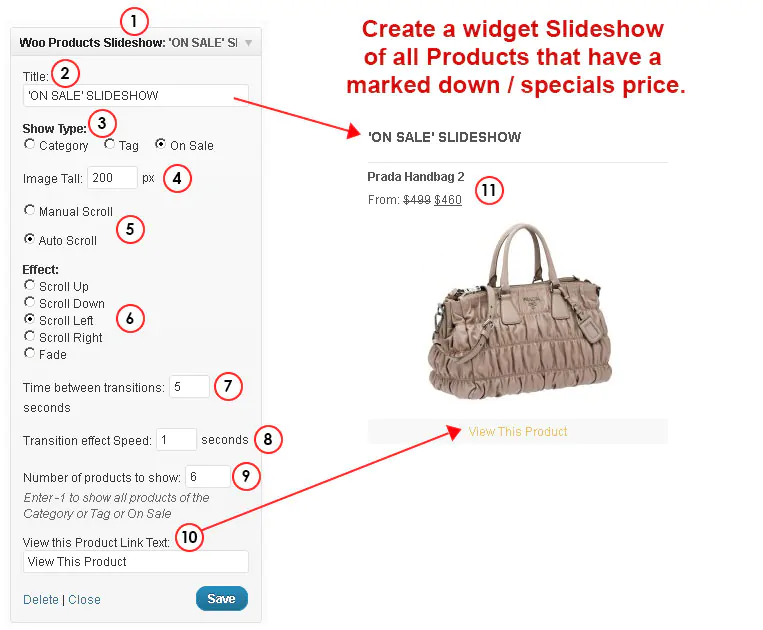
Image Legend
1. The WooCommerce Products Slideshow widget.
2. Title: Enter the Title that you want to show for this widget.
3. Show Type: Select the type of Slideshow you want to Create. In this example its Products that have a marked down or ‘specials’ price. Hence O ‘On Sale’ is selected.
4. Image Tall: set the tall or height of the images to show in px. The tall affects the wide of the images as they are always scaled from the centre of the gallery to show perfectly in proportion withing the gallery tall you set.
5. Manual Scroll or Auto Scroll – Set Manual to allow users to use the left / right arrow controls on the image to manually scroll through the gallery. Set Auto to automatically start the slideshow when the page is opened.
6. Effect: Set the image transition effect. Transition is the movement from one image to the next image. There are 5 Transition effects to choose from:
O Scroll Up
O Scroll Down
O Scroll Left
O Scroll Right
O Fade
7. Time between transitions in seconds – set how long you want the Product to show in the gallery after transitioning in and before transitioning to the next product.
8. Transition effect speed in seconds – set the time you want the transition effect to take.
9. Number of Products to show – set the number of products you want to show in the slideshow. Set at -1 to show all.
Please Note – If you have 100’s of ‘specials’ products and you set the gallery at -1 the images will take a long time to load as the gallery must get all of the images while it is loading. Each time a person clicks to a new page the gallery reloads – think about the average time people spend on a page on your site – if its 60 seconds and you have the total time and transition speed set at 6 + 2 = 8 seconds – this means that during that time 7 to 8 images will transition through the slideshow. Setting it to show hundreds of images from a category or a tag is a waste of time.
10. View this product Link text – Enter the text you want to show as the link through to the current image in the Galleries Product page.
11. Marked Down Price Shown – The plugin shows the normal price and the ‘special’, marked down price.
Multiple Widgets
You can set as many widgets up as you like in as many different places as you like – there are no conflicts with having a number of widgets on the same sidebar or in the footer of your site. See this example on the plugins DEMO Site.